The most comprehensive plant rapid seedling cutting rooting propagation technology

The most suitable environmental conditions for flower cuttings to take root;
practice has shown that even if the rooting ability of the cuttings is very strong, if the environmental conditions of the cutting bed are poor, the rooting activity will be affected, the resistance of the cuttings will be weakened, and even withering will
continue, leading to the failure of cuttings. The environmental conditions that affect the rooting of cuttings mainly include temperature, humidity, oxygen, light and soil quality. 1. Temperature: Different types of plants require different cutting temperatures. Generally, the temperature required for rooting is basically the same as the temperature required for bud germination and growth, so the rooting temperature of plants that germinate early is lower, and vice versa. Generally, at around 15 degrees, as long as the cuttings have the ability to take root, they can more or less enter the state of rooting activity. For example, the soft material cuttings of most plants should be carried out between 20-25 degrees. Temperate flowers generally require a temperature of about 20 degrees. Tropical roots are suitable for cuttings at a temperature above 25-30 degrees. Many tree species are about 25 degrees. As the temperature rises, the rooting activity gradually increases, but the decay also intensifies.
Generally, when the soil temperature is 3-6 degrees higher than the air temperature, it can promote early rooting and avoid the situation where the buds have sprouted but not rooted, which causes the cuttings to lose water balance and cause wilting. The temperature in spring is often higher than the upper temperature, so for tree species that are difficult to root, electric heating wire can be buried about 15 cm underground to form an electric hotbed before pole insertion, which can promote rooting.
2. Humidity: Maintaining reasonable soil and air humidity is also extremely important for the survival of cuttings.
In spring cuttings, many plants sprout and expand leaves before slowly growing roots. At this time, there needs to be sufficient water in the soil, which first absorbs water through wounds and callus tissue to maintain metabolism in the body. After a period of time, the hormones and nutrients produced in the leaves can in turn promote the growth of roots and continuously absorb water to achieve water balance in the body. Therefore, the soil in the cutting bed must have a large humidity to ensure that the leaves do not wilt before rooting, but it should not be too wet, otherwise it will easily cause rot. When soft materials are cut, the relative humidity in the air should be maintained at a higher level, preferably around 80%.
The spray cutting method is to use mechanical equipment to spray into the air to increase the humidity of the air. This method can achieve better stem cutting results for some plants that are difficult to root. In order to maintain a high air humidity, it is generally necessary to avoid wind and shade. Covering with transparent plastic film can also prevent excessive transpiration and achieve a good moisturizing effect.
3. Oxygen: The rooting process is a process of vigorous respiration and oxygen is one of the important conditions. Therefore, good ventilation should be ensured under the premise of ensuring soil humidity. The cutting medium requires good ventilation, easy to keep moist, and good drainage. Generally, sandy loam is better for dormant branch cuttings, and ridge cutting is the best operation method. Water can be poured between high ridges and penetrate around the cuttings instead of directly pouring water on the cuttings. Vermiculite and perlite are the best substrates for softwood cuttings. River sand, sandy soil, etc. can also be used to ensure ventilation conditions to facilitate rooting and survival.
4. Light: The formation and growth of roots do not directly require light, but the above-ground part needs to assimilate nutrients under light. Softwood cuttings generally have leaves so that they can photosynthesize under light and synthesize organic matter to promote rooting. Most experiments have shown that the more carbohydrate content in the cuttings, the higher the rooting rate. However, strong light can easily cause the cuttings to lose water and wilt, which is not conducive to the survival of cuttings. Therefore, moderate shading should be given in the early stage of cutting (the purpose is to prevent drought). If the moisture of the cutting bed can be guaranteed and it does not dry out and excessive transpiration of the cuttings occurs, shading is generally not required to avoid affecting the carbon assimilation of the cuttings or hindering the increase in the temperature of the cutting bed.
A complete guide to flower propagation by cuttings;
depending on the cutting materials, cutting conditions, cutting period and cutting purpose, there are many cutting methods, which are summarized as follows:
1. According to the cutting materials: there are branch cuttings, leaf bud cuttings, leaf cuttings and root cuttings.
1) Branch cutting: The method of using branches of plants as propagation materials for cuttings is called branch cutting, which is the most commonly used method. Among them, using the tender parts of herbaceous plants as cutting materials is called herbaceous cutting; using green tender branches of woody plants that have not yet completely lignified as materials is called tender branch cutting or green branch cutting; using old branches of woody plants that have been fully essentialized as materials is called hard branch cutting or mature branch cutting; using dormant branches for cuttings is called dormant branch cutting; using relatively young buds that have not yet elongated as materials is called bud cutting; using the tip of the branch for cuttings is called tip cutting; using branches with the tip cut off is called normal cutting or tip-removed cutting, which is also the most common cutting method. 
2) Leaf bud cutting: Using leaves with axillary buds for cuttings can also be regarded as leaf-with-single-bud cutting between leaf cutting and branch cutting. This method can be used when the material is limited and you want to get more seedlings. This method is often used for cuttings of Indian rubber trees, camellia, dahlias, and green radish. For tree species such as red pine, the top part of the young branches is cut off to promote the activity of adventitious buds at the base of the needles to form short branches, and then the needles are cut off for cuttings, which is called leaf bundle cutting, which is also a kind of leaf bud cutting.
3) Leaf cutting: a method of cutting using leaves as materials. This method can only be applied to species that can produce adventitious buds and adventitious roots from leaves, such as Sansevieria, Hairy Begonia, and Gloxinia. Most plants that can be leaf-cut have thick leaf stalks, leaf veins, or thick leaves.
The following methods of leaf cutting are commonly used:
Flat placement method: also known as full leaf sowing. First cut off the petiole, then lay the leaves flat on the sand surface, fix them with bamboo needles, etc., and make the bottom close to the sand surface. If the roots are taken from the ground, young plants can be produced from the edge of the leaves. Begonia produces young plants from the base or veins of the leaves.
Direct insertion method: also known as leaf-peg insertion. Insert the petiole into the sand, and the leaf blade stands on the sand surface, then adventitious buds will form at the base of the petiole. For leaf insertion of large petioles, small bulbs will first form at the base of the petiole, and then roots and buds will form.
Scale insertion: lily scales can be peeled for cuttings. After the lily blooms in July, the bulbs will rise. After drying for several days, the scales are peeled off and inserted into wet sand. After 6-8 weeks, small bulbs will form at the base of the scales.
Leaf cutting: also known as cutting cutting. This method is to cut a leaf into several pieces and cut them separately, so that each leaf forms adventitious buds. For example, Sansevieria, Gloxinia, and Pepper Grass can be propagated by this method.
Root cutting: Some plants can produce adventitious buds on their roots to form young plants, such as wintersweet, persimmon, peony, peony, blood-replenishing grass and other species with thick roots, which can be root-cut. It is usually carried out in autumn or early spring when transplanting. The method is to dig the roots of the plants, cut them into 4-10 cm root segments, and bury them horizontally in the substrate. You can also bury one end of the root slightly above the ground in a vertical shape.
2. According to the cutting season, there are spring cutting, summer cutting, autumn cutting and winter cutting.
1) Cutting: Cutting in the spring season. Mainly use old branches or dormant branches as materials. After surviving, the growth period is long in the same year, which is suitable for various plants. Therefore, this method is widely used. Cutting can use the spikelets stored in winter.
2) Summer cutting: It is carried out in the plum rain season when the air is relatively humid in summer, and mostly uses green branches or green branches of the same year. Summer cutting is particularly suitable for
evergreen broad-leaved tree species that require high temperatures.
3) Autumn cutting: It is generally carried out from September to October. During this period, the branches have fully developed and matured, hardened, have strong rooting ability, and have a certain degree of corrosion resistance. However, since winter is approaching after rooting, it is impossible to have a large growth in the current year, and it can only lay the foundation for vigorous growth in the second year. Perennial herbaceous plants are generally suitable for autumn cuttings.
4) Winter cuttings: Generally, it is carried out under artificial heating conditions in winter, such as in a greenhouse or a plastic temperature fence. It can be carried out during the entire dormant period of the plant from late autumn to early spring. During this period, the plant has a strong ability to resist decay, but it also takes a long time to root. According to comparative tests in recent years, the survival rate of cuttings in plastic greenhouses in northern winter is the highest.
3. According to the cutting medium: there are soil cuttings, sand cuttings, perlite and vermiculite cuttings, sphagnum moss cuttings, water cuttings and mold cuttings.
1) Soil cuttings: Using soil as a cutting medium is the most common
method . With different soil types, the cutting effect varies greatly, among which sandy soil and sandy loam have better effects.
2) Sand cuttings: Using sand as a cutting medium. Uniform fine sand has better effects.
3) Perlite and vermiculite cuttings: Perlite, vermiculite and other mineral materials are used as cutting substrates. This kind of substrate has good air permeability and ice retention, which is suitable for cuttings of various plants and has the best effect.
4) Sphagnum moss cuttings: Sphagnum moss with strong water retention is used as cutting material.
It is suitable for cuttings of tender cuttings and other special cuttings.
5) Water cuttings: It is suitable for plants that are easy to take root in water, such as willow, rose, oleander, dahlia, dragon blood tree, etc., which can be propagated by water cuttings, but the water should be changed frequently to keep the water clean. Sand can also be put at the bottom of the water to fix the cuttings.
6) Mist cuttings: Fix the cuttings indoors or in a container and supply water or nutrients through spraying. This is a special cutting method, which is characterized by no lack of oxygen and easy observation of the growth and cutting conditions.
4. According to the cutting position: there are vertical cuttings, oblique cuttings, horizontal cuttings and deep cuttings.
1) Vertical insertion: Insert the cuttings vertically into the substrate, also known as vertical insertion. This is a commonly used method that is easy for the growth and management of the cuttings.
2) Oblique insertion: Insert the cuttings obliquely into the substrate. Since the cuttings are exposed to the ground for a small part, they are not easy to dry; the base is buried shallowly in the soil layer, the temperature and air conditions in the soil are good, and the cuttings are easy to take root, but the seedlings are easy to
tilt.
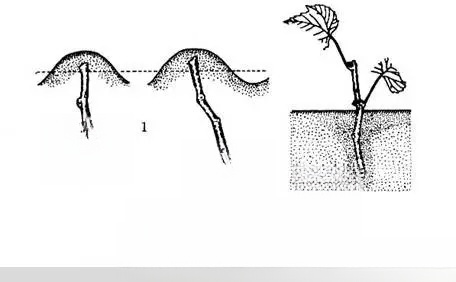
3) Horizontal insertion: Plant the cuttings roughly horizontally (i.e. bury the strips). Dormant branches without leaves can be completely buried in the soil, or the small heads or both ends can be slightly exposed from the soil surface. Grass cuttings can be buried shallowly with sphagnum moss. This method is easy to root near the base of the new buds. 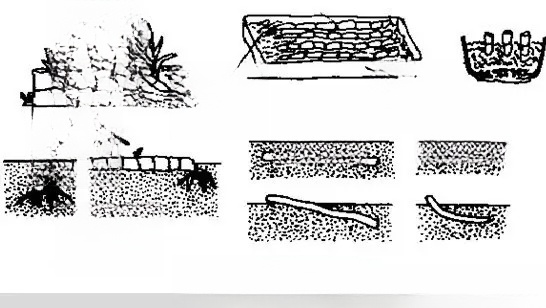
4) Deep insertion: Suitable for large cuttings. The method is: remove the lower branches and leaves of large cuttings of 0.6-1.5 meters, and cut the base on both sides. Dig a trench 0.6-1 meters deep, arrange the cuttings in order in the trench, fill 20 cm of new soil around the lower cut, tamp it down, irrigate it, and then fill it with topsoil.
5) The thickness of the soil filled in spring is half the depth of the trench, and the soil filled to the surface in autumn. Since the lower cut is in the new soil, it is not easy to rot. For example, deep cuttings can be used to cultivate large seedlings in a short period of time for coral trees, holly euonymus, figs, etc. There
are also potted cuttings. For cuttings that are not resistant to transplantation or a small amount of materials, they can be directly inserted into flower pots, one plant per pot, and directly cultivated after survival without transplanting.
How to improve the survival rate of softwood cuttings
In the production process, for tree species that are difficult to root with hardwood cuttings, such as five-needle pine, cedar, and arborvitae, softwood cuttings are often used instead. The reason is that softwood cuttings have strong metabolic effects, high endogenous auxin content, and vigorous cell division ability, which are conducive to rooting of cuttings. However, softwood cuttings have poor stress resistance. Cuttings are taken in summer when the temperature is high, and water and nutrient consumption is high, which can easily cause branches to wither and die. Therefore, softwood cuttings have particularly strict requirements on technology and environmental conditions. The relevant technical introduction is as follows:
Select the soil for planting and strictly disinfect it. To prevent the tender branches from rotting due to poor ventilation, the soil for planting should have good air permeability and water retention. You can use 70% yellow heart soil (or mycorrhizal soil), 20% fine river sand, and 10% rice husk ash, sieve and mix well before use. The soil for planting should be strictly disinfected. A small amount of soil for planting can be disinfected by high temperature methods, such as pan frying (pour the soil for planting into an iron pan at a temperature of 120℃ to 150℃ and fry for 30 to 50 minutes), boiling disinfection (pour the soil into a pot filled with water and heat it to
Hormone treatment
Treating the shoots with ABT rooting powder, indoleacetic acid, naphthaleneacetic acid and other plant hormones before cutting can greatly improve the survival rate of cuttings. The most commonly used and most effective hormone in production is green plant growth regulator (GGR). The method of use is: prepare GGR into a 50
Temperature, humidity and light intensity
Providing suitable environmental humidity and rooting temperature is the key to the success of softwood cuttings. Softwood cuttings require air relative humidity between 80% and 95%, temperature between 18℃ and 28℃, and suitable light conditions.
Management after rooting
Key points of dormant branch cutting propagation technology;
Dormant branch cuttings are fully developed and have accumulated a large amount of nutrients. It is conducive to the formation of adventitious roots and is in a dormant state, so it is not as sensitive to external conditions as tender branches. However, since dormant branches contain a large amount of rooting inhibitors and the content of endogenous auxin is very low, low temperature and darkness should be treated before cutting to promote the transformation of inhibitors and supplement exogenous rooting promoting substances to promote the formation of adventitious root primordia.
In addition, on dormant branches, buds have been formed as an organ, but adventitious root primordia have not yet formed. Therefore, before cutting, a condition that is conducive to the formation of adventitious roots but not conducive to bud germination must be created. Generally, temperature control is used to achieve this goal.
2. Cutting time
Generally, cuttings are taken when the leaves turn yellow or fall.
3. Cutting treatment
It is best to treat with ABT rooting powder or GGR before storage. For convenience, it can also be stored first and then treated. When using ABT rooting powder or GGR for treatment, prepare a 50-100mg.kg-1 solution in a non-metal container and soak the base of the cuttings. The treatment depth is 2-3 cm and the treatment time is 2-6 hours. Generally, branches are soaked for 2 hours; large branches (such as branches over 40 cm of sand juniper) are soaked for 6 hours. Plant cuttings that are difficult to root, such as pine, cypress, white poplar, catalpa, etc., are treated with ABT No. 1 rooting powder; plant cuttings that are easier to root, such as fir and grape, are treated with ABT No. 2 rooting powder or GGR No. 6.
4. Cutting of cuttings
It is best to select the middle part of the thick branches of the current year. Each cutting retains 3-4 buds and the cutting length is 15-20 cm. When cutting, the upper cut is cut flat 1-15 cm away from the bud, and the lower cut is cut flat at the scar at the base of the lateral bud. The cut should be smooth. After cutting, the cuttings should be soaked in ABT or GGR solution immediately and then stored at low temperature.
5. Low temperature storage
Store the cuttings treated with ABT rooting powder or GGR (or not) in a cellar or deep trench for more than 40 days.
6. Hotbed rooting
In order to solve the problem of metabolic imbalance caused by the unbalanced development of the aboveground part of the dormant branches, it is best to carry out hotbed rooting one month before the start of the growing season. Here we only introduce a method of rooting by inverted insertion.
The hotbed is selected in a place that is leeward, sunny, and well-drained. It is 30 cm deep, 100 cm wide, and 200 cm long. The bottom of the bed is covered with 5 cm thick clean river sand. Bundle the cuttings upside down in the cutting bed and fill it with river sand, then cover it with 2 cm thick sand, and use a watering can to spray water until it is thoroughly sprayed. The surface of the hotbed is tightly covered with a small plastic arch to promote temperature rise and retain moisture. Water it every day to maintain the temperature of the cutting bed. In order to keep the soil temperature in the bed in accordance with the specified requirements, a heat-insulating straw curtain should be covered on the plastic film at night and removed during the day.
The whole process of rooting takes 14-20 days, and water needs to be sprayed frequently in the middle. The temperature of the hotbed should not be lower than 18℃. The temperature is adjusted every day by shading and covering with straw curtains. In the process of rooting, raising the temperature of the base of the cuttings (i.e. the upper part of the cutting bed) (about 20-28℃) and controlling the temperature of the upper part of the cuttings (i.e. the lower part of the cutting) (about 14-25℃) are the keys to the success of rooting.
When the callus tissue is formed at the lower incision of the cuttings, a circle of small root tips are differentiated around it, and the dormant buds have not yet sprouted, the rooting can be stopped and the cuttings can be timely inserted.
7. Cuttings
After rooting, the cuttings have been living at a suitable temperature (in the hotbed) for 14-20 days before cutting, and young roots have been formed. Therefore, the cutting time should be carried out one week before the start of the growing season or just at the beginning.
8. Ditching and water cutting
Before cutting, the nursery should be fully fertilized, the soil should be disinfected, and deep plowing and leveling should be carried out. When digging ditches, the ditch width should be 20 cm and the depth should be 2.5 cm. The soil should be separated on both sides in a ridge shape, and then water should be sprayed. The amount of water should be sufficient. However, do not soak the original ground surface to facilitate cutting and covering. After irrigation, the cuttings should be pressed slightly tilted into the mud pit of the ditch in time. The top of the cuttings should be slightly lower than the original ground level to facilitate moisture conservation, frost prevention and soil cultivation. At the same time, it is also necessary to pay attention to the consistency of the top of the cuttings so that the soil is evenly covered. After the water falls, the soil should be solid at the bottom and hollow at the top, preferably more than half a finger above the top bud. It is also possible to carry out water cutting, that is, before cutting, water is first led into the seedbed, and when the water seeps into the bed surface and becomes muddy, cutting is carried out at a spacing of 15-20 cm. If the soil is still not soft enough when cutting, in order to prevent the young roots from being scratched, you can first poke holes with a slightly thicker wooden stick, and then insert the cuttings into the soil. All cuttings that are moldy, have injured young roots, and have no buds should be picked out. The depth of the cuttings into the soil is just close to the ground with the second bud on the upper part, and the upper cut surface of the cuttings is generally 10 cm from the ground. If the cuttings have young roots, these cuttings can be picked out to avoid damaging the young roots during cuttings. Dig a trench and bury the cuttings separately, that is, dig a trench after rain or irrigation, and the trench depth is about 10 cm. Arrange the cuttings against the trench wall, fill the soil, and flatten the bed surface. When filling the soil, first bury the roots with fine soil, and be careful not to crush the young roots. The rest is the same as the water-drop cutting method.
9. Management after cuttings
From cuttings to seedlings, it can be roughly divided into four periods: the emergence period, the early growth period of seedlings, the rapid growth period of seedlings, and the high growth stop period.
⑴ The emergence period
⑵ The seedling growth period (squatting period)
Full-light spray cutting rapid seedling raising technology and automatic spray device;
Full-light spray cutting seedling technology is the fastest-growing advanced rapid seedling technology in modern times and has become an important part of plant asexual reproduction and factory seedling cultivation.
1. Overview of full-light spray cutting seedling technology
Asexual reproduction of plants can make the propagated plants retain all the genetic traits of their mother plants, so asexual reproduction methods are widely used in the production of forests, fruit trees, flowers and vegetables. Asexual reproduction methods include cuttings, grafting, layering, division and tissue culture. Among them, cutting seedling cultivation is the most convenient, with fast seedling growth and low cost, so plants that can be propagated by cuttings generally do not use other asexual reproduction methods.
Hardwood cuttings are the most traditional and simple asexual propagation method, which can meet the needs of large-scale industrial production. However, hardwood cuttings are only used for a few tree species that are easy to root, while most tree species are difficult to root. However, the emergence of softwood cuttings has greatly improved the survival rate of cuttings of tree species that are difficult to root, and has gradually become the direction of cutting research. Softwood cuttings are cuttings with leaves and a low degree of lignification (semi-lignified) during the growing season. Because the softwood cuttings are relatively young, they have more endogenous growth-promoting substances, fewer inhibitory substances, and strong cell division ability, so they are easy to root; leaf cuttings can not only carry out photosynthesis and provide carbohydrates required for rooting, but also synthesize endogenous auxins to stimulate rooting; in addition, the temperature is high during the growing season, which is conducive to the rapid rooting of the cuttings.
The leafy shoot cuttings have very high requirements for environmental conditions. A suitable high-humidity environment must be created to ensure that the cuttings do not lose water, wilt, and rot before rooting. There are many ways to create an environment. In order to control the loss of water in the cuttings and maintain water balance, the leafy shoot cuttings were generally carried out in plastic greenhouses or small arch sheds in production before, which had a good moisturizing effect. However, the temperature of such a closed cutting bed is very high during the growing season, which is easy to burn the cuttings. This requires shading and frequent ventilation and watering. The low light after shading weakens the photosynthesis of the cuttings, while the respiration intensity of the cuttings is very high under high temperature, and carbohydrates accumulate very little, which affects the rooting speed. In addition, high temperature and humidity, low light and poor ventilation are prone to mold growth, affecting the survival of cuttings. Although this method does not require special equipment for leafy shoot cuttings, it will fail if you don't pay attention to management, and the workload of seedling cultivation is large, the cultivation time is long, the efficiency is low, and the cost is high.
Full light mist cutting is to keep a layer of water film on the surface of the cuttings by spraying in full light in the open field, ensuring that the cuttings will not dry out due to water loss for a considerable period of time before rooting, which greatly increases the possibility of rooting. The evaporation of water on the surface of the cuttings can effectively reduce the temperature of the cuttings and the surrounding environment, so that even in summer, young cuttings will not be burned. On the contrary, strong light is very beneficial to the rooting and seedling formation of the cuttings. This method can make the cuttings of plants that were previously believed to be unable to root or difficult to root be successfully propagated, and can replace the grafting, layering and division of many plants. Therefore, the full light spray cutting seedling technology not only has rapid and easy rooting, high survival rate, fast turnover of the seedbed, high reproduction index, many suitable breeding varieties, and abundant sources of cuttings, but also can realize the fully automatic management of the rooting process of seedling cuttings, save a lot of manpower, reduce the labor intensity of workers, and reduce the cost of seedling cultivation. Therefore, full-light spray cutting seedling technology is a recognized high-efficiency and high-profit advanced seedling technology.
2. Automatic control spray device
Ensuring that there is always a layer of water film on the leaf surface before the cuttings take root is a necessary condition for full-light fog cutting. The automatic spray device currently used in full-light fog cutting seedling cultivation mainly consists of two parts: a moisture sensor control device and a micro-spray system.
1. Moisture control device
1.1 Moisture sensing control devices have developed from the earliest timekeeping type, constant temperature type, weight type, photoelectric type, and electronic leaf type to the current dry-wet bulb type.
The dry-wet-bulb moisture evaporation controller is an original design by scientific researchers. It cleverly uses the principle of heat absorption by moisture evaporation. The sensor is composed of two temperature-sensitive elements with the same parameters, one of which is covered with water-absorbing gauze, the lower end of which is immersed in a container of water, and the other is exposed. The heat taken away by the evaporation of moisture causes a temperature difference between the two sensor elements, and the size of the temperature difference is linearly positively correlated with the size of the evaporation intensity. Based on this principle, the evaporation intensity and evaporation amount of leaf moisture can be accurately measured, thereby realizing automatic intermittent spraying.
The size of the preset evaporation is determined according to the water requirement at different rooting times after cutting, so the automatic management of water in each stage of self-cutting, rooting and seedling hardening can be realized. The newly developed LK-100 micro-sprinkler irrigation intelligent controller uses a computer chip as a controller to simulate artificial intelligence to monitor the temperature difference of the sensor, so that the greater the temperature difference, the more frequent the water spraying, and the smaller the temperature difference, the longer the interval between water spraying. In order to better simulate the surrounding environment, the basic temperature is weighted, which greatly improves the control accuracy. The LK-100 micro-sprinkler irrigation intelligent controller is designed with a time interval circuit, and the two sets of control circuits can be automatically switched, making the controller work more stable and reliable, and very convenient to use. It is currently the most ideal control device for implementing full-light fog cutting seedling technology.
1.2 A simple and practical LK microcomputer timing controller was developed, which is easy to operate and economical.
2. Micro-spray system
The use of micro-spraying pipeline system for cutting seedling cultivation has the advantages of advanced technology, water saving, labor saving, high efficiency, easy installation, no terrain restrictions, and the area of the cutting bed can be large or small. Its main structure includes: water source, water pump or solenoid valve, controller, valve, filter, main pipeline, branch pipeline, micro-spraying head, capillary tube, connector, etc.
Seedbed method: Make the bed 1-1.2 meters wide and the length according to the actual terrain and needs. Leave a 30-centimeter working path between the two beds for easy work and drainage. Block the two sides of the bed with bricks, put the substrate in the middle, and then you can plant cuttings on it. If you use plug trays for planting cuttings, you can directly stack them on the ground. Multiple beds can be placed in parallel according to the planting area.
The control is achieved by a water pump or a solenoid valve.
3. Key points of full-light spray cutting seedling technology
1. Preparation of slotting bed
1.1 Nursery site selection and seedbed construction
Cutting nurseries should be established in places with sufficient sunlight, flat terrain, good ventilation and convenient drainage. The soil should preferably be sandy or sandy loam. In windy areas, choose a sheltered place or set up wind barriers at the wind outlet. The nursery should be close to water and power sources. The construction of the seedbed should be based on the specific requirements of different spray equipment.
1.2 Types of cutting media
It is very important to choose a suitable cutting medium for full-light mist cutting seedlings. The cutting medium should be loose, water-permeable, and free of bacteria. Materials commonly used as cutting mediums: river sand, quartz sand, perlite, vermiculite, carbonized rice husks, sawdust, peat soil, etc. In addition, furnace ash, coconut fiber, peat soil, etc. can all be used as cutting mediums. When choosing cutting mediums, some cheap and easily available materials should be used according to local conditions. Mixing several substrates sometimes works better than using them alone. For example, the commonly used peat soil: perlite: sand is 1:1:1, which obtains more ideal results in production. In addition, sometimes using two substrates in layers can also achieve better results.
2. Preparation of spikelets
It mainly includes: selection and cultivation of parents; cultivation of ear strips; and techniques of ear picking and ear processing.
2.1 Picking ears
Full light mist cutting seedlings can be used throughout the growing season. Collecting semi-lignified green branches that have basically stopped elongating can generally obtain the best rooting results. The determination of the time for cutting must also take into account some special climatic factors. For example, in the rainy season in the south, although the continuous rainy weather provides good humidity, the light conditions are poor and the light and ability are too weak, the ability of the cuttings to defend against pathogens is reduced, and there are more bacteria in the air, which can easily cause rot and is not conducive to cutting propagation. On the contrary, in the hot and dry season, the use of full light spray cutting rapid seedling raising technology can often achieve a higher rooting rate, and the rooting is rapid and the root system is well developed.
When propagating softwood cuttings, one must also consider whether the rooted seedlings can safely survive the winter, especially in cold areas. Many tree species have a high rooting rate when propagated with leaves in autumn, but the seedlings cannot be well lignified that year and require certain warming facilities to safely survive the winter. Otherwise, it is not advisable to propagate too late.
The picking of ears should be done on cloudy days or in the morning when the dew has not dried up. The ears should be placed in a bucket or wrapped with wet cloth or plastic film and quickly transported to the ear processing site.
2.2 Ear Making
The processing of spikelets is best done indoors or in a shaded place outdoors. In dry and windy weather, attention should be paid to wind protection and frequent watering. Before processing, the spikelets should be rinsed with clean water, and attention should be paid to the cleanliness of the environment and spike-making tools.
Different tree species have different ways of making cuttings. Generally, conifers and most evergreen broad-leaved trees are made with top tips when making cuttings, while deciduous broad-leaved trees can be made by cutting the cuttings into several cuttings. The length of the cuttings also varies with different tree species, and is generally 6-10 cm long. For precious tree species that are easy to root, single bud cuttings can be used, and the cuttings can be shorter; on the contrary, species with smaller leaves need to leave more leaves on the cuttings, and for tree species with longer internodes, the cuttings should be longer. For spray cuttings, the amount of leaves left on the cuttings has a certain effect on rooting, and the larger the amount of leaves left, the easier it is to root. In order to reduce the evaporation intensity of the cuttings and improve the utilization rate of the cutting bed, some leaves should be appropriately cut off. Generally, the leaf area of each cutting should be about 10 cm2. For softwood cuttings, generally 400-1000 plants can be cut per square meter of cutting bed.
When making cuttings without top tips, the tender top tips are usually removed first, and then the cuttings are cut into several cuttings of certain specifications according to the size of the leaves and the density of the internodes. The upper incision should be 0.5-1.0 cm above the node, and the lower incision can be made at any position, but it is best to be below the node, remove the lower leaves and keep the upper leaves. For cuttings with top tips, it is only necessary to make the cuttings to a certain length and remove the lower leaves. It is best to use a sharp knife to cut the cuttings, and flat cutting, oblique cutting and double-sided oblique cutting are all possible. During the cutting process, the cuttings that have been made should be placed in a bucket to keep them moist and inserted in time.
3. Cutting and post-management
Before cuttings, the cuttings should be treated to promote rooting and sterilize, and a reasonable cutting density and depth should be determined; the cuttings should be well managed for water, fertilized and sprayed in time, and transplanted in time and management of the seedling stage should be strengthened.
3.1 Pre-insertion processing
3.1.1 Sterilization
The cuttings are usually sterilized with organic mercury, Bordeaux mixture, carbendazim, benomyl, thiophanate-methyl and chlorothalonil. There are two treatment methods: soaking the cuttings and soaking the base. The base is more commonly used to avoid leaf damage. In addition, bacterial infection is mainly at the base. Generally, 1000 times the above-mentioned agents are used for soaking for 15-30 seconds. Bordeaux mixture is treated with 1000 ml of water: 400 grams of copper sulfate: 400 grams of quicklime. Sometimes sterilization and growth hormone treatment are carried out at the same time.
3.1.2 Growth hormone treatment
Treating cuttings with plant growth hormones can effectively increase the rooting rate of cuttings, shorten the rooting time and increase the number of roots. The growth hormones currently used in production mainly include naphthylacetic acid, indolebutyric acid, ABT rooting powder, etc. There are three main treatment methods:
Low-concentration soaking method: soak the base of the cuttings in a low concentration of plant growth hormone. The specific cultivation method is to first dissolve indolebutyric acid or naphthaleneacetic acid in a small amount of 50% alcohol, and then add water to dilute to a certain concentration. The general treatment concentration for softwood cuttings is 10-100ppm, and the soaking time is 12-24 hours. The low-concentration soaking method has a relatively stable effect, but the treatment is more troublesome and time-consuming, and it is difficult to use in large-scale cuttings.
High-concentration quick-dipping method: Dissolve the plant growth regulator in a small amount of 50% alcohol, then dilute it with water to 500-2000 ppm, dip the base of the cuttings about 2 cm in the solution for 1-5 seconds and take out the cuttings.
LK microcomputer timing controller
1. Panel Description
1. Front panel: (1) Set key (SET): Pre-set the working program. After entering the password 123, it can be set; (2) Numeric key: Press the ▲ key to increase the parameter, and press the ▼ key to decrease the parameter.
2. Rear panel: (1) Power switch; (2) 220V AC power input socket (with 10A fuse); (3) 220V AC power output socket.
2. Technical Parameters
1. The instrument output delay (spray time 1-9999 seconds), intermittent delay 0.1--9999 minutes, can be adjusted arbitrarily.
2. Power supply voltage range: 150-250V, instrument power consumption ≤5W.
3. The instrument control output can start the solenoid valve or a water pump ≤800 W (if an intermediate AC contactor is added, a larger power water pump can be started. The instrument output is connected to A1A2 of the contactor, and the power supply and water pump are connected to L1L2 and T1T2 of the contactor respectively).
4. Overall dimensions: 9×13×15cm; Net weight of instrument: 0.5kg.
3. Usage
After the instrument is powered on, the word HELO is displayed to indicate that the instrument self-test is complete. Data input is completed using the indicator light and corresponding prompts. Press the setting key to enter the setting state. Press the ▲ key to increase the parameter by one, and press the ▼ key to decrease the parameter by one. If you keep pressing it, the value will increase or decrease rapidly, and it will stop after you release it.
When setting parameters, press the Set key to display the corresponding indicator light or prompt. Use the increase and decrease keys to set the required value, then press the Set key to save the value and enter the next parameter setting operation.
Order of Operations
1. Press the Set key, 109 appears, enter the parameter modification password 123, and then press the Set key to enter the parameter cycle. The purpose of setting the password is to prevent non-technical personnel from making mistakes.
2. a-×× appears, prompting you to enter the first hour, range: 0--24, unit is hour, press the set key to save the time you want to set.
3. When the water spray light comes on, enter the first cycle water spray time in seconds. Press the set key to save. When the "water stop time" indicator light comes on, enter the water stop time in minutes. Press the set key to save.
4. b-×× appears, prompting you to enter the second hour, range: 0--24, unit is hour, press the set key to save the time you want to set. The water spray light appears on, prompting you to enter the second cycle water spray time, unit is second. Press the set key to save. The water stop light appears on, prompting you to enter the second cycle water stop time, unit is minute. Press the set key to save.
5. C-×× appears, prompting you to enter the third hour segment, ... and so on.
The controller is divided into eight time periods, which can be set arbitrarily. If the hours of a certain period are set to zero, the time periods after this period will not work, and the previous set period will be cycled. If the sum of the set time periods is 24 hours, the set periods can be cycled every day. If only one period is set, it will always cycle. When pressing the setting key to modify the>This controller is mainly used for cutting seedling cultivation and can also control sprinkler irrigation.
LK-100 Micro-sprinkler Intelligent Controller
1.
1. Front panel: (1) Select key: observe the working status of the instrument; (2) Set key: pre-set the working program. After entering the password, you can set it; (3) Value key: press the ▲ key to increase the parameter, and press the ▼ key to decrease the parameter.
2. Rear panel: (1) Power switch; (2) 220V AC power input socket (with 10A fuse); (3) 220V AC power output socket.
2.
1. Evaporation range 1---9999, adjustable
2. Instrument output delay (spray time 1-9999 seconds), intermittent delay 0.1-9999 minutes, adjustable.
3. Power supply voltage range: 150-250V, instrument power consumption ≤5W.
4. The instrument control output can start the solenoid valve or ≤800 W water pump (if an intermediate relay is added, a higher power water pump can be started).
5. Temperature range: 0-100℃. Dimensions: 9×18×25cm.
7. Net weight of the instrument: 1 kg.
3.
After the instrument is powered on, the word HELO is displayed to indicate that the instrument self-test is complete. Data input is completed using the indicator light and corresponding prompts. Press the set key to enter the setting state. Press the key to increase the parameter by one, and press the key to decrease the parameter by one. If the or key is pressed without moving, the value will increase or decrease rapidly and stop after releasing it.
When setting parameters, press the Set key to display the corresponding indicator light or prompt. Use the increase and decrease keys to set the required value, then press the Set key to save the value and enter the next parameter setting operation.
Order of Operations
1. Press the Set key, 109 appears, enter the parameter modification password 123, and then press the Set key to enter the parameter cycle. The purpose of setting the password 123 is to prevent non-technical personnel from making mistakes.
2. Press the Set button. When the “Spray Time” indicator light is on, enter the spray time (determine it according to the water demand of the leaves) in seconds.
3. Press the Set button, and when the “Water Cutoff Time” indicator light is on, enter the water cutoff time (set by yourself) in minutes.
4. Press the Set key again, and the "Temperature Value" indicator light will light up with 00.0 or 00.0, and enter the corresponding temperature error correction value. (This step generally does not require adjustment. When the two sensor heads are in the same conditions and environment, if the temperature difference is too large, it can be corrected. The temperature difference of ±0.8 is normal. The correction method is to press the Select key, write down ××, × and ××, ×, and then press the Set key to enter the password 123. When the temperature value indicator light is on, make an increase or decrease correction.)
6. After inputting, press the "Select Key" to observe the water cut-off time, temperature, temperature difference and evaporation coefficient value in turn, and the corresponding indicator lights will light up.
7. When pressing the Set key to modify>Installation of LK-100 micro-sprinkler irrigation intelligent controller and determination of evaporation coefficient
The LK-100 micro-sprinkler irrigation intelligent controller should be installed in a room near the seedling bed or in a dedicated control box next to the seedling bed. Place the sensor next to the seedling bed or in the spray environment of the seedling bed. The sensor is filled with water, one of the sensor elements is covered with gauze, and the other sensor element is exposed.
Connect the sensor plug, connect the instrument output to the solenoid valve or water pump, connect the power supply, turn on the power switch and you can debug and use it.
Automatic control: Turn on the power, the instrument works, start the solenoid valve or water pump, and start spraying. The "spraying time" indicator light is on. When the leaf surface is completely wet, write down the spraying time. At this time, the evaporation coefficient can be determined. The method is: at noon when the light is strongest and the temperature is highest, first set the recorded spraying time and spray water. After the spraying is finished, the evaporation coefficient starts to count. When the water film on the leaf surface gradually decreases to about 1/4, it feels that the leaf needs to be sprayed with water, otherwise the leaf will be sunburned. Write down the evaporation coefficient value at this time. This value is the evaporation coefficient to be set. After setting the coefficient, observe the cuttings and make fine adjustments. The coefficient can be adjusted with time, environment and water requirements of seedlings.
Note: 1. When using automatic control, the water outage time of the timing control should be set larger, because the automatic and timing controls work at the same time, and whichever reaches the value first will take effect first.
2. If a water pump is used to supply water, an intermediate AC contactor should be installed, and the controller should be used to control the intermediate AC contactor to protect the controller. Connection method: The control output is connected to A1A2 of the contactor, the power supply is connected to the input of the controller and L1L2 of the contactor respectively, and the water pump is connected to T1T2.
This equipment is mainly used for greening, afforestation, cutting and seedling raising of fruit trees and flowers, and can also control sprinkler irrigation
ABT Rooting Powder Series Product Instructions
ABT rooting powder series products are a new type of broad-spectrum, highly efficient, compound plant growth regulator. Since being included in the National Key Promotion Plan for Scientific and Technological Achievements in 1989, ABT rooting powder series products have been widely used on 1,582 plant varieties in 30 provinces (cities) across the country. They can promote root development, generally improve survival rate, increase stress resistance, and have a significant yield-increasing effect.
ABT No. 1 rooting powder
ABT No. 2 rooting powder
ABT3 rooting powder
① Seed soaking method: Soak the tree seeds in 25-50 mg.kg-1 solution for 2-12 hours before sowing
② Seed dressing method: Spray and thoroughly soak the seeds with 20-50 mg.kg-1 solution, then simmer the seeds for 24 hours.
③ Leaf spraying method: During the seedling stage, use 5-10 mg.kg-1 solution to spray the stems and leaves of the seedlings until droplets fall.
④ Root dipping method for seedlings: Use a sharp knife to cut off 1/3 of the main root length of the seedlings, and quickly soak them in a low concentration of 5-50 mg.kg-1 solution for 3 seconds to 3 minutes.
⑤ Root immersion method: Before afforestation or transplanting seedlings, soak the roots of the seedlings in a 10-20 mg.kg-1 solution for 30 minutes to several hours, or soak the roots of the seedlings in a 10-50 mg.kg-1 solution for several hours, and then wrap the roots into a mud ball with wet soil.
⑥ Root spraying method: Before afforestation, use 20-100 mg.kg-1 solution to wet and thoroughly spray the roots of seedlings.
⑦ Quick root dipping method: Before afforestation, dip the roots of seedlings in 100-500 mg.kg-1 solution and quickly dip for 5-30 seconds before planting.
⑧ Root irrigation method: Use 10-20 mg.kg-1 solution, water the tree after planting, and then irrigate with ABT solution the next day until the roots have absorbed all the solution, and irrigate again every other week.
Preparation method: ABT rooting powder No. 1-5 needs to be dissolved with alcohol when used. Put 1 pack (1 gram) of ABT rooting powder into a non-metal container, then add 100-150ml (2-3 taels) of alcohol or high-proof liquor (650) to dissolve, stirring while adding, so that the rooting powder is fully dissolved, then add water to dilute to the appropriate concentration for use. The amount of water to be added is shown in the table below.
Required concentration (mg.kg-1) | 5 | 10 | 15 | 20 | 25 | 30 | 40 | 50 | 100 | 200 | 300 | 500 |
Amount of water added (kg) | 200 | 100 | 67 | 50 | 40 | 33 | 25 | 20 | 10 | 5 | 3 | 2 |
For example: if you use 15 mg.kg-1 to soak seeds, dissolve 1 gram of ABT powder in a small amount of water and then add 67 kg of water; if you use 30 mg.kg-1, add 33 kg of water.
Chemical and physical treatment of seedling materials in plant rapid propagation technology;
fully dissolve 1 gram of JH-1 and 25 grams of carbendazim in 20 kilograms of water (preferably diluted in stages).
Pour the cuttings into the above solution and soak for 30-60 minutes (generally 60 minutes for evergreen plants and 30 minutes for deciduous plants).
Insert the material into the sand bed. According to the leaf size of the material, generally 1000-1500 plants or even more can be inserted per square meter, and it is advisable that the leaves do not overlap each other. Insertion only plays a fixing role, and it is not necessary to insert too deep. Many plants can take root even without insertion.
Water management. For outdoor seedling cultivation, use a spray system controlled by an electronic automatic seedling instrument, adjust the relevant parameters according to the weather conditions, so that the leaves of the plants are dry and wet, neither wilting nor rotting due to long-term excessive water.
Nutritional supplementation and disinfection management. Before rooting, spray 0.2% dihydrogen phosphate aqueous solution every 5-7 days, and add JH-3 universal strong rooting agent (1 gram per 20 kg of the above solution) and fungicides such as carbendazim (25 grams of carbendazim per 20 kg of solution) to the solution; after rooting, spray 0.2% urea + 0.1% dihydrogen phosphate aqueous solution every 5-7 days.
Other treatments for cuttings Treatment
of rooting-hindering substances
Some tree species that are difficult to root may contain some substances that can hinder rooting in their tissues, such as tannins, gums, turpentine, resins, balsams, oxidases, etc. Selecting appropriate solutions for soaking can achieve certain results. The methods that have been studied by predecessors are as follows:
1. Soaking camphor trees, poinsettias, hollies, euonymus, and euphorbia in clean water can achieve good results. The soaking time can be extended to more than 2 hours when disinfected with carbendazim.
2. Azaleas, roses, etc. are effective when treated with 1%-3% alcohol solution for 2-6 hours.
3. Bayberry and chestnut can be treated with 0.05%-0.1% silver nitrate.
4. Many tree species such as waxwood, privet, cotinus coggygria, and rose are effectively treated with 0.1%-0.3% potassium permanganate aqueous solution.
Treatment of rooting promoting substances and nutrients
[General plants can use strong rooting powder JH, which is a general formula. ]
Cuttings are generally disinfected
by soaking in 700-800 times carbendazim. It can also be soaked in 0.1%-0.3% potassium permanganate. Plants with other special diseases use corresponding effective fungicides.
Due to different tree species, some plants have their own susceptible diseases, which should be highly valued. For example, grape downy mildew should be controlled during seedling cultivation. If it is serious, the leaves will wither when rooting, and the whole plant is still easy to die. Downy mildew can be controlled by spraying pesticides such as frostbite frequently, and special diseases of other plants should also use corresponding drugs. In order to improve the efficiency of
rooting
, the tree species that are difficult to root, such as azalea, maple, magnolia, holly, and coniferous species, can be incised before soaking in the agent. Method: Use a sharp knife tip to incise several longitudinal wounds deep into the wood at the base of the cuttings. Of course, for tree species or materials that are easy to root in general, the operation can be simplified as much as possible. As long as the purpose of rooting can be achieved, the simpler the better. Do not complicate it yourself, so as not to affect the work efficiency.
Cutting propagation
Cuttage propagation is a method of propagation in which a part of a plant's branches, leaves or roots is cut and inserted into a substrate to allow it to take root, sprout, and grow into a new plant. Cuttings and asexual propagation methods such as layering and division are collectively referred to as self-root propagation. Seedlings cultivated by self-root propagation are collectively referred to as self-root seedlings, which have the following characteristics: less variability, can maintain the excellent traits and characteristics of the mother plant; short seedling period, early fruiting, fast production; simple propagation method, rapid seedling formation. Therefore, it is an important way to cultivate horticultural plant seedlings.
1. Types and methods of cuttings
Leaf cuttings
Leaf cuttings
Bud cuttings
Stem cuttings
Hardwood cuttings
Root cuttings
(1) Leaf cuttings (1eaf cuttlng)
It is used for horticultural plants that can produce adventitious buds and adventitious roots from leaves, mostly flowers, most of which have thick petioles, leaf veins or thick leaves. Such as ball orchids, tiger orchids, welwitschia orchids, ivory orchids, gloxinia, begonias, and ground roots. Leaf cuttings must select fully developed leaves and be carried out in a well-equipped propagation bed, maintaining suitable temperature and humidity, so as to obtain strong seedlings.
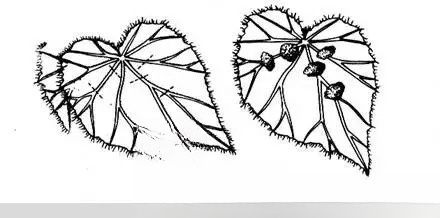
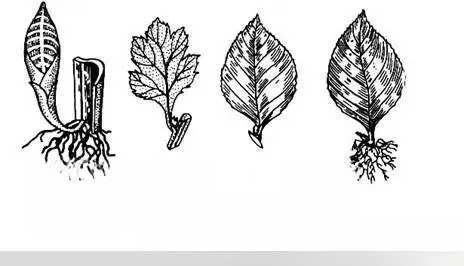
① Whole leaf cutting: Use complete leaves as cuttings (Figure 4-20). The first is the flat laying method, that is, lay the petiole-free leaves flat on the sand surface, fix them with needles or bamboo needles, and make the bottom of the leaves close to the sand surface. For the detached leaves of bryophyllum, young plants can be generated in the concave areas around the leaf margins (originating from the so-called leaf margin embryos). For Begonia, young plants are generated from the base of the petiole, the veins, or the cut-off points of the thick veins. The second is the direct insertion method, inserting the petiole into the substrate, with the leaves standing upright on the sand surface, and adventitious buds and adventitious roots are generated from the base of the petiole. For example, Gloxinia generates small bulbs from the base of the petiole and then roots and buds. African violets, chicory, peas, hoya, Cape primrose, etc. can all be propagated by this method.
② Leaf cuttings: Cut the leaves into several pieces and propagate them separately. Adventitious buds will form on each leaf, such as Begonia, Gloxinia, Peperomia, Welwitschia, etc.
③ Bud and leaf cutting: The cutting has only one bud with one leaf, and the lower part of the bud has a shield-shaped stem, or a small section of stem. Insert it into the sand bed, leaving only the tip of the bud exposed. Cover it with a film to prevent excessive evaporation of water. This method is suitable for species that are not easy to produce adventitious buds through leaf cutting, such as chrysanthemum, hydrangea, camellia, rubber tree, osmanthus, geranium, perennial phlox, etc.
(2)茎插(stem cutting)
① Hard branch cuttings: refers to the use of mature branches that have been essentialized for cuttings. Fruit trees and garden trees often use this method for propagation, such as grapes, pomegranates, figs, etc. (as shown in Figure 4-21).
② Softwood cuttings: also known as green branch cuttings. Cuttings are taken from growing season branches, usually 5 to 10 cm long, and the tissue should be moderately mature (woody plants mostly use semi-essential branches). Too young and tender branches are prone to rot, and too old branches will take root slowly. Softwood cuttings must retain a part of the leaves. If all the leaves are removed, it will be difficult to take root. For species with larger leaves, part of the leaves can be cut off to avoid excessive transpiration of water. The incision should be close to the bottom of the node, and the cut surface should be smooth. Most plants are suitable for cuttings before cutting, but for succulent plants, the incision must be dried for 0.5 days to several days before cutting to prevent rot. Figs, citrus, and flowers such as azaleas, poinsettias, tiger thorns, and rubber trees can be propagated by this method.
(3) Root cutting
A method of propagating seedlings by cuttings using the ability of roots to form adventitious buds. It is used for species that are not easy to root. This method can be used for fruit trees and perennial flowers, such as jujube, persimmon, hawthorn, pear, plum, apple and other fruit trees, yam grass, ox tongue, autumn peony, soapwort, hairy love flower, autumn prune, perennial phlox, peony, blood-replenishing grass, peonies, and Bo Luohui. Generally, thick root segments are selected for sand storage, or the mother plant can be dug up in autumn, the roots can be stored for winter, and cuttings can be taken in the spring of the following year. Cuttings can also be taken in hotbeds or greenhouses in winter. The roots have weak resistance to stress, so special attention should be paid to drought prevention.
2. Internal factors affecting rooting of cuttings
(1) Different plant species and varieties
There are great differences in the rooting ability of cuttings of different horticultural plants. Willow, black poplar, green poplar, boxwood, hibiscus, ivy, nandina domestica, amorpha, forsythia, tomato, rose, etc. are very easy to root. Plants that are relatively easy to root include white poplar, maple, camellia, bamboo, sycamore, arborvitae, azalea, thuja serrata, cherry, pomegranate, fig, grape, citrus, oleander, wild rose, privet, spirea, witch hazel, pearl bush, pepper, heather, etc. Plants that are difficult to root include Junqianzi, Alnus, chinaberry, Ailanthus altissima, Norway spruce, etc. Plants that are extremely difficult to root include walnut, chestnut, persimmon, Masson pine, etc. The difficulty of rooting from cuttings of different varieties of the same plant is also different. Jessica and Aidilang in American grapes are more difficult to root.
(2) Tree age: branch age and branch position
Generally speaking, the older the tree is, the harder it is for the cuttings to root. For tree species that are difficult to root, it is easier to root if you cut branches from seedlings for cuttings. One-year-old branches have the strongest regeneration ability for cuttings, and generally the younger the branch is, the easier it is for the cuttings to survive. However, some tree species, such as gooseberries, are easy to root with two-year-old cuttings. The main reason is that their one-year-old cores are too thin and contain less nutrients. Cuttings cut from different parts of a branch will have different rooting conditions. Evergreen tree species can be cut in spring, summer, autumn, and winter. For deciduous tree species, it is best to use branches in the middle and upper parts of the tree body for cuttings in summer and autumn; it is better to use branches in the middle and lower parts of the branches in winter and spring.
(3) Development of branches
All branches that are fully developed have rich nutrients, are easy to survive, and grow well. Softwood cuttings should be taken when the cuttings begin to lignify or semi-lignify; hardwood cuttings are mostly taken in late autumn and early winter when the nutritional status is good; herbaceous plants should be taken when the plants are growing vigorously.
(4) Storage of nutrients
The content and composition of nutrients stored in branches are closely related to the difficulty of rooting. Generally, the more carbohydrates in branches, the easier it is to root, because both rooting and germination require the consumption of organic nutrients. For example, the rooting rate of grape cuttings with high starch content is 63%, those with medium starch content is 35%, and those with low starch content is only 17%. Excessive nitrogen content in branches affects the number of roots. Low nitrogen can increase the number of roots, while nitrogen deficiency will inhibit rooting. Boron has a good promoting effect on the rooting of cuttings and the growth of the root system, so the mother plant from which the cuttings are taken should be supplemented with necessary boron.
(5) Hormones
Auxin and vitamins promote rooting and root growth. Since the transport direction of endogenous hormones and growth regulators has the characteristics of polar transport, if the branches are inserted upside down, the roots will still be at the morphological lower end of the branch segment. Therefore, special attention should be paid to avoid inserting the cuttings upside down.
(6) Leaf area of cuttings
The leaves on the cuttings can synthesize the nutrients and hormones needed for rooting, so when cuttings are used, a larger leaf area is more conducive to rooting. However, before the cuttings take root, the larger the leaf area, the greater the transpiration, and the cuttings are more likely to die. Therefore, in order to effectively maintain the balance between water absorption and transpiration, when actually cutting, the number of leaves and leaf area on the cuttings should be adjusted according to the plant species and conditions. Generally, 2-4 leaves are left, and for large-leaf species, half or more of the leaves should be cut off.
3. External factors affecting rooting of cuttings
(1) Humidity
One of the main reasons for failure of cuttings is that the cuttings lose water and dry up before taking root. Because new roots have not yet been formed, water cannot be supplied smoothly, and the branches and leaves of the cuttings continue to lose water due to mushroom transpiration. Therefore, it is necessary to maintain a high air humidity as much as possible to reduce the water consumption of the cuttings and the cutting bed, especially for tender branch cuttings. High humidity can reduce the transpiration of leaf water and prevent the leaves from wilting. The humidity of the cutting bed should be appropriate and well ventilated. Generally, it is advisable to maintain 60%-80% of the maximum water holding capacity of the soil.
The use of an automatically controlled intermittent spray device can maintain high humidity in the air and keep a layer of water film on the leaf surface, reducing the leaf surface temperature. Other methods such as shading and covering with plastic film can also maintain a certain air humidity.
(2) Temperature
When general tree species are cut, the daytime temperature reaches 21-25℃ and the night temperature reaches 15℃, which can meet the rooting needs. It can germinate under the condition of soil temperature of 10-12℃, but rooting requires soil temperature of 18-25℃ or slightly higher than the average temperature by 3~>5℃. If the soil temperature is low, or the air temperature is higher than the soil temperature, the cuttings can germinate but cannot take root. Because the branches and leaves grow first and consume a lot of nutrients, it will inhibit the root system and cause death. In the north, the spring temperature is higher than the soil temperature. When cutting, measures should be taken to increase the soil temperature so that the cuttings can take root first, such as heating with a kang, or heating with horse manure. If conditions permit, an electric hotbed can be used to provide the most suitable temperature. In the south, the soil temperature rises faster than the air temperature in early spring, so it is necessary to grasp the period and hurry up to cut.
(3) Lighting
Light has an inhibitory effect on the development of the root system. Therefore, the base of the branch must be buried in the soil to avoid light in order to stimulate rooting. At the same time, proper shading after cutting can reduce water evaporation from the nursery and water transpiration from the cuttings, so that the cuttings maintain water balance. However, excessive shading will affect the soil temperature. Cuttings of young branches with leaves require appropriate light to facilitate photosynthesis to produce nutrients and promote rooting. However, direct sunlight should still be avoided.
(4) Oxygen
Cuttings need oxygen for rooting. Water, temperature and oxygen in the cutting bed are interdependent and mutually restrictive. Too much water in the soil will cause the soil temperature to drop and squeeze out the air in the soil, causing hypoxia, which is not conducive to the healing and rooting of the cuttings and is also easy to cause the cuttings to rot. Cuttings require less oxygen when forming rhizogenes, but more oxygen when growing. Generally, it is best for the soil gas to contain more than 15% oxygen and maintain appropriate moisture.
(5) Rooting medium
An ideal rooting medium requires good water permeability and air permeability, has an appropriate pH value, can provide nutrients, can maintain appropriate humidity without water accumulation after watering or heavy rain, and is free of harmful bacteria and fungi.
4. Methods to promote rooting
(1) Mechanical treatment
① Peeling. For branches with relatively developed cork tissue (such as grapes), or species and varieties of woody horticultural plants that are difficult to root, the epidermal cork layer can be peeled off before cutting (do not damage the phloem), which is effective in promoting rooting. Peeling can increase the water absorption capacity of the cutting bark, and young roots are easier to grow.
② Longitudinal cuts. Use a sharp knife or hand saw to make five or six longitudinal cuts at the internodes of one or two nodes at the base of the cuttings, deep into the wood, which can promote rooting around the nodes and stem breaks.
③ Ring barking. 15-20 days before taking cuttings, peel off a circle of bark about 1.5 cm wide from the base of the branches to be used on the mother plant. When healing tissue grows out of the ring bark and it is completely healed, it can be cut off for cuttings.
(2) Yellowing treatment
For branches that are difficult to root, wrap the base with black paper, black cloth or black plastic film in the early stage of their growth. This can make the chlorophyll disappear, the tissue turn yellow, the cortex thicken, the number of parenchyma cells increase, and the accumulation of auxin, which is beneficial to the differentiation and rooting of rhizogenes.
(3) Water immersion
For cuttings during the dormant period, soak the cuttings in clean water for about 12 hours before cutting to allow them to fully absorb water. This can promote the formation of root primordia and increase the survival rate of the cuttings.
(4) Heating and rooting treatment
Artificially increase the temperature of the rooting part at the bottom of the cuttings and reduce the temperature of the germination part at the top, so that the cuttings will take root first and then germinate. Common rooting methods are:
① Rooting in the sunny bed. One month before open-field cuttings in spring, build a sunny bed in the leeward and sunny place, and set up a wind barrier on the north side of the sunny bed. The direction of the bed is preferably east-west, with a width of 1.4m and a depth of about 60cm. The length of the bed depends on the number of cuttings. Spread 15-20cm of wet fine sand on the bottom of the sunny bed, then put the cuttings upside down in bundles on it, and then cover with fine sand and film, and use the characteristics of rapid temperature rise and low soil temperature in early spring to promote rooting. This method requires a longer cutting length to keep a certain distance between the germination and rooting parts, and maintain a certain temperature difference. If the cuttings are short or the grape single buds are cut, the effect is not good. After the cuttings are placed in the sunny bed, the temperature and humidity should be checked frequently. When the bed temperature is higher than 30℃, water should be sprayed to cool down. Generally, root primordia will appear in about 20 days. After most cuttings have root primordia, cuttings should be carried out in time. Because the original roots are very fragile and tender, and are afraid of wind and sun, the soil should be prepared first and the plants can be planted as soon as they are taken.
② Make a hotbed to promote rooting. Put 30cm thick horse manure in the hotbed, spray it with water, cover it with 5cm of soil, arrange the cuttings (upright) on it, fill the soil between the branches, and leave the terminal buds outside. Use the horse manure to make heat, create high temperature conditions, and promote rooting at the base of the cuttings.
③ Heat to promote rooting. Put sawdust 5cm thick on the heat, put the cuttings vertically on it, fill the gaps with sawdust, expose the top buds, spray them with water, and keep the temperature of the lower rooting area at 22-28℃. After about 20 days of treatment, most of the cuttings can take root or produce callus tissue, so that they can be transplanted to the nursery or planted.
④ Electric hotbed to promote rooting. In the greenhouse or hotbed, first spread 10cm thick fine sand on the ground, put plastic film on it, spread 5cm of fine soil on the film, lay electric heating wire on it and set up a temperature controller, spread 4-5cm thick river sand on the electric heating wire, put the cuttings on it, fill the gaps with sand, and keep the temperature at 20-25℃.
(5) Drug treatment
① Plant growth regulators. Applying various artificially synthesized plant growth regulators to treat cuttings before cutting not only significantly improves the rooting rate, number of roots, root thickness and length, but also shortens the rooting period of seedlings and makes the roots uniform. Commonly used plant growth regulators include indolebutyric acid (IBA), indoleacetic acid (1AA), naphthylacetic acid (NAA), 2,4-D, 2,4,5-TP, etc. Usage methods are:
Powder coating method: Use ground inert powder (talcum powder or clay) as a carrier, with a dosage of 500-2000 mg/kg. When using, first wet the base of the cutting with water, then insert it into the powder, and then make the cutting base adhere to the powder.
Liquid dipping: Prepare an aqueous solution (for those that are insoluble in water, first use alcohol to make the stock solution, then dilute with water), divided into high concentration (500-1000 mg/L) and low concentration (5-200 mg/L). Soak the cuttings in low concentration solution for 4-24 hours, and dip in high concentration solution for 5-15 seconds.
In addition, ABT rooting powder is a mixture of various growth regulators. It is a highly effective, broad-spectrum root promoter that can be used to promote root growth in cuttings of a variety of horticultural plants.
Rooting powder can process 3000-6000 cuttings. The models available are as follows: No. 1 rooting powder: used to promote the induction of adventitious roots of cuttings of plants that are difficult to root, such as golden camellia, magnolia, apple, wild grape, hawthorn, crabapple, jujube, pear, plum, ginkgo, etc. No. 2 rooting powder: used for the breeding of general flowers, fruit trees and forestry seedlings. Such as roses, camellia, grapes, pomegranates, etc. No. 3 rooting powder: used for root core restoration and improving survival rate when transplanting seedlings.
②Other chemical agents. Vitamin B1 and vitamin C promote the rooting of some types of cuttings. Boron can promote the rooting of cuttings and has a significant effect when used in combination with plant growth regulators, such as IBA.
50mg/L plus 10-200mg/L of boron, treat the cuttings for 12 hours, the rooting rate can be significantly improved. 2%-5% sucrose solution and 0.1%-0.5% potassium permanganate solution soak for 12-24 hours. It also has the effect of promoting rooting and survival.
5. Cutting Technology
(1) Cutting procedure
Cutting seedlings need to go through different stages due to different plant species and conditions. The procedures are roughly as follows:
① Direct cuttings in the open field.
② After rooting, carry out cuttings in the open field.
③ After root-promoting treatment, the plants will take root and sprout in the cutting bed and then be transplanted into the open field.
④ After rooting, the plants will take root and sprout in the cutting bed, and then be transplanted to the open field after hardening.
After the roots are destroyed, they will take root and sprout in the planting bed and become seedlings.
(2) Storage of cuttings
If hardwood cuttings are not planted immediately, they can be cut into 60-70 cm long and bundled into 50 or 100 pieces, with the species, collection date and location marked. Choose a high and dry place with good drainage to dig a ditch or build a cellar to store in wet sand. For short-term storage, bury in wet sand in a cool place.
(3) Seeding period
Different types of plants have different suitable cutting periods. Generally, hard branches of deciduous broad-leaved trees are cut in March, and tender branches are cut in June-August. Evergreen broad-leaved trees are mostly cut in summer (July-August); evergreen conifers are best cut in early spring, and herbaceous plants can be cut all year round.
(4) Cutting method
① Open-field cuttings are divided into bed cuttings and ridge cuttings. Bed cuttings: Generally, the bed width is 1m, length is 8-10m, and the row spacing is 12-15cm×50-60cm. 120,000-15,000 cuttings are inserted per hectare, and the cuttings are inserted obliquely into the soil, leaving one bud on the ground. Ridge cuttings: The ridge width is about 30cm, the height is 15cm, the ridge spacing is 50-60cm, and the plant spacing is 12-15cm. 120,000-150,000 cuttings are inserted per hectare. All cuttings are inserted in the ridge, and water is irrigated in the ridge ditch after insertion.
②Full-light mist cutting. This is the fastest-growing and most widely used new seedling technology in foreign countries in modern times. The method is to use advanced automatic intermittent spraying devices to cut young branches with leaves outdoors during the plant growth season, so that the cuttings can photosynthesize and root at the same time, and the leaves can produce nutrients for their own rooting and growth needs, which significantly improves the rooting rate and survival rate of cuttings, especially for fruit trees that are difficult to root.
(5) Insert bed matrix:
Species that are easy to root, such as grapes, are not very demanding on the substrate, and general loam is sufficient. Species that are slow to root and softwood cuttings have strict requirements on the substrate, and commonly used substrates are vermiculite, perlite, peat, river sand, moss, forest humus, slag ash, volcanic ash, charcoal powder, etc. Used substrates should be burned, fumigated or disinfected with fungicides before reuse.
(6) Cutting
In cutting propagation, the length of the cuttings has a certain effect on the survival rate and growth rate. When there is less cutting material, in order to save cuttings, it is necessary to seek the most suitable specifications for cuttings. Generally speaking, herbaceous cuttings are 7-10cm long, deciduous dormant branches are 15-20cm long, and evergreen broad-leaved branches are 10-15cm long. The cuttings can be cut into a double-sided model or a single-sided horse ear shape at the bottom, or cut flat. Generally, it is required to be close to the node. The cutting should be neat and without burrs. Also pay attention to the polarity of the cuttings, and do not turn them upside down.
(7) Cutting depth and angle
The cutting depth should be appropriate. If the hard branches are inserted too deep in the open field, the ground temperature will be low and the oxygen supply will be insufficient; if they are too shallow, the cuttings will easily lose water. Generally, the top bud of hard branches is level with the ground when they are inserted in spring. The top bud is exposed to the ground when they are inserted in summer or in saline-alkali land. For cuttings in arid areas, the top bud of the cuttings is level with the ground or slightly lower than the ground. When inserting tender branches, the cuttings are inserted into 1/3 or 1/2 of the substrate. The cutting angle is generally straight, and the cuttings can be inserted obliquely if they are long, but the angle should not exceed 45°. When cutting, if the soil is soft, the cuttings can be inserted directly. If the soil is hard, you can first use this stick to make holes according to the spacing between plants and rows, and then insert the cuttings along the holes and seal them tightly with soil. You can also irrigate the seedbed with water once to soften the soil before inserting the cuttings. For cuttings that have been rooted, if the adventitious roots have exposed the epidermis, do not insert them hard, dig holes and bury them lightly to prevent root damage.
6. Post-insertion management
The survival period is when the lower part of the cuttings takes root, the upper part sprouts and leaves, and the new cuttings can grow independently. The key at this stage is water management, especially for green branch cuttings, it is best to have spray conditions. The nursery should be watered enough for cuttings, and water should be replenished in time according to the soil moisture during the survival period. After watering, the soil should be cultivated and loosened in time. Covering the soil with film after cutting is an effective water conservation measure. After the seedlings grow independently, in addition to continuing to ensure water, they should also be topdressed, cultivated and weeded. When the seedlings enter the hardening period and the seedling stems become lignified, stop watering and fertilizing to prevent the seedlings from growing too tall.
Rooting method of seedlings1. Mechanical treatment;
① Peeling: Generally speaking, fruit tree varieties with more developed cork tissue in branches are more difficult to root. Before cuttings, peel off the epidermal cork layer to enhance the cuttings' ability to absorb water and promote rooting.
② Longitudinal wound: Use a knife to cut a 2 to 3 cm long wound at the base of the cuttings, reaching the phloem, which can form neatly arranged adventitious roots between the longitudinal wounds.
③ Ring peeling: 15-20 days before cutting, ring peel a circle of bark (3-5 cm wide) at the base of the branches to be used as cuttings on the mother plant, which is conducive to promoting adventitious roots.
Generally, producers adopt outdoor seedling cultivation to develop scale and save costs. The following are the types of outdoor seedbeds:
1. Full matrix seedbed (soilless seedbed);
The full matrix seedbed is also called soilless seedbed. The bottom layer is made of cement or separated from the soil by plastic film. On top of it, a 10-15 cm thick gravel (or stone) is laid, and then a 10-15 cm thick layer of coarse sand (or half perlite and half coarse sand, or 1/3 perlite, coarse sand, and peat moss) is laid on the stone. For ease of operation, the width of the seedbed is generally 100-130 cm, and the length depends on the specific field.
The advantages of this seedbed are:
a. Due to isolation from the soil, microorganisms in the soil will not infect and harm the plant cuttings;
b. It has good water and air permeability, and will not cause suffocation due to excessive moisture;
c. Because it is mainly composed of inorganic substances, it is difficult for microorganisms to hide and disinfection is easy and thorough;
d. The seedbed can be used repeatedly, and 5-8 batches of seedlings can be grown on the same seedbed every year.
2. Transplant-free thin substrate seedbed;
Directly spread about 4 cm of coarse sand on the soil, insert the cuttings into the coarse sand, and after taking root in the breathable environment of the coarse sand, send them deep into the soil layer below.
The advantages of this approach are:
a. Save materials;
b. After the cuttings have taken root, you don't need to transplant them immediately. Let them grow in the soil until they are safely transplanted out of the nursery during the dormant period. The disadvantage is that due to contact with the soil, there are more microorganisms, so you need to pay attention to regular disinfection.
3. Container seedling cultivation;
Use a plug tray or seedling cup, put a substrate in it (usually 1/3 each of perlite, vermiculite, and peat), insert the cuttings directly into the substrate, and carry out soilless cultivation after they take root. After the seedlings are mature, they are sold with the container.
Advantages of this approach:
a. The substrate is used once and there will be no accumulation of germs;
b. Container seedlings are the trend of international standardized cultivation;
c. Container seedlings break the season for seedling sales and transplanting. They can be sold at any time and can be transported and transplanted over long distances at any time.
植物快繁苗床的類型和制作方法;
一般生產者都是采用室外育苗的方法以發展規模和節省成本,下面介紹室外苗床的類型:
1、全基質型苗床(無土苗床)
全基質型苗床又稱無土苗床,底層用水泥制作或用塑料薄膜與土壤隔開,其上先鋪厚度10-15厘米的碎石(或石子),石子上再鋪一層10-15厘米厚的粗沙(或珍珠巖與粗沙各半,或珍珠巖、粗沙、草泥炭各1/3)。為了便於操作,苗床寬度一般為100-130厘米,長度根據具體田塊而定。
這種苗床的優點是:
a、由於與土壤隔離,土壤中的微生物不會浸染、危害植物插穗;
b、透水透氣性很好,不會因水分過多而窒息;
c、因為以無機物為主,微生物難以藏身,消毒容易徹底;
d、苗床可以反復使用,每年能在同一張苗床上育苗5-8批。
2、免移栽薄基質苗床
直接在土壤上面鋪上4公分左右的粗沙,插穗插入粗沙之中,在粗沙透氣的環境中生根後向下面的土層中深紮。
這種方法的優點是:
a、節省材料;
b、插穗生根後可以不用急著移栽,讓她在有土的條件下生長,直到休眠期安全地移栽出圃。缺點是:由於與土壤接觸,微生物較多,要註意經常消毒。
3. Container seedling cultivation
采用穴盤或育苗杯,在其中放入基質(一般珍珠巖、蛭石、泥炭各1/3),插穗直接插入基質,待生根後進行無土栽培,成苗後連容器銷售。
這種方法的優點:
a、基質一次使用,不會有病菌累積;
b、容器苗是國際標準化栽培的趨勢;
c、容器苗打破了苗木銷售、移栽的季節,隨時可以銷售,隨時可以遠距離運輸移栽。
Cultivation and management of seedling materials;
1. Water management;
水分管理是快繁技術的核心,成敗往往就在於水分的管理。
通過育苗儀間隙噴霧的控制功能,使材料的葉片保持水分的平衡,不至於幹枯萎蔫。噴霧的最終目的並不是提高苗床基質的濕度,而是提高葉面的濕度。葉片的濕度能夠保持,苗床基質自然不會幹燥。
在每一個育苗者學習育苗的初期,間隔時間的長短最好通過多觀察而獲得相關感官知識和經驗。未生根材料的噴霧標準是:當上一次噴霧後葉片水分逐步揮發,到2/3葉片剛幹,1/3葉片仍然有水分的時候,開始下一次的噴霧。材料生根後,噴霧間隔的時間相對逐步延長。以次標準來設置育苗儀的間隔時間。嚴格地說,每種植物葉片的結構不同,水分揮發的速度也不一樣,因此開始育苗時多觀察是有好處的。每次噴霧的時間與噴頭種類有關系,標準是把葉片正好均勻噴濕。一般的噴頭只需噴5-10秒就可以了。
2、消毒殺菌管理
苗床基質消毒:在沒有植物的基質上消毒,可以使用高濃度消毒劑,如1%的高錳酸鉀等常規消毒藥物。每批苗木出圃之後都要進行一次比較細致的消毒,盡可能減少上一批育苗時殘留的有害微生物。
殺菌劑使用:育苗過程中,每隔5天噴一次多菌靈(或甲基托布津、百菌清、退菌特、根腐靈等廣譜殺菌劑)。對於易於發生特殊病害的植物則還應同時使用特效專用藥劑,如白粉病和黑粉病需要用粉銹靈,霜黴病需要用甲霜靈(疫霜靈、乙磷鋁)。
3. Lighting management
棚內育苗可以適當遮蔭,一般植物使用遮蔭率30%左右的遮蔭網即可,不要過分遮蔭。
全光照育苗則無須遮蔭,但要設置育苗儀的間隔時間更短以防止日灼燒苗。
4、溫度管理
自然溫度育苗:只需註意在夏季打開大棚的四周,註意通風降溫。加上噴霧本身的降溫效果,一般能夠獲得較好的育苗效果。大棚育苗在秋季11月份溫度下降時逐步封閉大棚,以達到增溫崔根促長的目的。
控溫育苗:冬季設置育苗儀溫度為25℃左右,當外界低於設置溫度時育苗儀會自動打開加溫設備(如地熱線等)。夏季將溫度設置在30℃左右,當外界溫度高於30℃時育苗儀會自動打開濕簾風機將溫度將到設置溫度。
5、營養管理
每隔五天噴一次低濃度營養液,生根前噴0.2%的磷酸二氫鉀(同時,每20公斤水中加入1克JH強力生根劑);生根後每隔3-5天噴一次0.2%的營養液(尿素50%、磷酸二氫鉀40%、復合微量元素10%)。
許多生根困難的樹種或品種,在采條之前事先對枝條進行必要的技術處理可以提高插穗生根能力。
黃化處理;
黃化處理能抑制生根阻礙物質的生成,增強植物生長激素的活性,同時又可以使插穗的木質化進度減慢,保持組織的幼嫩性。
方法:把要采用的枝條用黑色塑料袋或紙袋套住或對幼樹的小枝壓伏地面後覆蓋。
例如:柿樹和蘋果是被認為不能用組織進行繁殖的,而采用黃化處理後,生根率可以達到60%以上。具體方法:在開始發芽時,將一年生枝的先端芽剪去,留基部2-3個芽,用大一些的黑色紙袋套住枝條基部,讓芽在紙袋內長成15厘米長的新梢,此時可取下紙袋,並隨即用黑膠布裹纏每個新梢的基部(寬5厘米),其余部分裸露,待枝葉變綠後剪下新梢做材料。
環剝處理;
環剝能使枝條上部輸送來的碳水化合物和其他物質儲蓄在環剝口的上部,使生根所需的有效物質更充足。
方法:在新枝條的基部環狀剝皮0.5-1.5厘米,待15-20天後剪下扡插。
縛縊處理
用不易腐蝕的銅絲或鍍鋅鉛絲在枝條下部緊縛,勒進樹皮內,經過20天左右剪下扡插。
不管是什麽樹種,還應遵循以下原則,以提高繁殖的效率。
建立幼齡采穗圃; 如果有條件,最好引進采用非試管微組織快繁技術培育的母本。如果沒有,則應用1-2年生的實生苗建立采穗圃。由於幼齡樹生理代謝旺盛,細胞分裂強,體內含有的生根阻礙物質少,因此扡插成活率高。
培育幼齡枝條;
對母樹采用強剪截幹,重剪回縮等方法,抑制向高處生長,可以迫使產生許多直立的幼齡化枝條。
培育萌蘗枝條;
對一些闊葉樹種,每年將母樹重剪平茬,保留基部隱芽,讓其從基部長出許多萌條。
去掉花芽;
許多開花的品種應事先將枝條上的潛伏花芽及時去掉。
打頂; 打頂可以促進枝條的成熟,增加營養物質的積累。打頂有時還可以促進側枝的產生,增加更多的采穗材料。
以苗繁苗;
從原始親本上采集的插穗,一般生根能力不會太強,需要進行植物生長激素和其他許多物質綜合處理,同時還需要良好的插床和管理條件。采用扡插苗為母樹,將其枝條作為插穗(再插),經過多次、多年反復扡插,枝條生根會變得越來越容易。
The space where the in vitro material lives during the rooting process is called the environment. The rooting environment of the in vitro material includes temperature, humidity, light, air and rapid propagation matrix, which are external factors that have an important impact on the rooting of the in vitro material. As for the internal factors that affect the rooting of the in vitro material, their common meaning refers to the type, amount and regeneration ability of the rooting substances in the in vitro material. Without the existence of internal factors, the in vitro material will not take root. This is the main condition for the rooting of in vitro materials.
1. Comprehensive effect
The various factors in the rooting of in vitro materials are mutually influential and closely related. They constitute a comprehensive whole and play a comprehensive role in the rooting of in vitro materials. The formation of adventitious roots is the result of the comprehensive effect of many factors. For example, the carbon source content of photosynthetic products and endogenous growth hormones are comprehensive factors that promote rooting. However, for plants that are difficult to root, there is often a contradiction between these two factors. For example, in order to make the in vitro materials contain more carbon sources and stronger photosynthesis ability, branches with good growth and sufficient light on the periphery of the plant are usually selected as in vitro materials. However, these parts will produce more rooting inhibitory substances such as tannins, aromatic substances, chlorogenic acid, etc. due to light synthesis. Under the comprehensive effect of these two factors, producers have to conduct a comprehensive analysis to find an optimal balance point. These comprehensive factors can be adjusted through pre-cultivation of the mother plant or artificial measures, such as shading the mother plant garden, or spraying growth hormones and gibberellins to promote growth, which can optimize the appropriate ratio between these comprehensive factors and be more conducive to rooting.
2. Dominant role
Among the comprehensive effects of many factors on the rooting of in vitro materials, some factors are in a dominant position or play a dominant role in a certain development stage. At the same time, for the rooting of in vitro materials, the dominant factors are not fixed, but change with the rooting development stage of the in vitro materials. The dominant factors affecting the rooting of in vitro materials obtained from the same variety at different developmental stages are also changing and different. For example, the endogenous growth hormone of young material tissues is often sufficient, but the accumulation of carbon sources and the photosynthetic area are too small, which will also affect the rapid propagation of rooting. At this time, the carbon source becomes the dominant factor. In production, the adverse effects of insufficient carbon source on rooting can be compensated by treating the incision of the material with sugar or creating a high concentration of carbon dioxide environment. The mother tree can also be pre-treated. For the branches intended for rapid propagation materials, early pinching or spraying of dwarfing agents such as PP333 can be performed. If the mother plant is mature and aged, the branches and leaves need to have sufficient photosynthetic area and carbon source accumulation, but its endogenous hormone content is low. When such material propagates quickly, endogenous hormones become the dominant factor or limiting factor for its rooting. During production operations, the incision treatment concentration can be increased or the time can be extended, or exogenous hormones can be applied to the in vitro material in stages. It is best to increase fertilizer and water to promote growth during mother plant management, and spray hormones to promote the increase of endogenous hormones, so as to achieve the technical purpose of artificially regulating the dominant factors.
3. They cannot replace each other.
Although the rooting factors have mutual influence and close connection, they cannot replace each other. In the process of in vitro material rooting, various rooting factors are indispensable according to the rooting needs of the tree species. They each bear their own physiological functions and play a unique role, so that the in vitro material is in a normal physiological state. This is a necessary physiological phenomenon for the rooting of in vitro materials.
Among the many factors that determine the development and rooting of in vitro materials, it can be said that they are both relatively independent and mutually promoting. Whether it is the demand for nutrient carbon sources or mineral ions, or the regulation of various hormones and active enzymes, they are extremely important and indispensable. The existence of this indispensable and substitutable relationship requires people to learn to comprehensively judge and analyze the limiting factors that affect rooting during the production process, and weigh the relationship between various factors, so as to formulate rapid propagation plans and formulate auxiliary measures in accordance with the situation.
4. Adjustability of rooting factors
The rooting factors of in vitro materials are irreplaceable, but they can be adjusted in quantity. The rooting of in vitro materials has an adaptability range to the changing intensity of each rooting factor, which can only change within a certain limit. This shows that the quantity is adjustable or variable, but it cannot be exceeded. Exceeding this limit will not work on the rooting of in vitro materials, and some may even cause death. Among the many rooting factors of in vitro materials, the total amount of each factor and the ratio between them can be adjusted through artificial measures. This is the adjustability of rooting factors. It is precisely because of the adjustability of rooting factors that some extremely difficult to propagate varieties can be successfully propagated quickly, and the regulation technology can be used to achieve efficient and rapid propagation of all plants. In the regulation of rooting factors, usually the following factors need to be adjusted, such as the adjustment of carbon-nitrogen ratio, the ratio between endogenous growth hormone and cytokinin, the ratio between growth hormone and abscisic acid, the adjustment of rooting inhibitory substances, etc. These can be consciously adjusted during the management of the mother plant, and can also be managed and adjusted during the rapid propagation treatment or rapid propagation process, but it is best to adjust them during the management of the mother plant, which is the most effective.
Breaking the dormancy of deciduous fruit trees and protected fruit trees;
1. The concept of hibernation
Dormancy refers to the temporary cessation of visible growth of the meristem of any plant. It is only a relative phenomenon, not an absolute cessation of all life activities. It is a cyclical process in plant development. Dormancy is also a result of biological adaptation and domestication of plants to environmental conditions and seasonal climate changes formed during the evolution process. The release of dormancy and breaking dormancy are two different concepts. The former refers to the process from dormancy to full recovery of growth (a period of time), and the latter refers to the instantaneous state (time point) when growth begins to resume.
2. Cold temperature requirements of deciduous fruit trees (cold requirement)
1. Cold temperature demand
Low temperature induces dormancy, and the release of dormancy also requires low temperature. When fruit trees enter the natural dormancy period, in order to release the natural dormancy of the buds, they must go through a certain period of low temperature to make the buds undergo a qualitative change - sprouting. This certain period of low temperature is called the chilling requirement (
2. Factors affecting bud dormancy
1. Tree species:
2. Rootstock and scion: Tree species and different rootstock and scion combinations have different requirements for cold temperatures. Roots and rhizomes require low temperatures, and the root system passes through the interface to affect the germination of the scion buds.
3. Bud heterogeneity: leaf buds are larger than flower buds, lateral buds are larger than terminal buds (and vary with their location, growth potential of new shoots and location in the crown).
4. Scales: Removing scales can induce germination, which is especially effective for late-flowering varieties.
5. Leaves: Removing leaves during the growing season or due to pests and diseases can cause dormant buds in summer to germinate, because ABA content decreases, while GA and CTK content increases. Falling leaves in autumn can only break dormancy by accumulating low temperatures, and branches that fall leaves late in autumn need more low temperatures. N fertilizer and GA will cause more ABA accumulation, delaying leaf fall, resulting in delayed flowering the following year.
6. Environmental conditions: light, oxygen, temperature, adversity (low or high temperature, drought, cold damage, poisoning, defoliation)
3. Termination of dormancy and heat unit requirements
III. 1. Methods of breaking dormancy
1. Lime nitrogen As early as the 1860s, Japan used an analogue of cyanamide, lime nitrogen, to break the dormancy of fruit trees. In 1963, Kuroi et al. reported the effect of lime nitrogen on grape germination, and then lime nitrogen was widely used in grape germination.
2. Cyanamide: Experiments have shown that cyanamide has good effects on grapes, kiwis, apples, plums, apricots, and certain peach and pear varieties that require high cold, raspberries, and figs. In Brazil, 1% and 1.5% cyanamide treatment of Gala apples significantly increased the germination rate of lateral buds and terminal buds, and the number of short branches and inflorescences per plant also increased significantly. The older the tree, the more obvious the effect. However, different tree species and varieties have different effects on spraying cyanamide, which may be related to the early or late dormancy of fruit tree buds. Therefore, pay attention to the appropriate period when spraying cyanamide. Spraying too early or too late is not conducive to breaking dormancy.
3. Hormone substances: In the process of dormancy and dormancy release, most plants, in addition to obvious morphological differences, will undergo a series of changes in the plant body, among which the changes in the content of various endogenous hormones are the most significant. When deciduous fruit trees begin to dormant, the content of inhibitory substances in the tree body increases, while the content of growth-promoting substances decreases. Many studies have shown that when dormancy begins, the decrease in GA content in the tree body is often balanced by the accumulation of ABA. As dormancy is released, the ABA content gradually decreases, and the GA content gradually increases.
The use of exogenous GA3 has the ability to break the dormancy of fruit tree buds, but its effect is not generally effective. Treating peach tree buds that have not yet completed natural dormancy with 100 mg/L GA3 significantly promotes the germination of leaf buds, but the effect on flowers is poor. 100 mg/L zeatin and 6-BA can also promote the germination of peach tree buds that have not yet completed dormancy, but the effect is not as good as GA3. In addition, ethylene can break the dormancy of almond buds.
In addition, some growth retardants can not only delay the growth of fruit trees, but also significantly promote the budding of fruit trees. For example, applying B9 with high concentrations in autumn and low concentrations in spring can promote grape germination; paclobutrazol can also break the dormancy of fruit trees and promote budding.
Exogenous hormone (6BA) applied externally to the roots in late autumn can delay leaf senescence and dormancy, but the buds will sprout early in the greenhouse the following year with a high germination rate. ABA accelerates senescence and shedding.
5. Nitric acid substances: Nitric acid substances can also promote germination of fruit trees. Wang Yuetai et al. treated grapes with different concentrations of nitrates and found that ammonium nitrate treatment had the best effect on grape germination, and leaf expansion was 14 to 16 days earlier than the control. In addition, potassium nitrate can also break the dormancy of fruit trees, and even a concentration of 10% will not harm flower buds.
6. Physical methods of breaking dormancy
Temperature is an important climate parameter that affects bud dormancy, so many artificial measures to break dormancy of fruit trees are centered around temperature changes.
4. Measures to break dormancy in facility cultivation
1. Cold requirements and dormancy-breaking measures for greenhouse grape cultivation
In recent years, grape facility cultivation, especially forced cultivation, has developed rapidly and has become another way to get rich in some areas. Theoretically, for forced cultivation of grapes, the earlier the time of covering the shed, the earlier the time of maturity and listing, and the higher the benefit; but the time of covering the shed in facility cultivation is limited, and it is not unlimited and arbitrary. Because deciduous fruit trees have the habit of natural dormancy, as a kind of deciduous fruit trees, if the accumulated low temperature of grapes is not enough, it cannot reach its required cold amount and does not go through natural dormancy. Even if the shed is covered with heat preservation and the environment conditions suitable for growth and development are provided, the fruit trees will not sprout and bloom; sometimes, although they sprout, they often have negative effects such as unevenness, long period, low fruit setting rate, and serious physiological disorders. There is a common problem of improper shed time in production, especially premature shed covering, which leads to the failure of facility cultivation.
Different varieties of grapes have different requirements for low temperature through natural dormancy, which determines the shed covering time of different varieties in facility cultivation. The demand for low temperature is the primary basis for the time of covering the greenhouse. Only when the fruit trees meet their cold demand and cover the greenhouse after natural dormancy, can the protected cultivation be successful and the grapes can grow and develop normally under the conditions of the facility. In order to make the protected grapes quickly pass the natural dormancy, the greenhouse should be covered in advance to promote production as early as possible. In production practice, the "artificial low temperature centralized treatment method" is generally adopted. That is, when the average temperature in late autumn is lower than 10℃, preferably 7℃~8℃, the greenhouse is covered with straw or straw curtains outside the greenhouse film, but the placement of straw is exactly the opposite of normal protection; the straw is uncovered at night, the greenhouse vents are opened for low temperature treatment, and the straw is covered during the day and the vents are closed to keep the temperature at night. Generally, this method is used for centralized treatment for about 20 to 30 days, and then the natural dormancy can be successfully passed, and protected cultivation can be carried out later. However, it is worth noting that fruit trees are in a low temperature and dark environment for a long time, which will have a certain negative effect on the growth and development of fruit trees. Therefore, people are more concerned about how to use artificial methods to replace low temperature and break dormancy at any time, that is, fruit tree dormancy breaking technology. At present, the method of breaking dormancy with lime nitrogen is more accepted in production.
The scientific name of lime nitrogen is calcium cyanamide. The best application concentration is 20%, and 10% is also effective. When it exceeds 20%, it is easy to cause phytotoxicity. Grapes treated with lime nitrogen can germinate 20 to 25 days earlier than those without treatment. There are two preparation methods for testing. One is to put 5 kg of warm water at 40℃ to 50℃ into a plastic bucket or basin for each kilogram of lime nitrogen, and stir it continuously. It will be evenly pasted in about 1 to 2 hours to prevent agglomeration; the other is to weigh 1 part of lime nitrogen and 5 parts of water, dissolve the lime nitrogen in water, and stir it immediately. Generally, stir it once every 20 to 30 minutes. After stirring 4 to 5 times, let it stand for 6 to 12 hours, and take the supernatant for application. When applying, you can use an old brush or cloth strip to apply it. When applying, you should carefully and evenly apply the branches and buds. After applying, you can put the grape branches and vines on the ground in a row and cover them with plastic film to keep them moist. The application time is generally when the grapes are 2/3 into dormancy (around mid-December).
In actual operation, the following should be noted: the soil should be irrigated before treatment to increase humidity; pruning should be completed before treatment, and the cut should be dry; one week after treatment, if the branches are dry, they should be sprayed with water once to promote the absorption of lime nitrogen into the branches; another treatment is required if rainfall is more than 4 mm to 5 mm within 1 to 2 days after treatment; do not inhale the drug liquid and drug mist when spraying.
Cold requirements for greenhouse grapes (2-year-old)
Type of |
Jufeng Chana Early high ink Richard Matt Jingxiu Jingya Yatomi Rosa 8611 |
(II) Cold requirements and dormancy-breaking measures for greenhouse strawberry cultivation
Strawberry varieties require cold
Cooling capacity required | variety | Suitable cultivation form |
Dormancy shallow 50-100 | Chunxiang, Fengxiang, Shizuka, Sweet Charlie, Nvfeng, Mingbao | Forcing cultivation (winter greenhouse) |
Dormant Medium 200-500 | Baojiao Zaosheng, New Star, Goreira, Fegenia, Tudela | Semi-forcing cultivation (cold greenhouse) |
Dormant depth 600-1000 | Sheng Gang 16, All Star, Honey, Dana | Suitable for open-air cultivation |
To break the dormancy of strawberries: (1) Spray 10 mg/kg gibberellin 1-3 times before the flower buds emerge; (2) After the temperature drops below 5°C, spray 10 mg/kg gibberellin 2 times.
| Schematic diagram of 8*30 standard greenhouse rapid propagation seedling bed construction |
Practical young cutting seedling raising technology. For most tree species, in terms of large-scale production, the general operation methods are described according to the order of their cutting seedling operations. However, due to the differences in plant species, variety characteristics and the difficulty of cutting, there are corresponding changes in the specific practices. Different methods and measures are adopted to ensure the expected good results. |