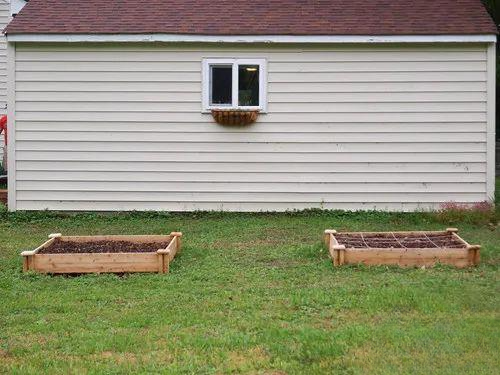
The UK is a country where "everyone is a gardener". Prince Charles and former Prime Minister Churchill are both veritable "garden masters". Today, when the epidemic is still not completely clear, gardening can allow you to feel the beautiful spring without leaving your home, and more importantly, it can help you maintain a good mood during the time at home. The following 22 tips are not only suitable for people who are not familiar with gardening, but amateur gardening masters can also learn something here.
Are your plants drooping and not growing? Even if they are placed in the best position and given enough water, they still don't seem to be growing. That's because your green babies need fertilizer. But you don't have to spend a lot of money or use chemical products. All you need is something you can find in your trash can.
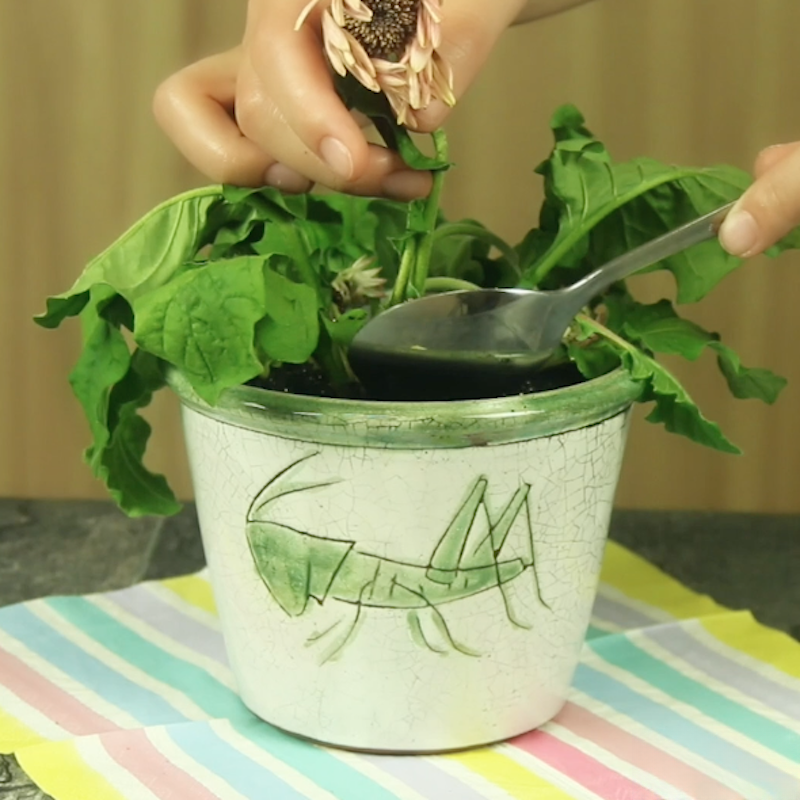
Cheap and nutritious fertilizerPlant an egg in the soil. This unique gardening trick will make your garden bloom!Anyone who has a green thumb knows that good soil is the most important element in gardening. However, not every soil is rich in nutrients, and this simple yet unusual technique will show you how to add the nutrients that plants need to their soil.Materials needed: flower pot, soil, raw eggsFirst, you need to know where you want to plant your plants. This location depends on the seeds you are using and the type of plants. Some may have to be in direct sunlight, and some must be in the shade. Once you have decided, that is where you will plant your eggs. Yes, you read that right, "plant" eggs.
It is well known that eggs are rich in many nutrients that plants also need. The limestone in the eggshell acts as a fertilizer, and the yolk is rich in calcium, which helps plants grow and ensures that their roots do not rot.Now pick up the flowerpot and fill it with about 5 cm of soil. Then crack the egg (a bad egg with a cracked shell will also work), place it in the middle of the flowerpot and cover it with soil. The egg will decompose in the flowerpot and turn directly into fertilizer. The key is not to place the egg at the bottom of the pot, and do not let it directly contact the roots of the plant.Tip: Some gardening experts have discovered that bananas are also a good fertilizer. Give it a try!Now is the time to plant them according to the instructions on the seeds.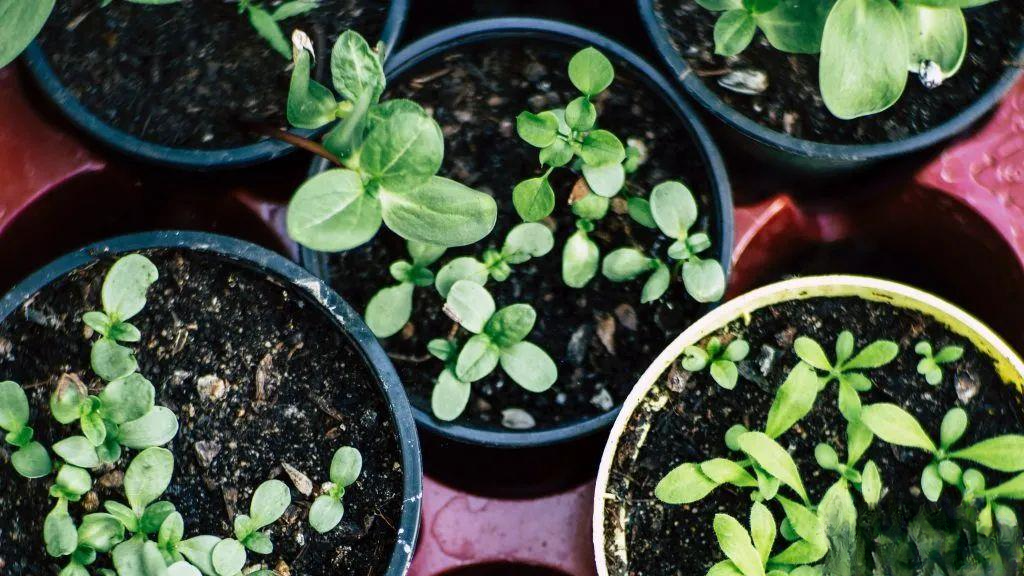
Next is to wait for the plants to start sprouting, which usually takes a while, but patience is rewarded and when they pop out of the soil, you will have a super healthy plant.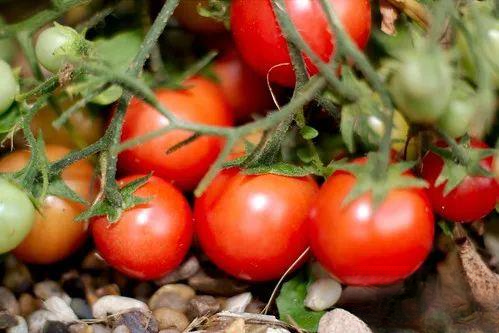
The special thing about this trick is that you can use bad/old eggs that have passed their expiration date. This way you won't waste any of the egg's value! Try it!
Do you want to grow your own fruit? These 8 tips will make your dream come true. From strawberries to mushrooms or pineapples, you can grow anything!Home becomes orchard
8 kinds of fruits that can be grown in pots
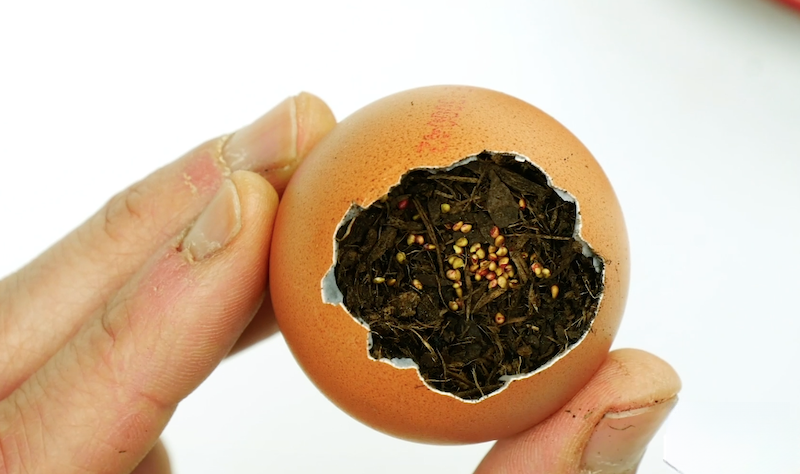
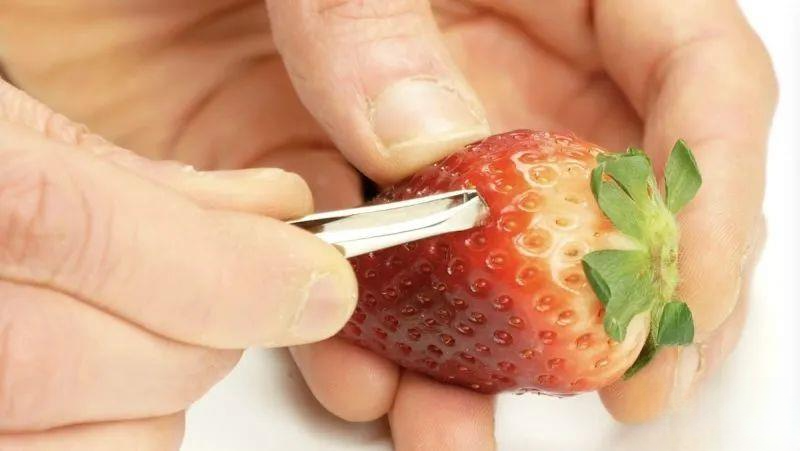
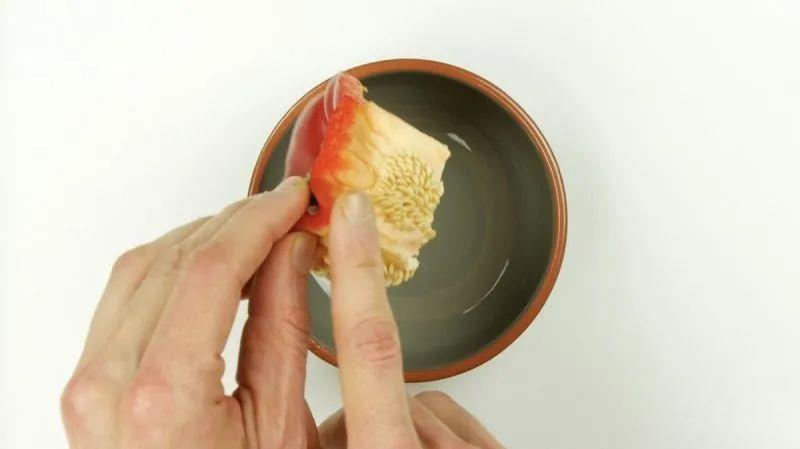
Strawberry - Materials required: 1 strawberry, 1 egg, potting soil, tweezers.Take out a ripe strawberry and use tweezers to remove the small yellow seeds on its surface.
Tap the top of the egg to break it open, then pour out the yolk and white.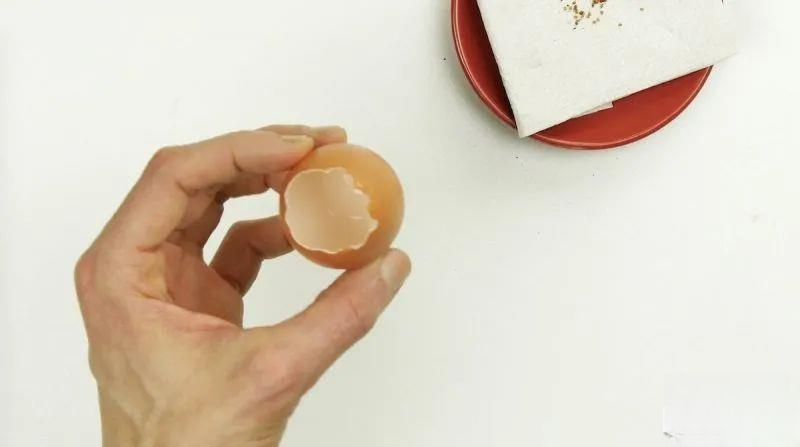
Fill the egg with potting soil and place the small yellow seeds.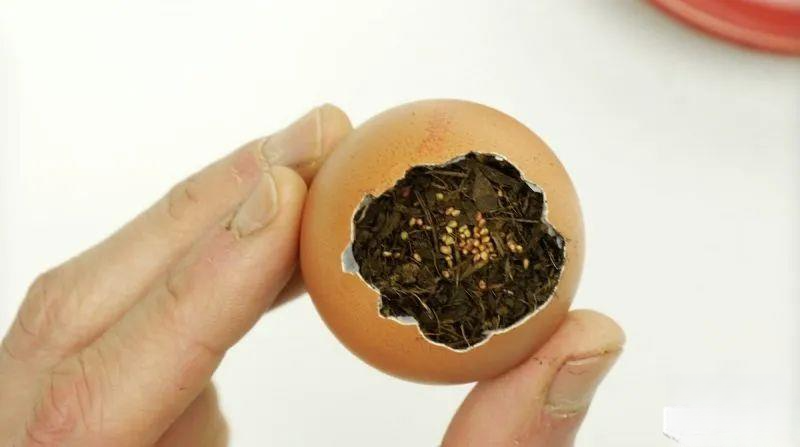
Keep the soil moist and transplant the strawberries once they are large enough for the garden.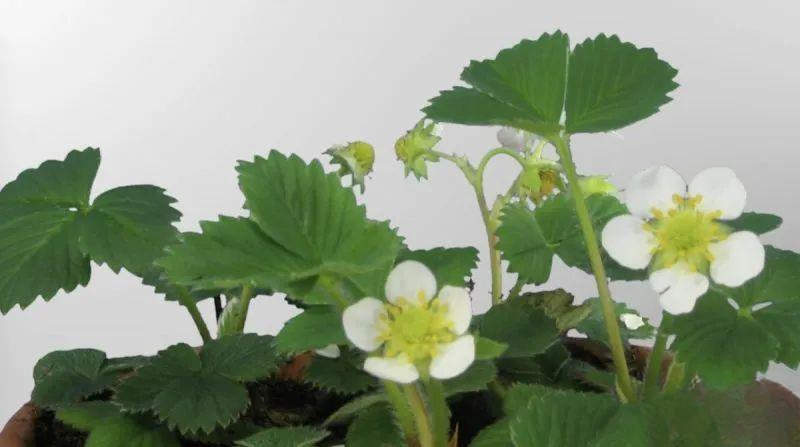
Mushrooms – Materials needed: coffee grounds, mushrooms, coffee filters, rubber bands, toothpicks.Pour the coffee grounds into a glass.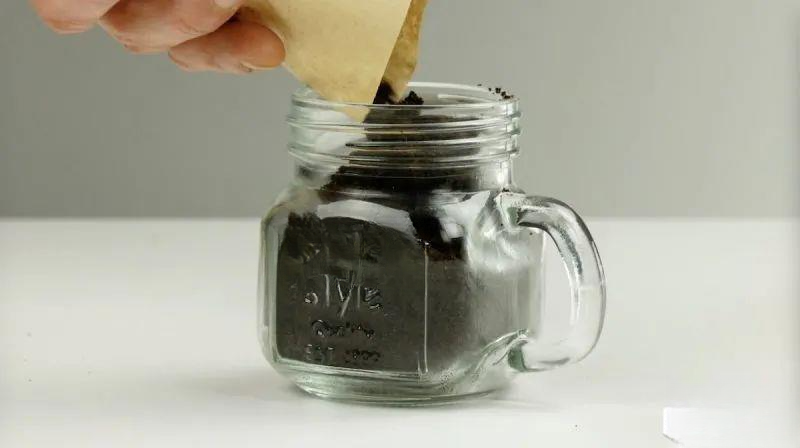
Separate the stem of one mushroom and place it in the coffee grounds.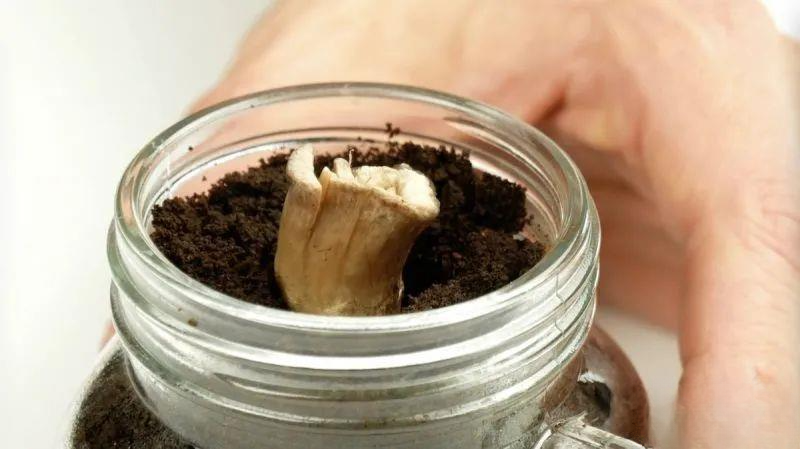
Place coffee filter over the top and seal with a rubber band.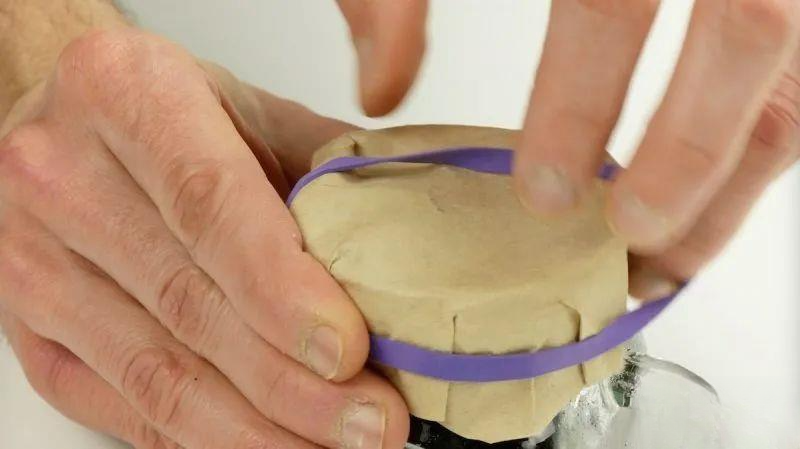
Poke multiple holes in it with a toothpick.
Place the jar in a cool place. After about three weeks, a new mushroom should emerge from the stem. If you use a larger container and add more mushroom stems, you will have plenty of delicious mushrooms ready to enjoy in about three weeks.
Raspberries – Materials needed: 1 handful of raspberries, 1 egg, water, sieve.Place the raspberries in a sieve and squeeze out the juice with a spoon.
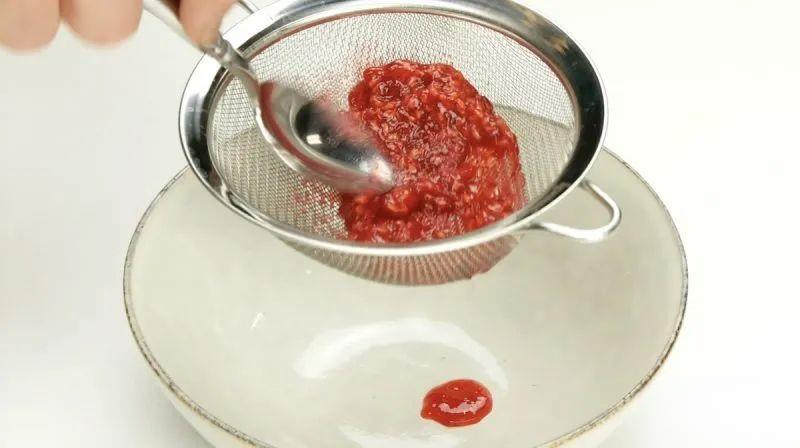
Pour water through a sieve to squeeze out more pulp. Then dry the raspberries.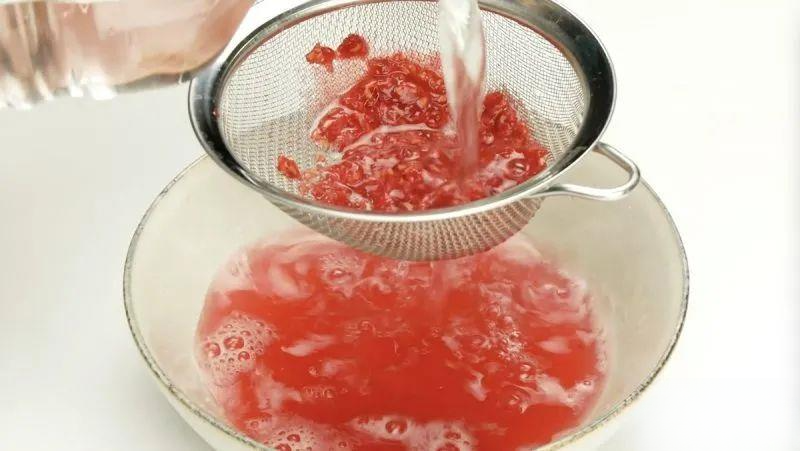
Hit the top of the egg to break it open and pour out the yolk and white. Fill the egg with potting soil and top with the dried raspberries.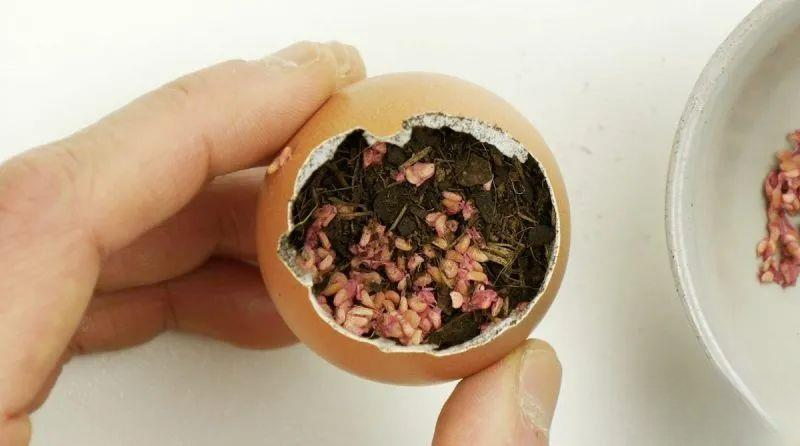
Now place it in the sun, keep the soil moist, and wait until the raspberry plant sprouts before transplanting it into a pot. Continue planting and nurturing, and soon it will bear delicious fruit.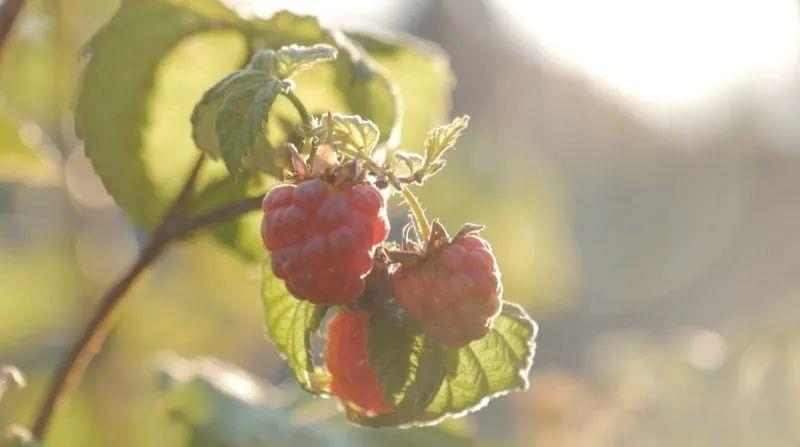
Pineapple - Materials needed: 1 pineapple, 3 toothpicks, 1 cup of water Cut off the top of the pineapple and remove the leaves.
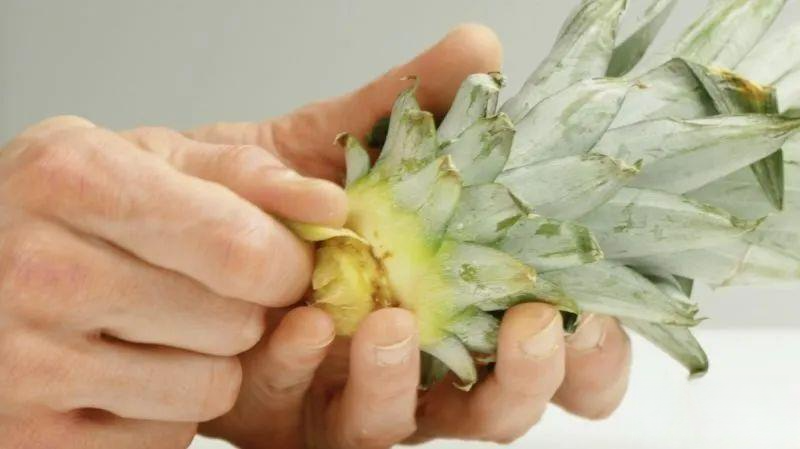
Now stick a toothpick into the pineapple head and place it in a glass filled with water.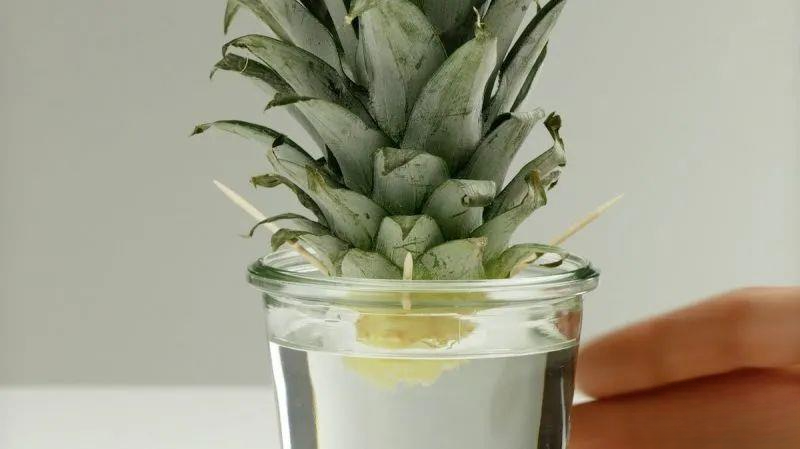
Allow the sprouted bromeliad to sit in water for about eight weeks before transplanting it. With a little patience, you will soon be able to harvest fruit.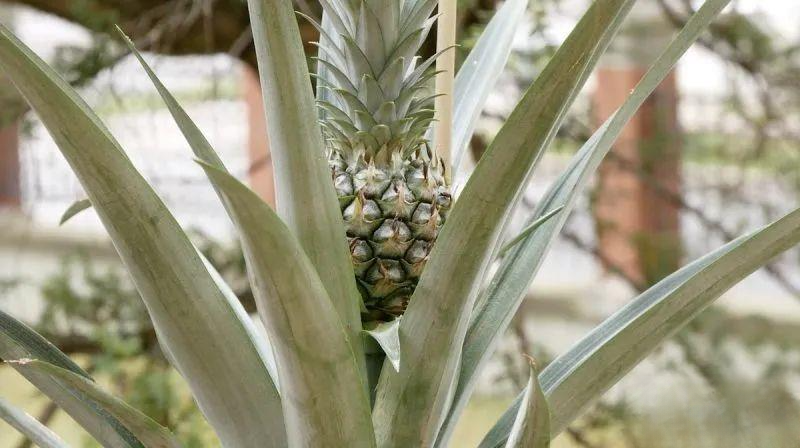
Bean sprouts – Materials needed: 1 handful of mung beans, water, silk cloth, 1 rubber band.Place the mung beans in a glass and fill it with water.
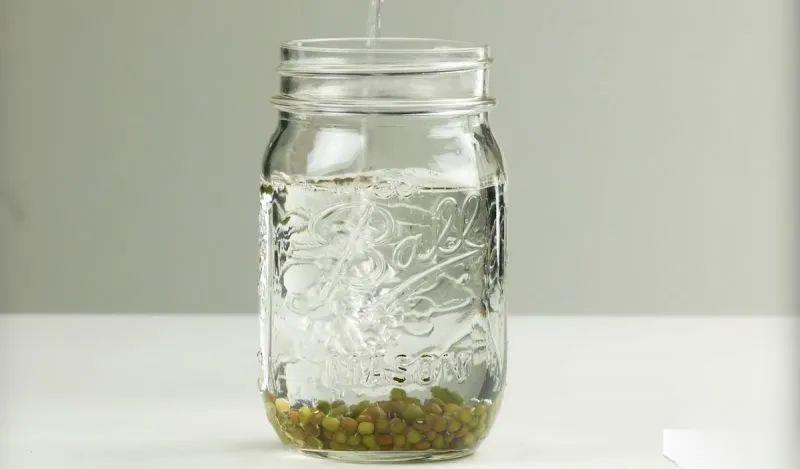
Cover with silk cloth and seal with a rubber band.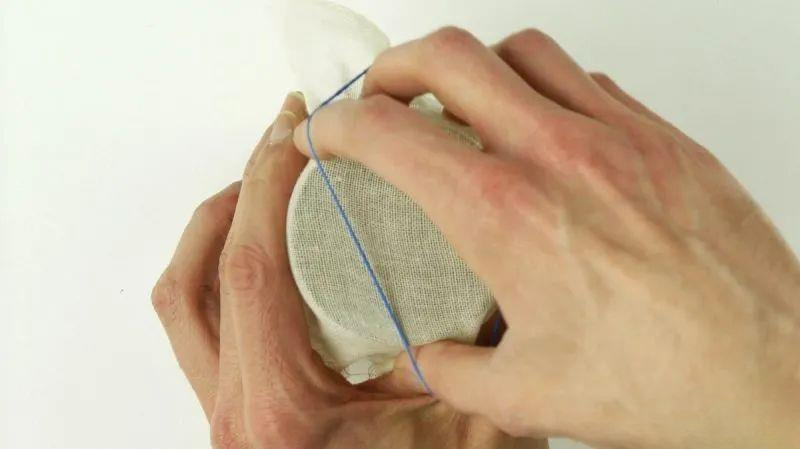
Let it sit for a few days to allow the mung beans to swell and turn into delicious bean sprouts.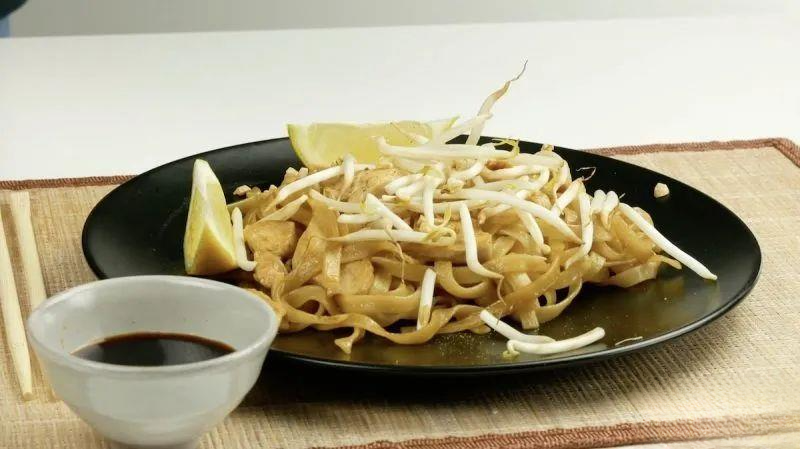
Avocado – Materials needed: 1 avocado, 3 toothpicks, waterCut the avocado in half and remove the pit. Then insert a toothpick into the pit and place it in a glass filled with water. Note: The top third of the pit should be above the water surface.
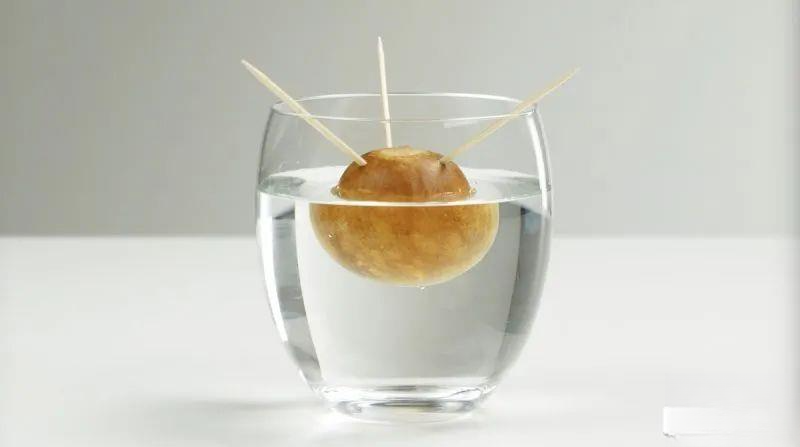
Keep it in water for about 8 weeks, then transplant it.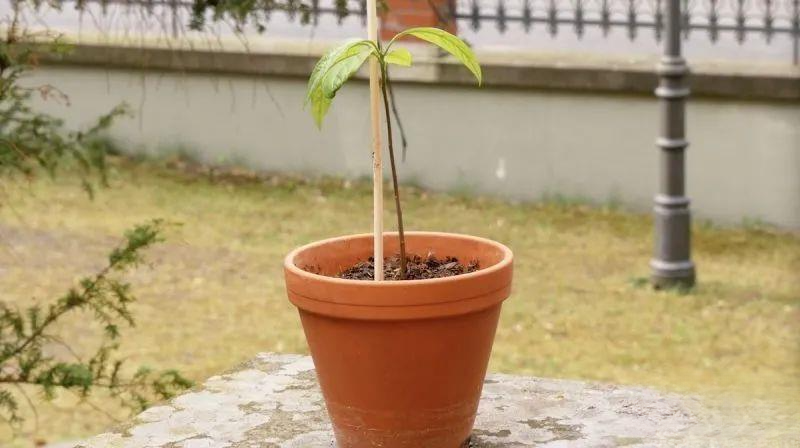
Bell pepper ——Materials required: 1 bell pepper, 1 eggCut the bell peppers and remove the seeds.
Tap the top of the egg to break it open and pour out the yolk and white. Fill the egg with potting soil and add the bell pepper seeds.
Keep the soil in the eggs moist for about two weeks, then transplant along with the eggshells.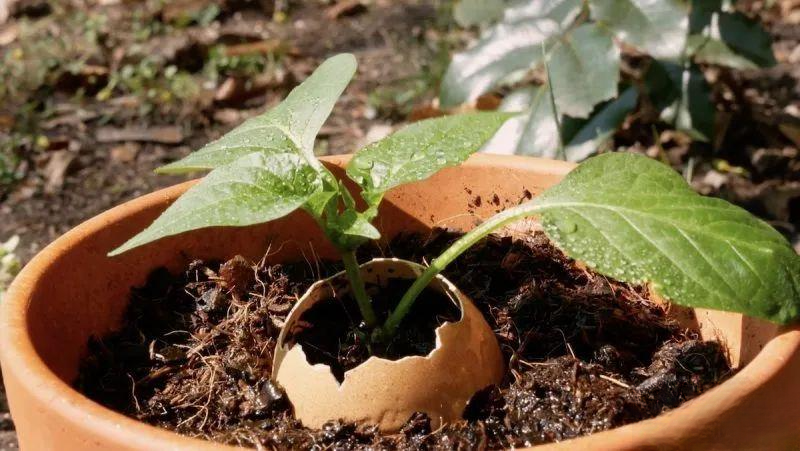
Lemon - Materials required: 1 lemon, 1 eggCut the lemon in half and remove the seeds.
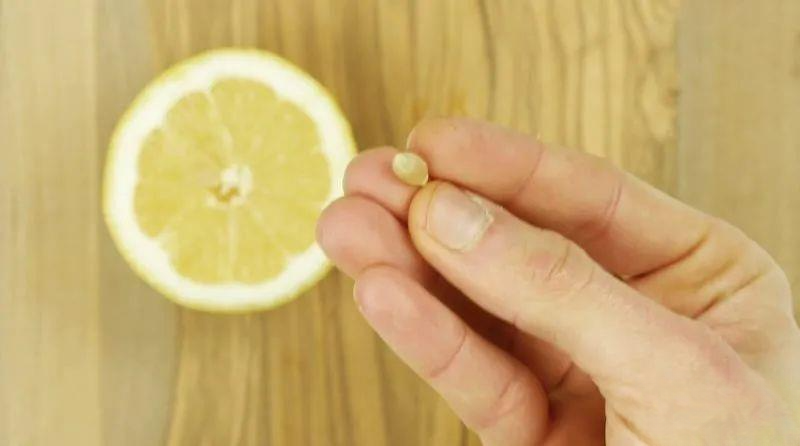
Tap the top of the egg to break it open and pour out the yolk and white. Fill the egg with potting soil and add the lemon seeds.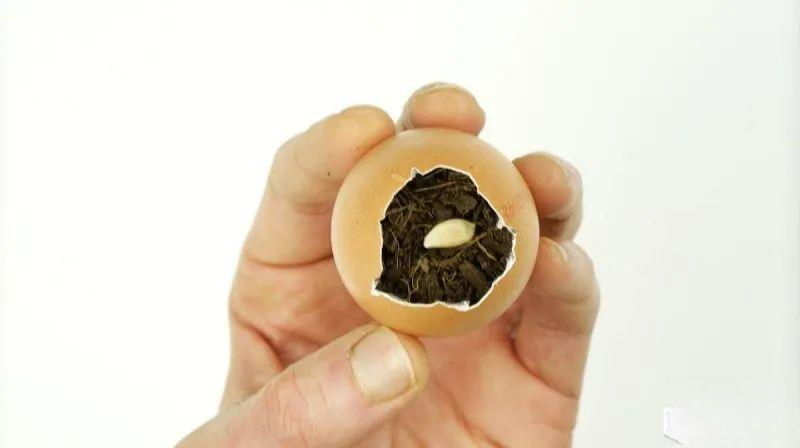
About two weeks, then transplant with the eggshell. With proper care, it will soon bear fruit.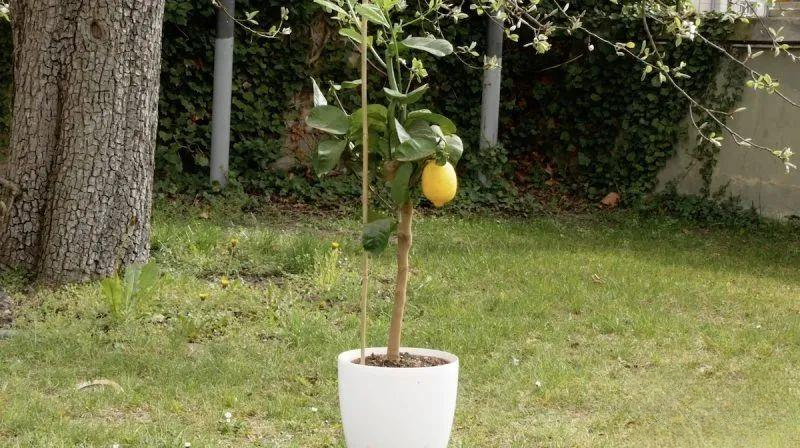
With these tips, your garden will be filled with abundant fruit that is both juicy and safe!Growing Roses from Potatoes
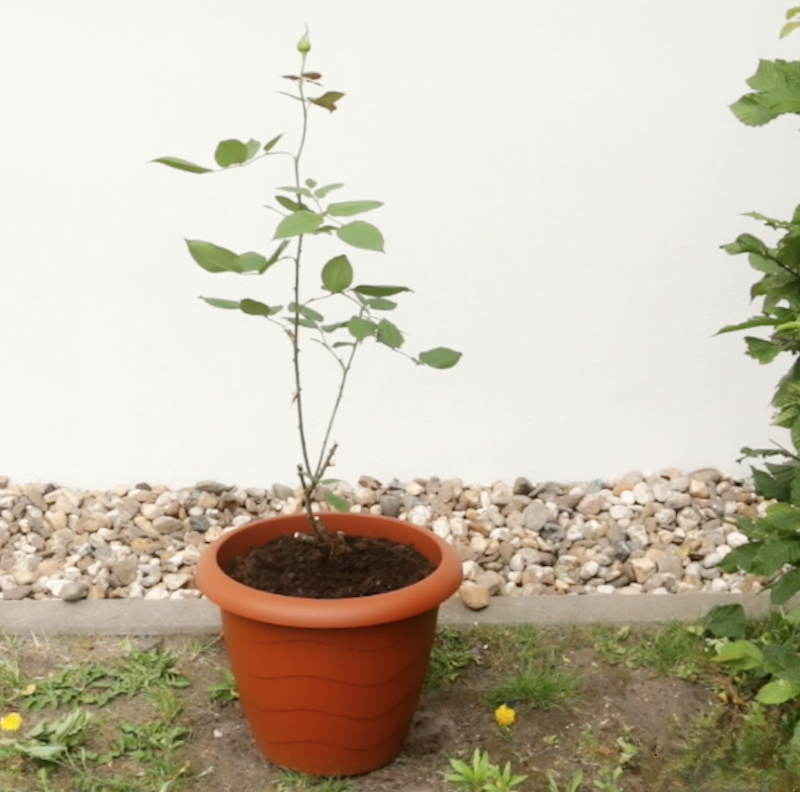
Regardless of the festival, a bouquet is one of the safest gifts, especially on Valentine's Day, when roses are indispensable. But flowers have a disadvantage: they wither in just a few days! You try your best to freeze the beauty of the flowers in an instant, but no matter how you water them, the life of the flowers in the vase is limited. Using this little trick, you can extend their life in a special way.Materials required: roses, potatoes, drill, flower pots, soil, mineral water bottles.Choose the roses you want to plant in the pot, remove the rose flowers and thorns, and remember to pick off the leaves, leaving the rose stems. If they are too long, remember to cut them.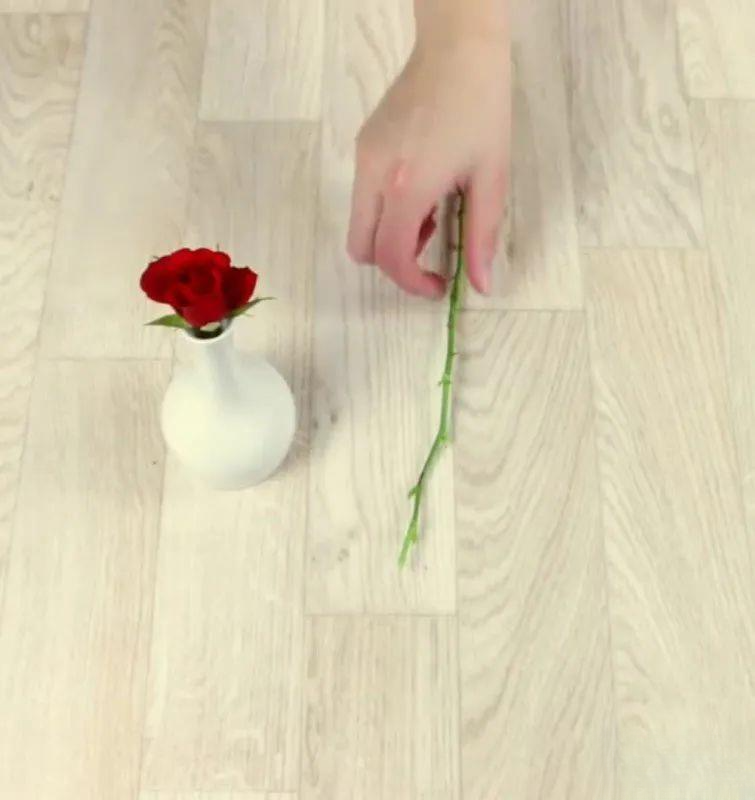
Now drill a hole in the potato with a drill. The hole should be the same size as the rose stem. Note: The rose stem should be completely fixed inside and not swing.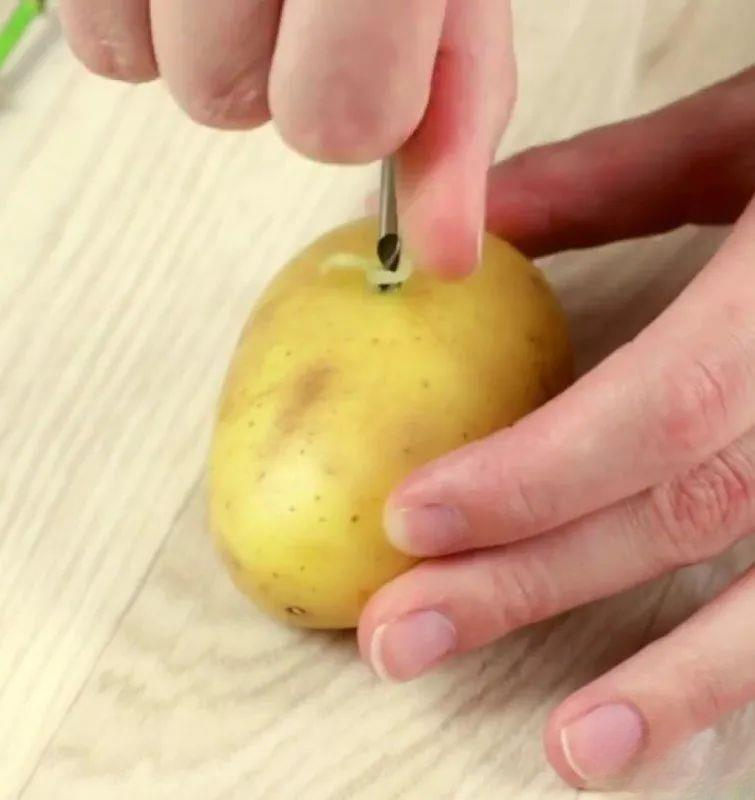
Fill the pot with soil to about 5 cm high, then place the potato with the rose stem in the middle.
Then pour in soil to fill the pot.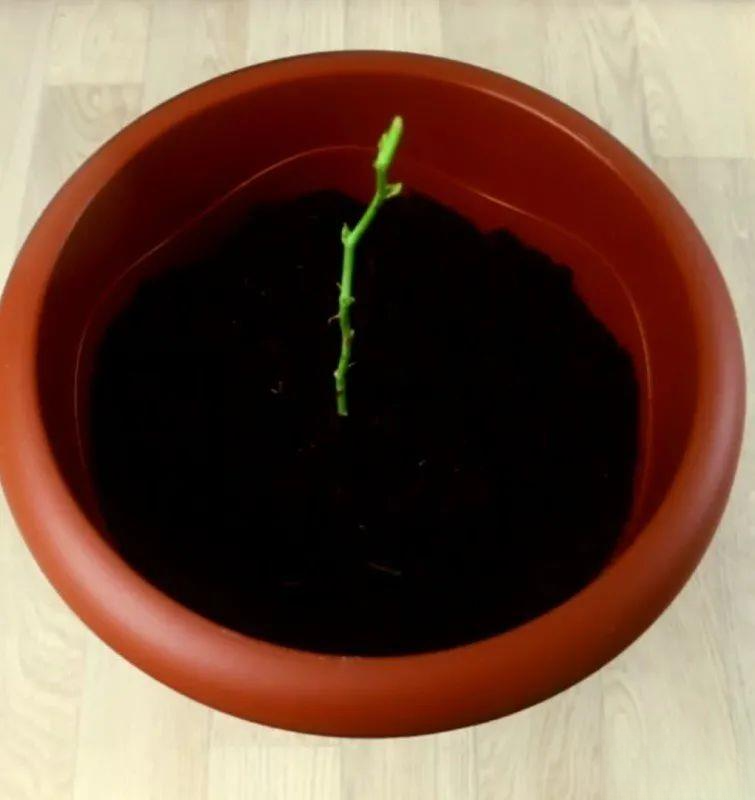
Now you need to build a small greenhouse for your rose stems. Cut the 1/3 of the spring water and cover the rose stems with the opening. When you water, do not pour the water into the bottle, but pour it into the soil around the bottle.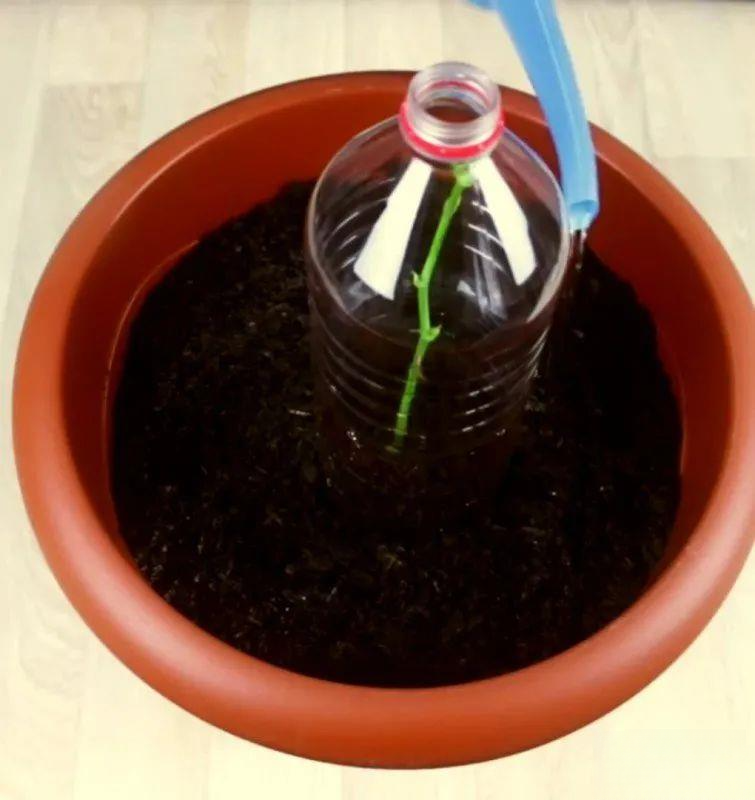
From now on, your rose will grow safely and comfortably in its little greenhouse. Soon, you will see new shoots.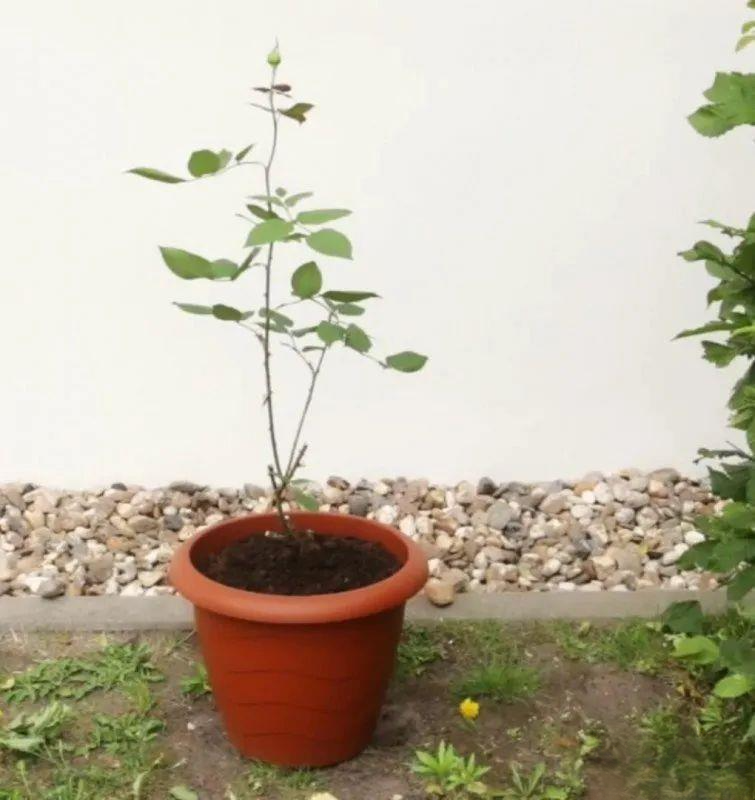
You can try this method with all kinds of roses. If it doesn't work at first, don't worry: they won't grow up overnight, and you need some patience. Roses represent true love. After learning this method, you don't have to worry about the roses you receive withering or throwing them in the trash. Keep them fresh with your love!Fairy tale world in a flower pot
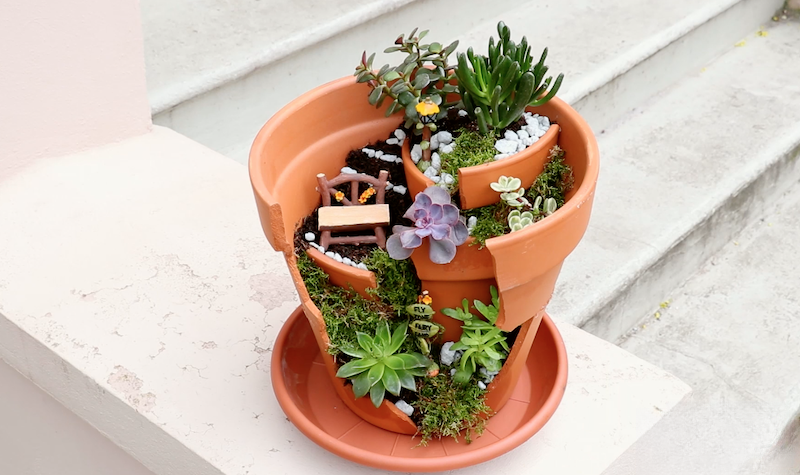
In most cases, there is only one place for a broken flower pot to find its new home: the trash can. But its fate doesn’t have to end this way! Next time you have a broken flower pot, you can try to turn it into a wonderfully charming decorative piece.When you see this, do you want to smash a flower pot at home? With this cute outdoor decoration, you may have some very special little visitors... fairies?
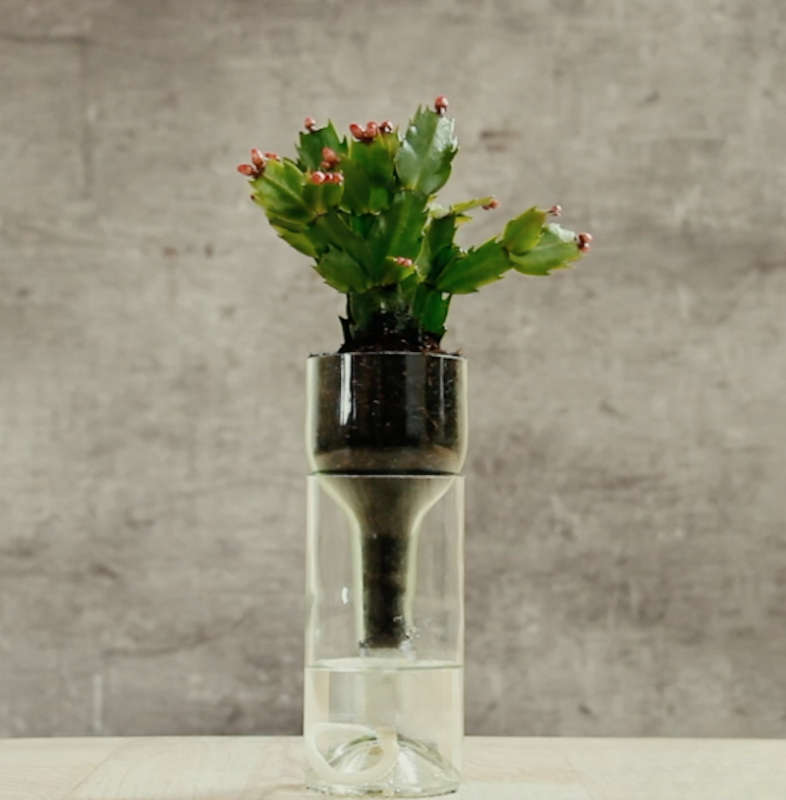
Self-watering flower pots are a great helper on vacation. You can make your own water-absorbing glass vase using an empty glass bottle: Use a glass cutter to make a circle on the glass where you want to cut. Pour ice water over the cut, then pour hot water. The temperature will cause the glass to break along the cut. Use sandpaper to smooth the cut to avoid hurting your hands. Use a shoelace to pass through a perforated cork and then insert it into the bottle. Place the top half of the bottle upside down on the bottom of the bottle. The top is ready for planting.Everyone who has plants at home must have experienced this situation: because of something, you are away from home for a while, maybe two or three days, or maybe a week. When you return home and open the door, you see dry and dying plants crying to welcome you!Some people may stubbornly insist that these plants are hardly dead and will revive again, so they immediately "replenish" them with large amounts of water, but often they still cannot be saved.Here's a little trick that will solve this dilemma: your plants will always have water and stay fresh whether you're home or not.Materials needed: empty glass bottles, a machine for cutting glass bottles (wine bottle cutter), boiling water, sandpaper, cork, drill, cotton thread (about 15 cm long)The glass bottle is placed on a glass bottle cutting machine so as to be cut into two halves.
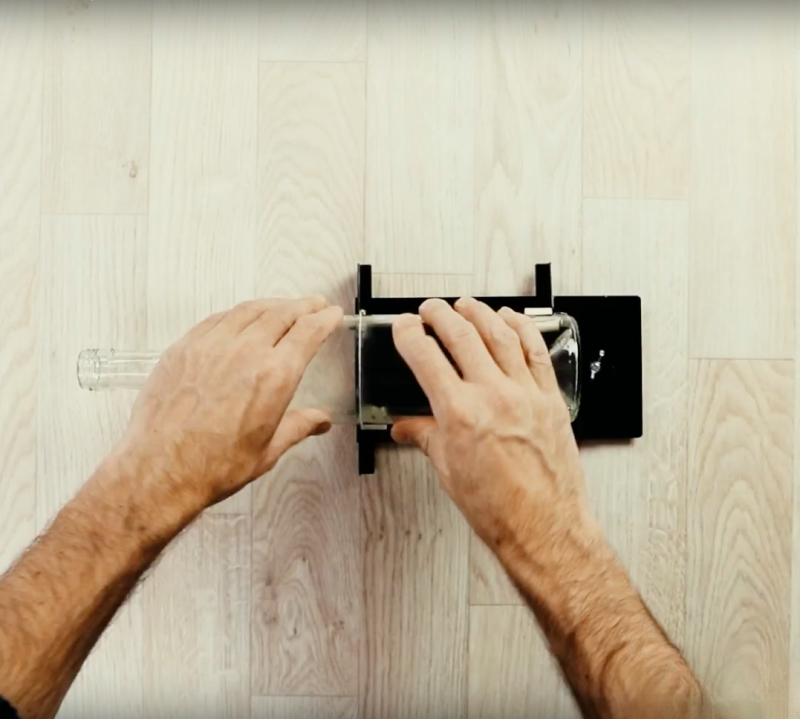
Hold the glass bottle and slowly rotate it to create a cut in the bottle.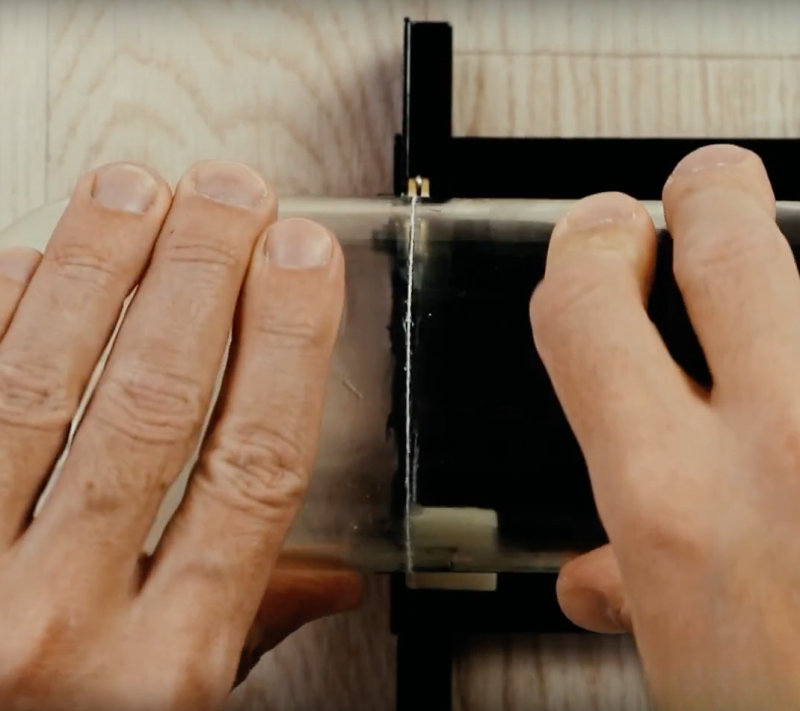
Now place the bottle in a sink or large bowl and run hot water over the cut lines from the previous step. (Be careful not to burn yourself!)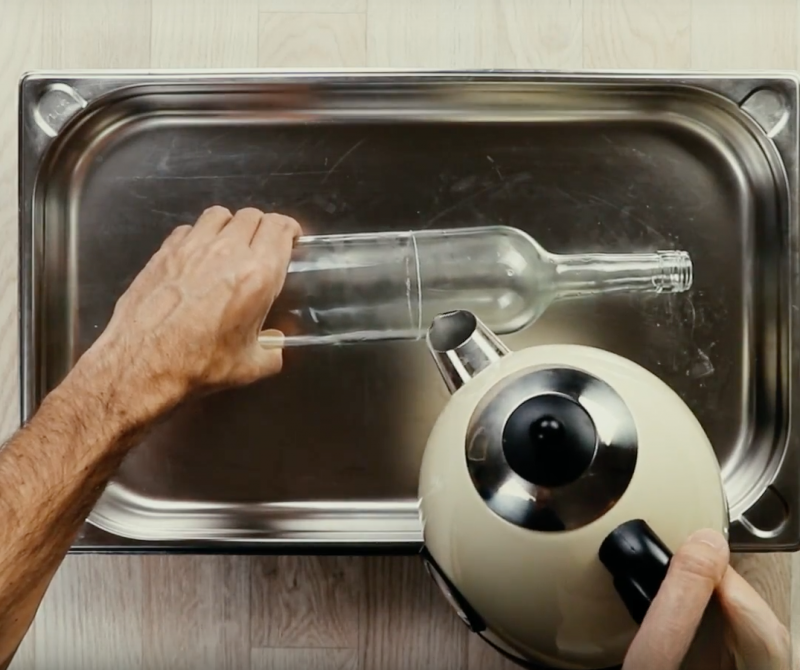
Now switch to cold water and run it over the cut line.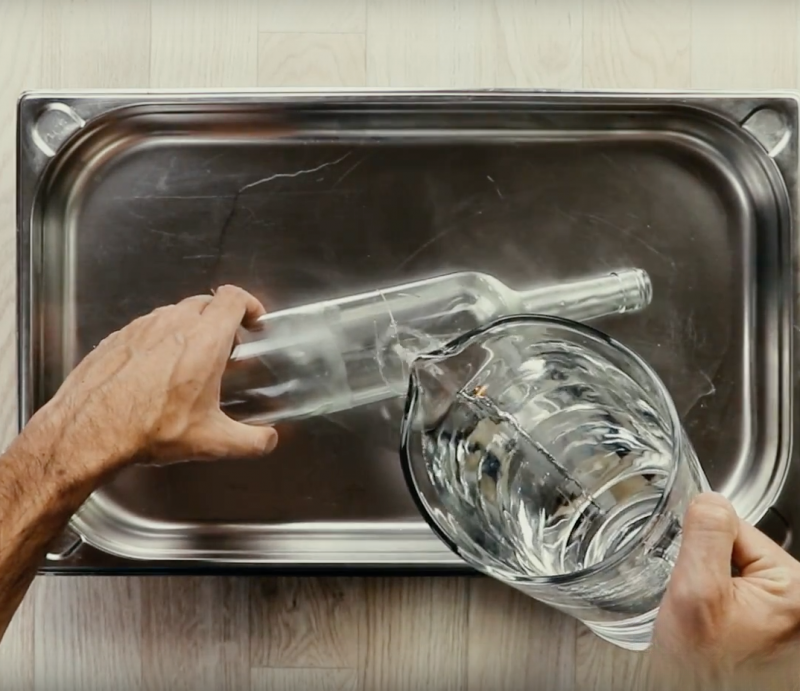
Yes, you guessed it, use hot water again. Usually the glass bottle will break along the cut line at this point, and the neck of the bottle will fall into the bowl or sink.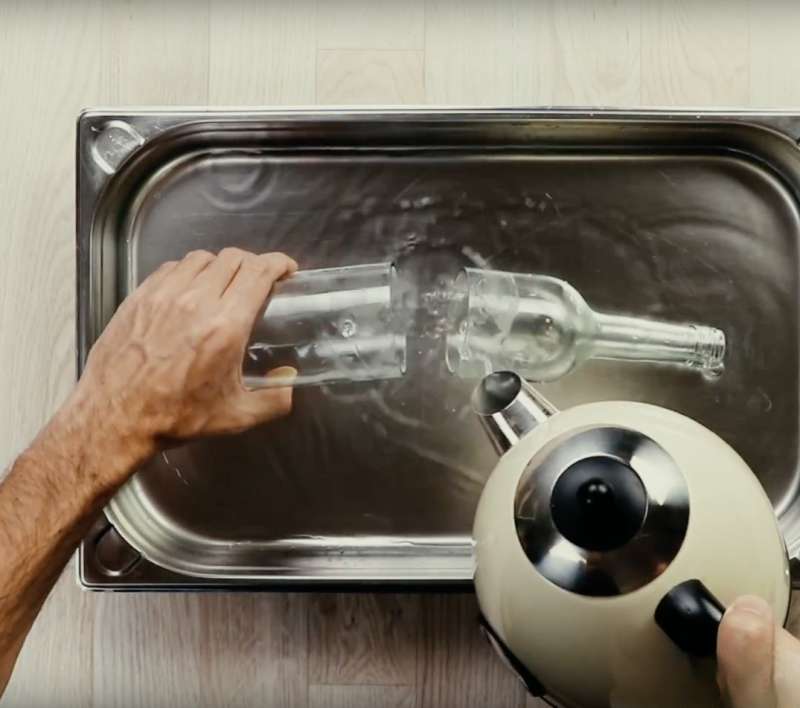
After the glass bottle is broken, use sandpaper to grind the cut surface until it is smooth and neat.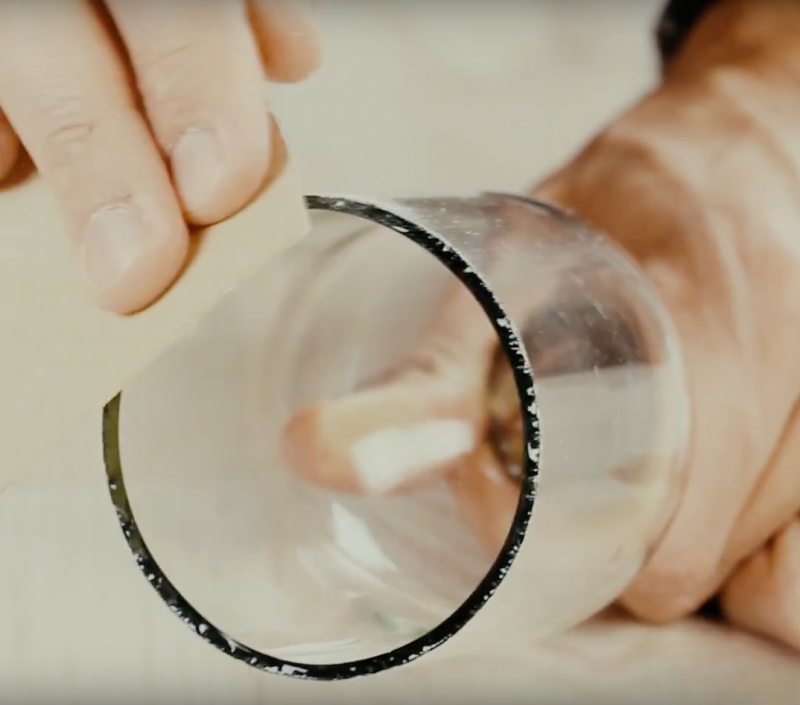
Make a hole in the center of the cork, about 0.3 to 0.4 cm in diameter.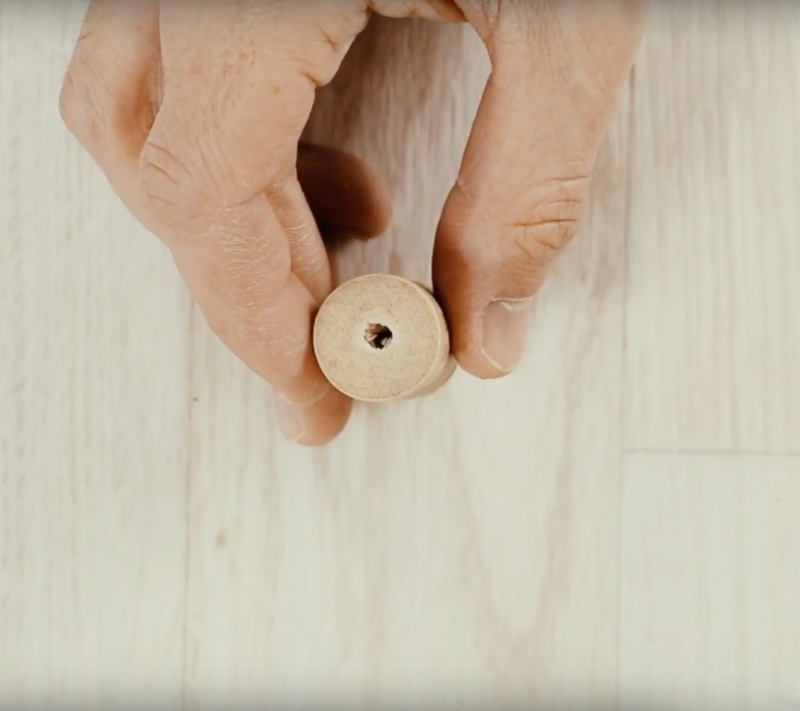
Pass the cotton thread through this hole. Note: the cotton thread protruding on the upper and lower sides must be the same length.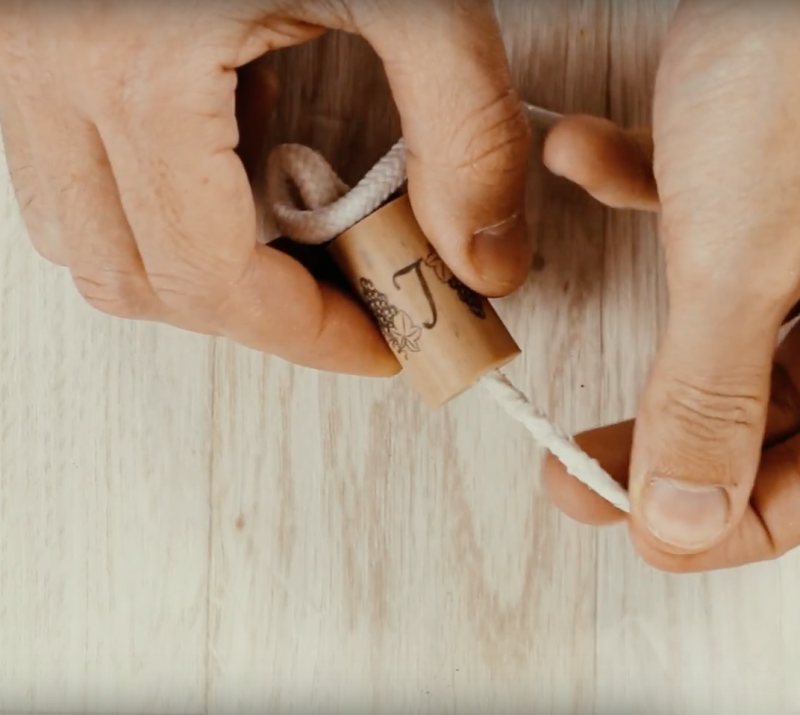
Insert the cork with cotton thread into the mouth of the glass bottle, and put it upside down into another glass bottle (with a bottom), and then pour water into the glass bottle with a glass bottom.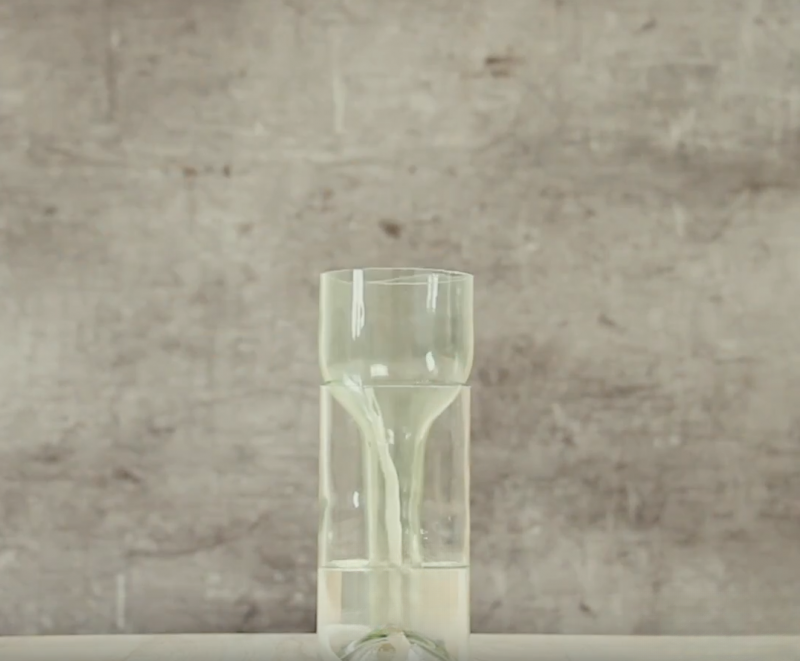
Now all you have to do is transplant your favorite plants and soil into the inverted glass bottle.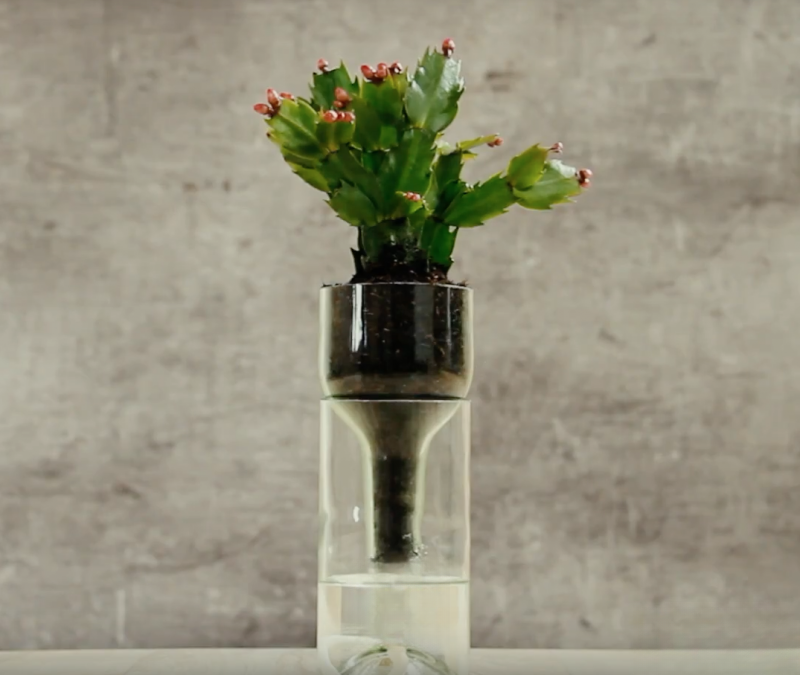
That's it, done!
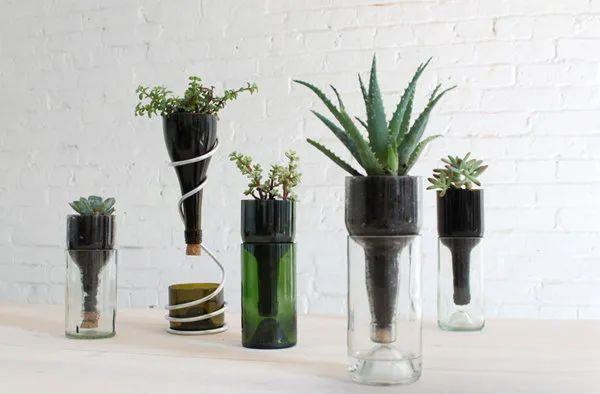
Not only will this protect your plants from drying out and dying, it will also add a different touch of decor to your home. Have fun!Kitchen waste becomes fresh foodThere is no food healthier than fruits and vegetables grown by yourself. You know where they come from and whether they are treated with pesticides. Everything is fresh and organic! However, it is rare to have the opportunity to grow fruits and vegetables in the city, unless you live in the countryside. However, the little trick I will teach you today does not require vegetable seeds, but only some soil and a pot to enjoy fresh and crisp vegetables.Cut off a 5 cm length from the root of the stem and place it in a bowl filled with water, with the root side facing downward. Soak it for five to seven days before planting.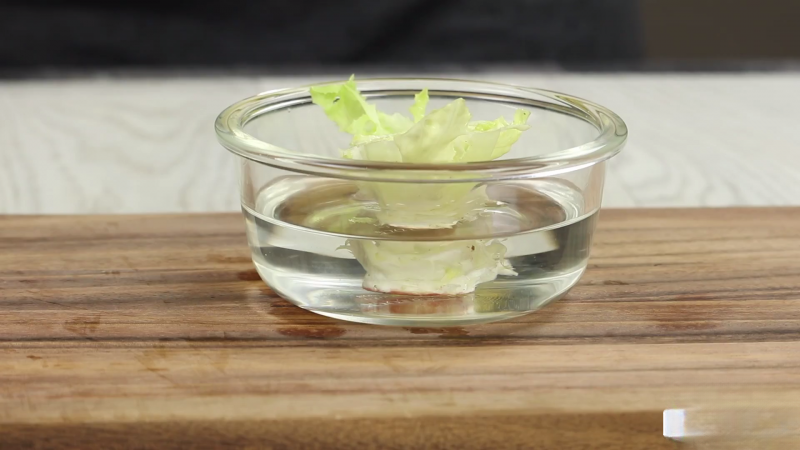
To reuse the mint leaves, you must have leaves left on the stem. When the stem is placed in water, new roots will quickly begin to grow. Once the mint roots are 5 cm long, transplant them into soil.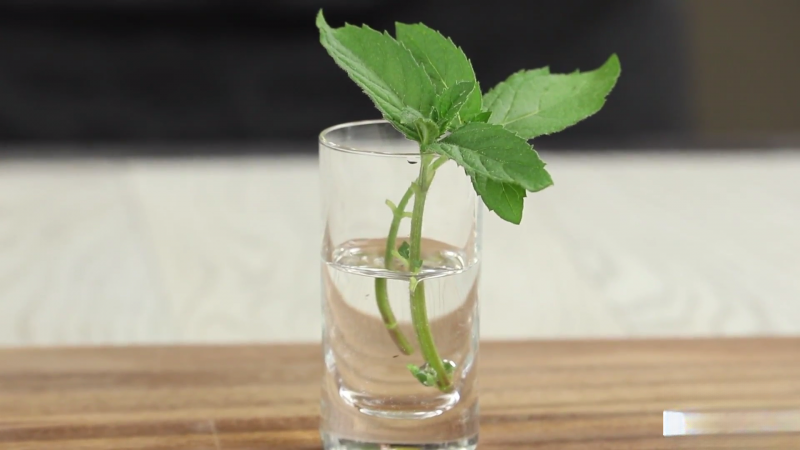
To reuse the green onion, cut it off about 3 cm above the root. Then soak the root in water for 5 to 7 days and then transplant it into soil.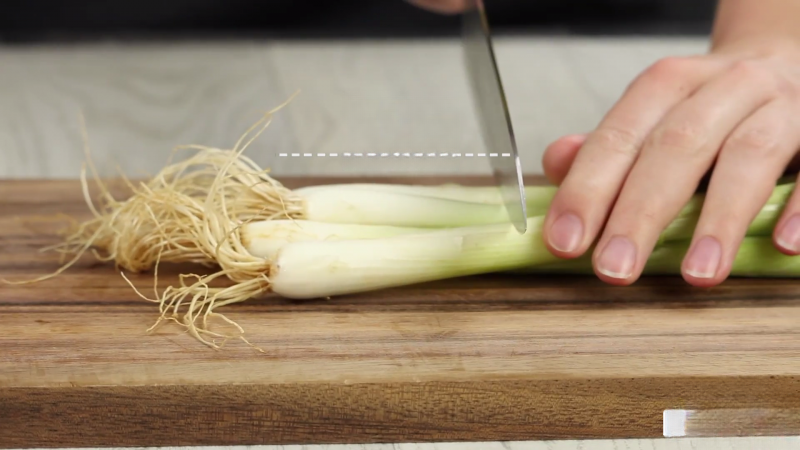
The situation with celery is the same as that with onions, except that the cut length should be about 5 cm longer. 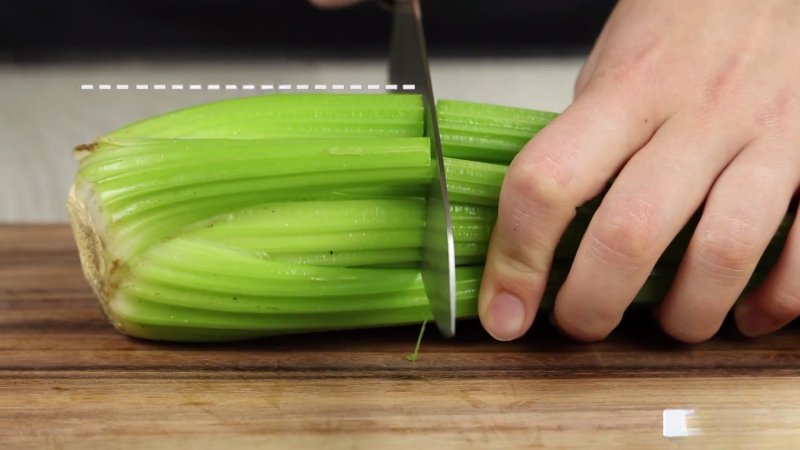
If you want to grow basil, keep the pair of leaves on the stem and place it in water. Once the roots are 5 cm long, you can transplant them.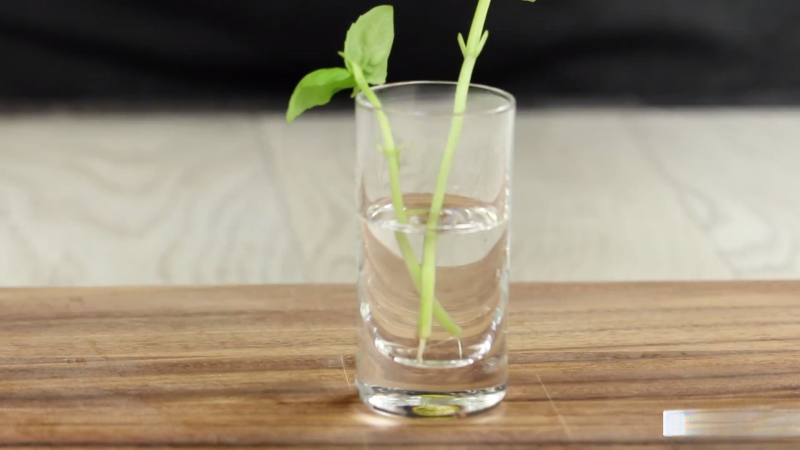
To plant onions, they must be cut in a special way (see video). Then they are placed root-side down in the soil and covered with a thin layer of soil.
To grow garlic, simply place peeled garlic cloves in the soil.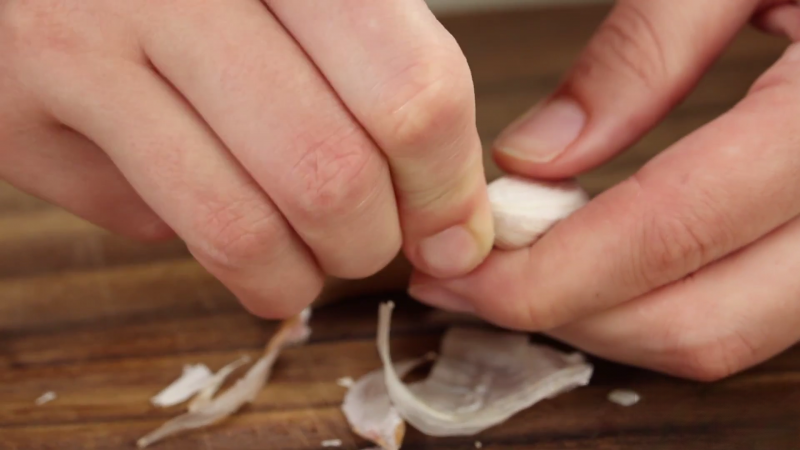
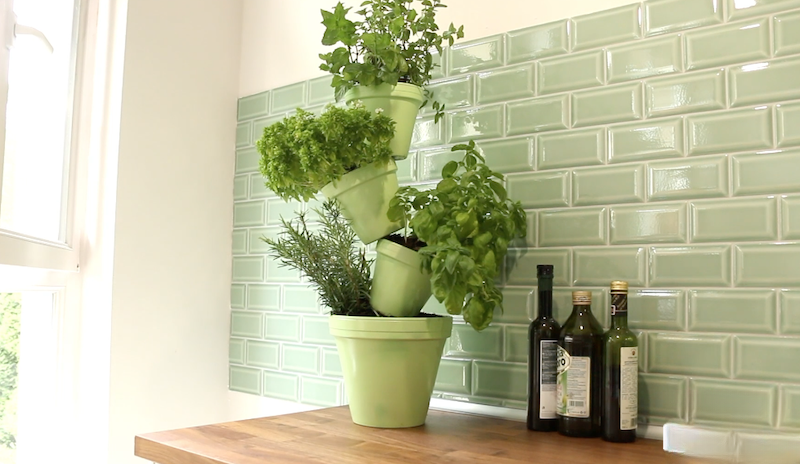
Remember, organic waste can be recycled. If everyone remembers this and follows it, it is one of the best ways to love the earth.Baking food with fresh spices is a pleasure. However, not everyone has a garden to grow them, or enough space in the kitchen. Today's DIY will solve both problems. Basil, mint leaves, basil, rosemary, what's the problem! Come and see how to make this space-saving herb garden.Materials needed: 1 large flower pot, 3 small flower pots, 1 70 cm long bamboo pole, spray paint (color depends on personal preference), hot melt glue, bracket, spices or flowersSpray the pot with the spray paint of your choice and set aside to dry.
Once the spray paint has dried, place the large flower pots on the brackets and fill them with soil, then insert the bamboo poles.Now, put the small flower pots through the bamboo poles one by one, place them at an angle, and then use a hot melt gun to glue their edges to the bamboo poles. (Please refer to the video for details)Finally, plant different spices in each pot and you will have a variety of spices to choose from in your kitchen!Concrete can not only build houses, but also do many DIY. Here, you will see 4 beautiful home decoration DIY, have fun!Materials needed: plastic bottles, DIY concrete, towels.
Use a knife to cut the top of the plastic bottle and then turn it over?
Pour DIY concrete and water into a bowl and mix. The mixed concrete should be lump-free and not too sticky. Then soak the towel in it.Once the towel is completely covered with concrete, place it on a plastic bottle to dry. It may take a day to completely harden. Then your beautiful vase is done. If you like, you can spray paint it with your favorite color.Materials needed: plastic wrap, cookie cutters, oil sprinkler, notepads, DIY concrete, tape, paint, stapler.Place plastic wrap on the work surface, place the cookie cutter on it, and spray it with oil (either cooking oil or WD-40).
Mix the concrete according to the package instructions and pour it into the cookie cutter. Now put the note clip on and use a staple gun to secure it until the concrete dries.Once the concrete has set, it can be released from the cookie cutter. Use masking tape to mask off half of the concrete mold and paint the other half. Your photo clip is complete.Materials needed: muffin molds (with patterns on the bottom), DIY concrete, oil, plastic wrap, eggs, and small candles.Grease the muffin molds thoroughly and pour the mixed concrete in. Tip: The concrete should not be too liquid.
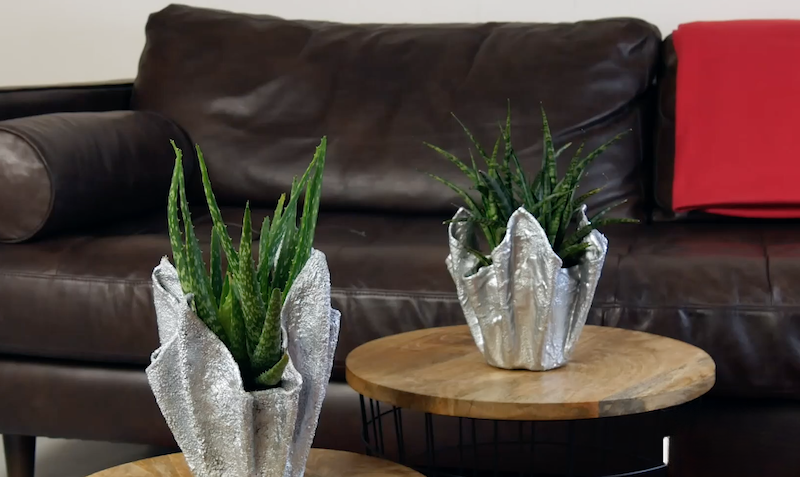
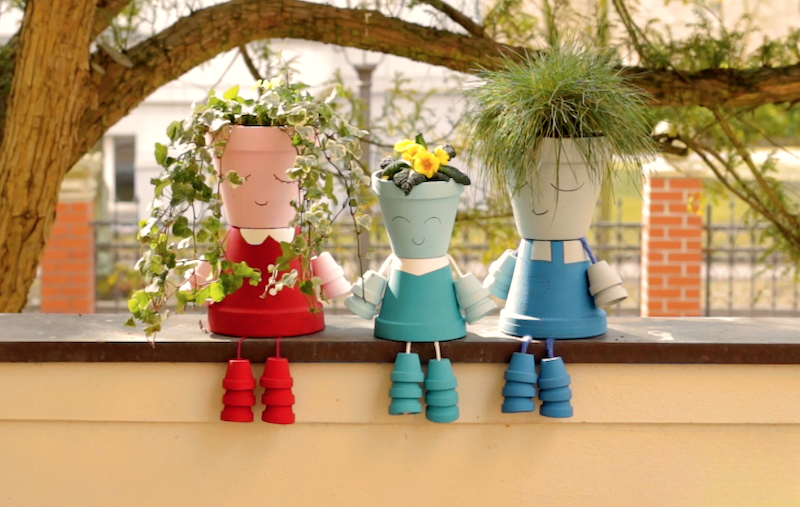
Wrap the tip of the egg with plastic wrap, then place on the muffin mould and press down.When the concrete has cured, remove it from the mold and sand off the excess edges to finish.Materials needed: concrete, sand, 1 large bucket, 2 large cans, 2 disposable gloves, and plastic wrap.Mix cement, water and sand in a bucket in a ratio of 1:3:2.Put disposable gloves over the can and pour in concrete to fill it up.Line another jar with plastic wrap and carefully put the glove filled with concrete in it. Use a knife to gently cut it and adjust the cement inside so that there is no bulge on the palm.After about 24 hours, the cement hardens and the disposable gloves are removed. This creative hand rubbing is suitable as a small flower pot.By the way, here’s a small reminder: remember to wear gloves throughout the process!Every year when spring is around the corner, many people start thinking about how to design their balcony or garden. If your flower pots are looking a bit boring, here is a DIY that can add some visual interest to them.To do this you will need: 2 large pots, 10 small pots, wire, paint and brushes, hot glue.
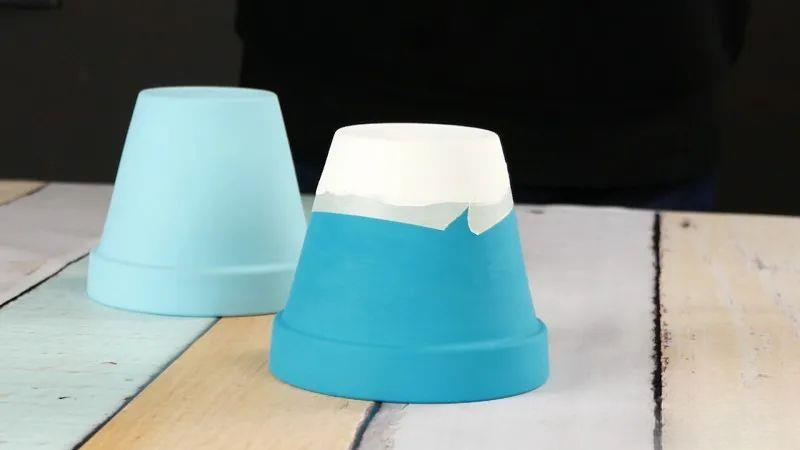
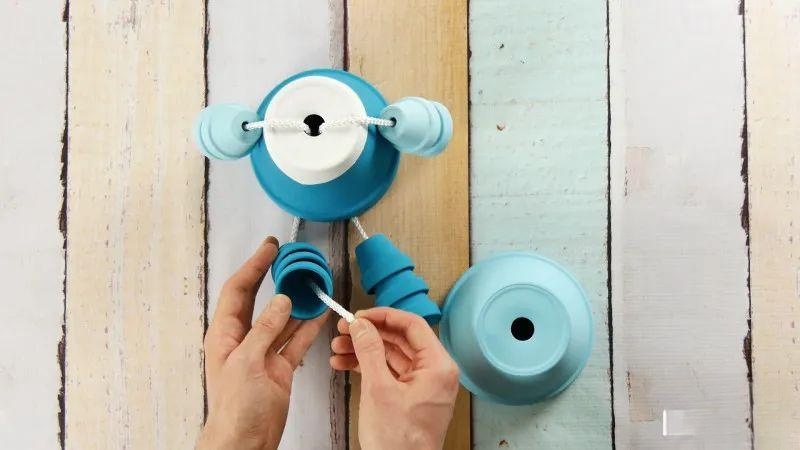
Start by painting the two larger pots two different shades of blue: light blue for one pot and dark blue for the other. Add a white border to the dark blue pot, which will represent the shirt collar from now on.
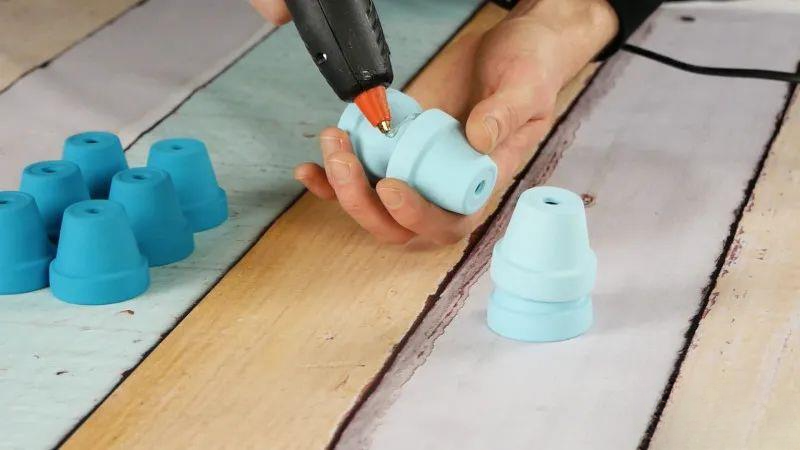
Paint six small flower pots dark blue and four light blue. Then hot glue the two light blue pots and the three dark blue pots together.
Turn the large dark blue pot so the large opening is facing downward. Pass the rope through the drainage hole in the pot. Pass the top end of the rope through the hole in the pair of small light blue flower pots and tie a knot. Pass the bottom end of the rope through the hole in one of the two dark blue pots and tie a knot.
Repeat this process with the second rope and remaining small pots.
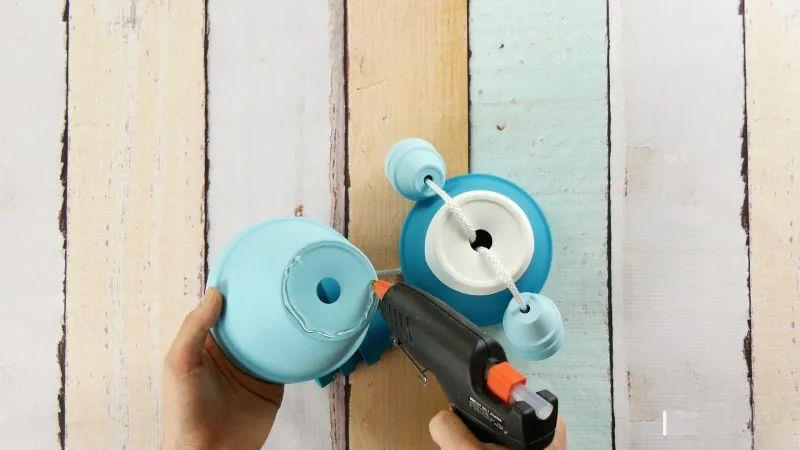
Use hot glue to attach the large light blue plant pot to the dark blue one, then use a waterproof felt pen to give it a friendly face before planting.
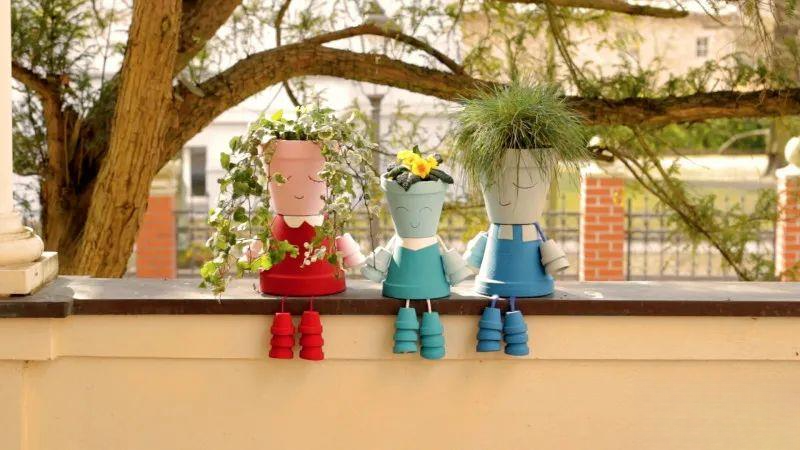
The plants are now lovely flower pots for the kids to style. Of course, you can also paint the pots to your taste or use slightly larger pots for the body and head to create a lovely collection of flower pots on your balcony.
After reading these 22 tips, you should have at least one green finger. Happy planting!