Knowledge on growing various flowers (Autumn flowers 2)
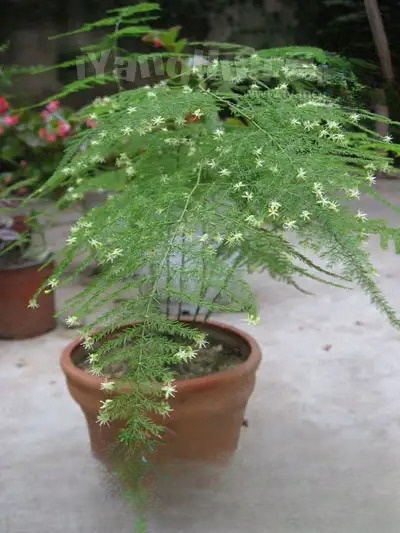
Origin: South Africa
Type: Foliage Plant
Flowering Period: February-March or June-July
Sunlight: Avoid dry wind, slightly shade-tolerant
Temperature: Likes warmth, low cold resistance, avoids frost
Soil: Likes loose, fertile, humus-rich, well-drained soil
Water: Likes moisture, afraid of drought.
The potting soil can be loose, fertile leaf mold, or a mixture of 1 part each of loam, leaf mold and manure.
The asparagus fern should be repotted once every spring. When repotting, remove the old soil, keep the original subsoil, add fresh fertilizer around the subsoil, and apply 3-4 pieces of horseshoe slices as base fertilizer at the bottom of the pot. More coarse sand or tiles should be placed at the bottom of the pot to facilitate drainage, otherwise it will easily cause yellowing of branches and leaves and root rot. Dead branches and yellow leaves should also be cut off and shaped appropriately.
During the vigorous growth period, the asparagus fern should be fertilized with thin water of decomposed horse hoof slices 1-2 times a month, or with decomposed thin liquid fertilizer mainly containing nitrogen and potassium once. If there is a lack of fertilizer or too much fertilizer is applied, it will cause the asparagus fern to turn yellow or die. Fertilization should be stopped after winter. Fertilization should be controlled after the plant is established.
Asparagus fern likes moisture but is afraid of waterlogging. When watering, you should pay great attention to the amount of water. Generally, it is advisable to keep the soil in the pot at 20% humidity, that is, the water poured into the pot quickly seeps into the soil without water accumulation on the soil surface. Water accumulation in the pot will cause root rot, and too dry soil will cause branches and leaves to turn yellow or fall off. Watering should be reduced in winter, and branches and leaves should be sprayed with water close to room temperature to increase air humidity. However, cold water should not be used to spray branches and bushes in winter.
The room temperature should be maintained at 12-18℃, and the wintering temperature is 5-10℃.
Asparagus fern prefers shade and should not be exposed to the sun. It should be placed in a ventilated semi-shaded place in summer and autumn, and in a sunny place indoors in spring and winter.
Diseases include gray mold and leaf blight that damage leaves. Spray with 1000 times diluted 50% thiophanate wettable powder.
When the room is not ventilated, scale insects are prone to damage, which can be eliminated by spraying 2000 times dichlorvos emulsion. Aphids are prone to damage in summer, which can be controlled by spraying 1000 times 40% omethoate emulsion.
The branches and leaves of asparagus fern are the most beautiful when they are 1-3 years old. After 3 years, the plant will show the characteristics of climbing, with soft stems, bending and drooping, and winding. If you don't want it to grow into a climbing shape, you can cut the overlong branches short to promote the sprouting of new branches at the root; if you want to keep it, you can set up a frame to let it climb and grow. Usually, when combining repotting or maintenance, old branches and overcrowded branches should be pruned to make the branches of the plant dense and well-organized, with clear layers, maintain a beautiful plant shape, and improve the ornamental value.
Asparagus fern can be propagated by sowing or division. Large plants of 4-5 years old can be divided. Division is usually carried out in spring when the temperature rises, combined with repotting. Cut the plants with a sharp knife, keep 2-3 plants in each small clump, place them in a cool place after division, spray to keep moisture, cultivate for 1 year, and they can be used for viewing the following year. Since the new plants obtained by division are often irregular in shape, sowing is often used to raise seedlings in production. First, it is necessary to cultivate a strong mother plant. Generally, the nutrient area of potted plants is too small, so they bloom but do not bear fruit. Usually, 2-3 year old strong plants are transplanted to greenhouse ground planting or planted in larger containers, and sufficient basal fertilizer is applied, mainly phosphorus and potassium fertilizers, and a support is set up to allow creeping branches to climb upwards, maintain proper shade and ventilation, and they can bloom and bear fruit from winter to spring, and the seeds will mature in the next spring. Seeds should be sown shallowly in a wet sand pot to germinate, keep the temperature at 20℃ and the pot soil moist frequently, and they will germinate in 25-30 days. Apply plant ash or superphosphate to seedlings after germination. Transplant once when the seedlings are 5-6 cm tall, and plant them in small pots individually when they are 8-10 cm tall.
How to prevent asparagus fern branches and leaves from turning yellow?
If potted asparagus fern is not properly maintained, its branches and leaves will often turn yellow. The reasons for the yellowing of asparagus fern branches and leaves and their prevention and control methods are summarized as follows:
(1) Too much light. Asparagus fern prefers partial shade and partial sun, and avoids strong direct sunlight, otherwise it will cause the branches and leaves to turn yellow, so it is necessary to shade the asparagus fern.
(2) Improper watering. Asparagus fern likes moisture but is afraid of waterlogging, so it is best to choose sandy loam with good ventilation and water permeability for cultivation. Watering should be appropriate. Too much watering will cause root rot, and too little watering will cause the leaves to wither and turn yellow. When the weather is hot and dry, spray clean water on the branches and leaves every day to increase the humidity of the environment and compensate for the evaporation of water from the branches and leaves.
(3) Insufficient nutrients. If potted asparagus fern is not repotted for many years, the soil will be insufficient in nutrients. If it is only watered without fertilizer, it will also be insufficient in nutrients. Potted asparagus fern should be watered with a thin layer of decomposed liquid fertilizer once a week, and the soil should be loosened and watered in time.
(4) Improper fertilization. If too concentrated or undecomposed fertilizer is used, it will damage the roots and cause the leaves to turn yellow and fall off. Use water to rinse the pot soil to dilute the fertilizer concentration, or immediately change the soil to save the situation.
(5) Poor management in winter. Asparagus fern likes warmth and is afraid of cold. It should be placed in a sunny and warm place indoors in winter, and the room temperature should be kept above 8-12℃. If it is placed in the shade for a long time and the room temperature is below 8℃, the branches and leaves will turn yellow. In addition, watering must be controlled.
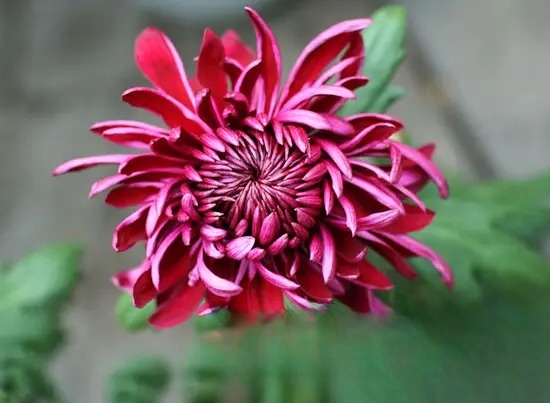
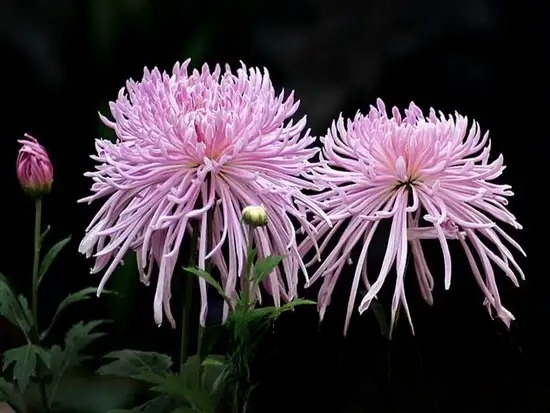
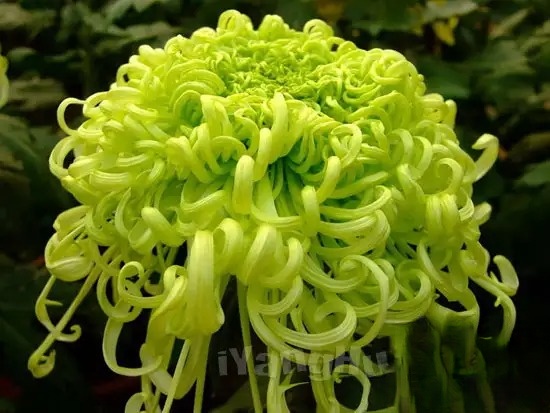
Origin: China
Type: Flowering plant
Flowering period: October-December, there are also different ecological types such as summer, winter and four-season flowering.
Sunlight: It likes light and is a typical short-day plant. Artificial control of light time can advance or delay flowering.
Temperature: It likes cool climate. The optimal temperature for its growth is 18-25℃, and it avoids high temperature. It has a certain degree of cold resistance, especially small chrysanthemums. Some varieties can overwinter in the open field in North China and can be covered in the northeast.
Soil: Suitable for deep, fertile, loose, well-drained sandy loam.
Water: Avoid waterlogging and continuous cropping.

Tips for growing flowers:
After the cuttings survive, transplant them to pots in time. Loose, fertile sandy loam should be used as potting soil. As the plants grow, the general varieties need to be repotted 2-3 times before they can be finally planted. When planting, you can choose a culture soil mixed with 6 parts of leaf mold, 3 parts of sandy loam and 1 part of cake fertilizer residue. When transplanting seedlings, it is best to plant them in pots with wet soil, place them in a shaded place to slow down the growth, then water them thoroughly, and gradually move them to a sunny place for maintenance.
In addition to applying enough basal fertilizer, chrysanthemums should not be applied too much or too early, otherwise it will cause root damage and leaf fall. However, from the beginning of autumn to the time when buds are formed, fertilizer and water should be sufficient. Generally, a thin bone slice sauce residue water should be applied once a week. When the buds are about to bloom, superphosphate or 0.1% potassium dihydrogen phosphate solution should be applied once to make the flowers more colorful. Water and loosen the soil in time after each fertilization to facilitate ventilation.
Stop watering before fertilizing, and wait until the soil in the pot is slightly dry before fertilizing for better results. After fertilizing, spray clean water with a spray bottle in time to wash away the fertilizer juice on the leaves to prevent the leaves from turning yellow and affecting the ornamental effect.
Whether watering is reasonable is a key issue in the success of chrysanthemum cultivation. Watering requires timely and appropriate amount. The frequency and amount of watering should be determined according to the different characteristics of chrysanthemums in terms of water requirements from cutting to flowering.
Under normal circumstances, in spring, chrysanthemum seedlings are small, so less watering is recommended to help the root development of chrysanthemum seedlings; in summer, the plants are large and evaporation is fast, so watering should be sufficient, and water should be sprayed on the branches and leaves and the ground to increase air humidity; in autumn, the temperature difference between day and night in the north is large, which is the peak period of chrysanthemum growth and development, so the amount of watering should be appropriately increased; in winter, seedlings need to be overwintered, so watering should be strictly controlled. Do not water too much throughout the year to avoid water accumulation in the pot, which will cause root rot, plant chlorosis, or even death. In addition, avoid watering directly to prevent pot mud from splashing onto the leaves.
The key to raising autumn chrysanthemums well is to make them survive the winter. Due to the different climatic conditions in the north and south, the management methods for wintering autumn chrysanthemums are also different. In some areas of the south, after the flowers of chrysanthemums grown in the open air wither and the stems and leaves gradually wither, they can be cut off 15 cm from the ground, watered once for wintering, and then covered with dry soil from fallen leaves, leaving 3-5 cm of the stems and leaves exposed to facilitate ventilation, so that they can survive the winter safely. Chrysanthemums need to be moved indoors in the northern regions and some areas of Jiangnan. There are two main methods for overwintering potted autumn chrysanthemums:
(1) Perennial root preservation method: After the flowers have faded, cut off the old roots, then water them thoroughly once and place them in a sunny cold room with a room temperature of 0-3℃. At this time, watering should be strictly controlled. Do not water if the pot soil is not too dry. When watering, the amount of water should be less rather than more, as long as the pot soil is kept slightly moist. This will keep it in a fully dormant state, which is conducive to healthy growth in the next year. The place where it is placed in winter should not be too shady, and the room temperature should not be too high; otherwise, insufficient light, high temperature, and excessive watering will easily lead to the growth of yellow and thin root buds, which will consume a lot of nutrients and affect normal growth and flowering in the second year. Therefore, the environment should be kept neither dry nor wet, neither hot nor frozen throughout the winter, and attention should be paid to prevent wind drying. After the weather gradually warms up in March of the following year, gradually increase the amount of watering and move it to a sunny place outdoors for maintenance to promote the germination of new buds from old roots for division propagation or cuttings.
(2) Bud storage method: In late autumn and early winter, select the first generation of new buds from the rhizomes for cuttings. When selecting buds, choose buds with plump and full heads. Use a sharp knife to dig out the buds about 2 cm deep into the soil, and insert them into a cylindrical pot filled with half culture soil and half fine sand. After inserting, place them in a lighted cold room, keep the room temperature at around 3°C, water them sparingly, and keep the pot soil slightly moist. There are also four taboos when storing buds: avoid high temperatures, humidity, shade, and wind drying. Move them outdoors in mid-March of the following year and place them in a sunny place to exercise for 7-10 days, then they can be divided into pots or planted in the ground.
The main diseases of chrysanthemum are rust, black spot and gray mold. Rust harms leaves and stems, with leaves being the most affected. You can spray 65% mancozeb wettable powder at a concentration of 500 times. Black spot mainly harms leaves, and you can spray Bordeaux mixture in equal amounts for prevention and control. Gray mold harms flowers, leaves, stems, etc. You can spray 65% mancozeb wettable powder at a concentration of 500 times in the early stage of the disease.
The insect pests include aphids, which can be killed by spraying 1500 times diluted 40% oxydemeton-methyl emulsion.
Timely pinching can promote the growth of side branches and reduce the height of the plant. The time and frequency of pinching potted plants vary according to different artistic shapes. In the northern region, most families keep 4-7 flowers in potted chrysanthemums. After the chrysanthemum seedlings are planted, they are pinched with 4-5 leaves. When the side branches grow 4-5 leaves, each side branch is pinched for the second time with 2-3 leaves. However, large upright chrysanthemums need to be pinched 6-9 times.
During the chrysanthemum seedling stage, many axillary buds sprout, which need to be pinched off with fingers in time, otherwise they will consume a lot of nutrients and grow many small branches with small flowers, making the plant look messy. During the bud formation period, side buds sometimes appear on the branches under the top buds. Except for those that need to be retained, the side buds should be removed with tweezers as soon as possible to promote the hypertrophy of the top buds.
Chrysanthemums are commonly propagated by cuttings, divisions, and grafting. When raising chrysanthemums at home, divisions and cuttings are generally used for propagation.
(1) Division method: After the chrysanthemum blooms in autumn and winter, cut off the old stems. Soon many buds will grow next to the old roots. Around the Qingming Festival of the following year, dig out the mother plant and split it into several small roots according to the state of the roots. Each small root must have a bud and can be planted in the open field or in a pot. Chrysanthemum plants propagated by division are tall and have many flowers, but the flowers are not as large as those cultivated by cuttings.
(2) Cutting method: Generally in May-June, cut 10 cm long branches with 2-4 nodes from the new branches of the old plants of the previous year as cuttings, remove the lower part, cut off half of the upper leaves, and then cut the lower part of the branches flat, insert them into the substrate (the cutting soil is mostly made of half garden soil and half rice husk ash), the depth is 1/3 of the total length of the cuttings, and each plant is 10 cm apart. Water thoroughly and pay attention to shade. At a temperature of 18-21℃, roots can be formed 15-20 days after cutting. Leaf cuttings can also be used, but the leaves with the epidermis of the mother plant branch at the base of the petiole must be taken, that is, the leaves with the growth point in the axils, so that new buds can grow after cuttings.
Early flowering: Chrysanthemum is a short-day plant, and generally it can bloom only when the sunlight does not exceed 10 hours a day. If you want to make chrysanthemum bloom early, you must control the sunlight time. When the chrysanthemum plant grows to a certain stage, when the temperature is 25-30℃, the sunlight time is controlled within 8-10 hours a day, and the plant can bud and bloom in 2 to 2 and a half months. It is best to shade the chrysanthemum in the morning and evening.
Delayed flowering: Starting from early September, add 3 hours of light to the chrysanthemum plants around midnight every day until late October, so that the chrysanthemums can bloom around New Year's Day. If you want to delay flowering even later, you can continue to illuminate the chrysanthemums at night every day, so that the chrysanthemums can bloom even before the Spring Festival. Please note that when winter approaches, the plants must be moved indoors for maintenance to prevent freezing.
Some varieties of chrysanthemum can be eaten, drunk and used as medicine. In some areas of the south, people use chrysanthemum seedlings to stir-fry and eat; use chrysanthemum as medicine or drink; and use chrysanthemum to make chrysanthemum wine, chrysanthemum meat, chrysanthemum sauce and other flavor foods.
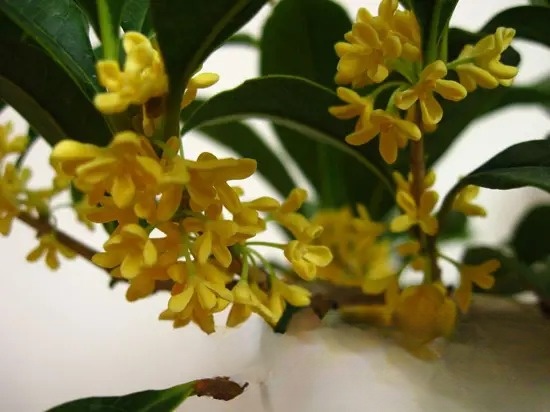
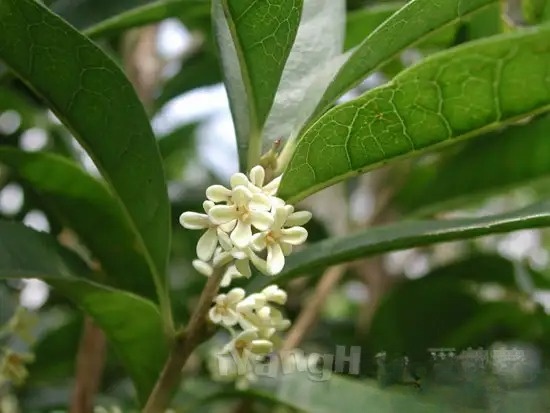
Osmanthus fragrans
Origin: Southwest and Central South China
Type: Fragrant
Flowering period: September-October.
Sunlight: Likes light, but also relatively shade-tolerant.
Temperature: Likes warmth, not cold-tolerant.
Soil: Suitable for acidic soil. For potted plants, you can choose to mix 5 parts of mountain mud, 3 parts of humus soil, and 2 parts of sandy soil, or use half leaf humus and half sandy loam as the culture soil. If the soil is too acidic, it will grow slowly, and the leaves will turn yellow and wither. In alkaline soil, after 2-3 months, the leaves will wither and even die.
Water: Afraid of stagnant water.
The potted osmanthus should be repotted in the autumn of the second year. A clay pot or a larger clay pot is suitable. When repotting, do not damage the roots when lifting the seedlings. Remove part of the old soil, replace with new culture soil, and add a small amount of base fertilizer. When planting, pay attention to allowing the roots to stretch out in the pot and not nestle in one place. After planting, shake the flower pot to make the culture soil and the root system in close contact, then water it once thoroughly, and place the pot indoors when frost falls. In the early stage of potting and repotting, do not water too much to prevent root rot. The indoor temperature should be maintained at 5-10℃. Too high a temperature is not conducive to hibernation, and it will produce leaf buds and weak branches, affecting normal growth and development in the spring of the following year; if the temperature is low, it is easy to be frozen.
After germination in spring, apply fully decomposed cake fertilizer water once every 10 days or so to promote branching. After July, apply liquid fertilizer mainly composed of phosphorus fertilizer to promote flower bud differentiation, so that the plant will grow vigorously, bloom more and smell good. If the fertilizer is insufficient, especially phosphorus fertilizer, there will be few branches, few flowers, and the smell will not be good.
When watering osmanthus, you should master the principle of "two less and one more", that is, less watering before new shoots appear, less watering on rainy days, and more watering in dry weather in summer and autumn. It is advisable to keep the water content of the pot soil at about 50% during normal watering. Drain the water in time on rainy days to prevent water accumulation in the pot and root rot.
Osmanthus fragrans is often susceptible to diseases and insect damage such as charcoal blast, brown spot, gray plaster disease, dead spot, algae spot, scale insects, moths, caterpillars, cicadas, and osmanthus leafhoppers, which require timely spraying of pesticides for prevention and control. In addition, special attention should be paid to the prevention and control of blackthorn whiteflies.
The adult body of the black spiny whitefly is 1-1.3 mm long, orange-yellow with a thin layer of white powder. The adults and larvae gather on the back of the leaves to suck the sap, and yellow spots form on the affected parts. Its excrement can easily induce sooty mold disease, which can cause branches and leaves to turn black, wither and fall off.
Prevention and control methods: When blackthorn whiteflies are found, spray 2.5% cypermethrin or 20% cypermethrin at a concentration of 2000-2500 times, or spray 800-4000 times of neutral laundry detergent at a concentration of once every 5-6 days, and spray 3-4 times in a row.
Osmanthus has a well-developed root system and strong germination ability. Adult osmanthus trees produce shoots twice a year. Therefore, to make the osmanthus bloom and grow luxuriantly, proper pruning is required to maintain a balance between reproductive growth and nutritional growth. Generally, overgrown branches, thin branches, and diseased and insect-infested branches should be cut off to facilitate ventilation and light transmission, concentrate nutrients, and encourage the osmanthus to breed more and fuller flower buds, so that it blooms luxuriantly.
Potted plants are usually pruned into a single trunk. From the seedling stage, select one main trunk and top it when it reaches the predetermined height to encourage the sprouting of 3-5 side branches to form a crown. Prune once every winter and spring before budding to remove diseased and dead branches, overcrowded branches, and thin and weak branches. For plants that are strong on the top and weak on the bottom, or have a poor tree shape, appropriately shorten them to encourage the sprouting of adventitious buds at the bottom and the growth of new branches. However, pruning should not be excessive, otherwise it is easy to sprout long branches, affecting the number of flowers.
Osmanthus fragrans can be propagated by sowing, cutting, grafting, layering and other methods. It takes a long time for sowing and seedlings to bloom, so most family flower-growing methods are not used. Cuttings are carried out before budding in spring. Select branches of the current year as cuttings, insert them into plain sand or peat soil, cover them with plastic film, and place them in the shade. They will take root in about two months. Grafting can use Ligustrum lucidum, Ligustrum lucidum, Fraxinus chinensis, etc. as rootstocks. Cut them 5 cm above the ground before budding in spring and then use the cleft grafting method for grafting. In northern regions, potted osmanthus fragrans can be propagated by grafting in summer. In early spring, Ligustrum lucidum is first potted and then grafted with branches of similar thickness on the osmanthus tree. After survival, the scion is cut off from the mother body, and the branches above the rootstock interface are cut off at the same time. The high-pressure method is carried out before the buds sprout in spring. Select 2-3 year old branches, ring cut them and wrap them with moisturizing materials such as moss for propagation.
The normal flowering period of sweet osmanthus is September. If you want to extend it to bloom until National Day, you can move it indoors in early August and keep the temperature above 17℃. At this time, water less and make the pot soil slightly moist. At the same time, stop fertilizing to slow down the growth of flower buds. Move it outdoors in mid-September for outdoor maintenance. At this time, the outdoor climate is cooler, which is conducive to the rapid growth of flower buds, and it will bloom just before National Day.
What is the reason for not flowering?
Osmanthus likes strong light and warmth, avoids stagnant water, and is afraid of coal smoke. If potted osmanthus is not properly maintained and its physiological requirements are not met, it will not bloom. There are generally five reasons why osmanthus does not bloom:
(1) Improper winter maintenance. After entering the house in winter, the osmanthus should be placed in a low temperature place to make it dormant, so that it can thrive and bloom and have luxuriant leaves the next year. If the room temperature is high, the osmanthus cannot fully dormant, sprouts and leaves prematurely, and the branches are thin and weak, consuming a lot of nutrients. After being taken out of the house in spring, it is easy to shrink and die in drought and wind. Excessive watering in winter or insufficient light in the place where it is placed can easily cause the plant to shed a lot of leaves, affecting flowering the next year.
(2) The location is too shady. Osmanthus is a long-day plant that prefers strong light. If the plant does not receive sufficient light during its growth and development, it will cause the branches and leaves to grow too long, affecting the formation of flower buds, which is also a reason for its failure to bloom.
(3) Contaminated by coal smoke. Osmanthus fragrans cannot tolerate coal smoke. If it is allowed to live in an area with air pollution, it will grow poorly, its leaves will become smaller and fall off easily, and it will bloom less or not at all.
(4) Insufficient nutrients. If potted osmanthus is not repotted or soil is not changed for a long time, it will be insufficiently nourished and the roots will become tangled and unable to stretch, which is also a factor that affects flowering. For this reason, potted osmanthus should be repotted once every 1-2 years and a small amount of bone meal should be applied as base fertilizer.
(5) Excessive watering. Osmanthus should not be waterlogged. Watering should be done when the soil is dry and when the soil is wet during the growing season. Excessive watering or waterlogging in the pot on rainy days will cause the roots to rot and the leaves to fall.
In addition to being ornamental, osmanthus also has high economic value. Fresh osmanthus is an important raw material for making osmanthus candy, osmanthus cake, osmanthus tea, and osmanthus wine. The essence extracted from osmanthus is a high-end and precious spice used in the food industry and daily chemical industry. The osmanthus wood has a glossy luster and beautiful texture like a rhinoceros, so it is called osmanthus, and is a good material for carving. Cinnamon bark can be used to extract dyes and tanning agents. Cassia leaves can be used as seasonings to enhance the fragrance of food.
Origin: China
Type: Fruit-viewing plant
Flowering period: May-June, fruiting period: August-September
Sunlight: Likes light, slightly shade-tolerant
Temperature: Cold-tolerant
Soil: Suitable for deep, well-drained fertile soil
Water: Tolerant to moisture, also tolerant to early flowering.
Tips for growing flowers:
As a potted plant, the goldenrod needs to be transplanted into a pot. The best time is in March in spring. The plants should be 1-2 year old seedlings. When digging up the seedlings, the soil should be taken with them and the fine roots should not be damaged. The potting soil should be fertile, loose, well-drained humus soil or farmland soil.
The plant should be repotted once every two years, with half of the old soil replaced and some of the excess roots cut off. This will help it to bloom and bear fruit.
Apply a thin layer of decomposed cake fertilizer water once before flowering in early summer, and apply phosphorus fertilizer once after flowering to promote fruiting. In winter, it is advisable to apply decomposed poultry manure and bone meal as basal fertilizer.
After planting, water it thoroughly once. In normal management, keep the pot soil moist, especially before flowering and fruiting, and do not lack water.
Origin: Argentina and southern Brazil
Type: Cactus
Flowering period: Summer.
Sunlight: Likes light, but avoids long-term direct sunlight in summer, avoids shade, and should not be placed indoors for a long time.
Temperature: Likes warmth, not cold-resistant.
Soil: Requires moderately fertile, well-drained and breathable, lime-containing sandy loam.
Water: Likes moisture.
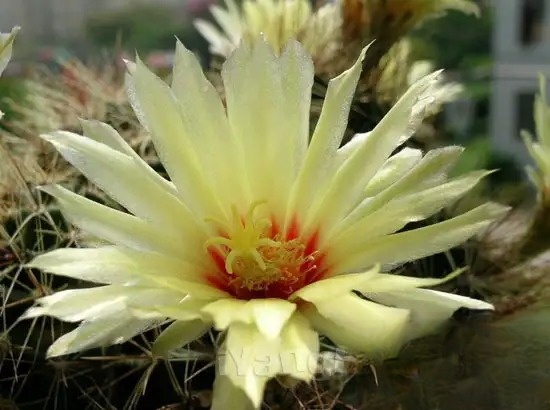
Tips for growing flowers:
For potting, you can use 3 parts of leaf mold, garden soil and coarse sand, and add 1 part of plant ash and old ash wall scraps to mix and prepare the culture soil. It is best to pot and repot in early spring. The size of the pot should be large enough to accommodate the ball with a little gap. It should not be too large, otherwise it will affect the appearance. When potting, a layer of broken tiles or gravel about 3 cm thick should be placed on the bottom of the pot to facilitate drainage. The planting depth should be such that the root neck of the ball is level with the soil surface. The lower the temperature, the drier the pot soil should be kept. As the temperature rises, the dormancy of the plant is gradually lifted, and the amount of watering should also be gradually increased. However, in the hot summer, watering should be properly controlled, and the potted flowers should be placed in a shaded place. After the dog days are over and the weather turns cool, normal watering can be resumed.
Apply thin liquid fertilizer or compound flower fertilizer once every half a month during the growing season. Stop fertilizing in winter and midsummer.
Do not water the newly planted cactus. Just spray it 2-3 times a day. After half a month, you can water it lightly. After one month, when new roots grow, you can gradually increase the amount of watering. When cultivating cacti, you should pay attention to the difference between watering cacti and other potted flowers. Watering should be limited during the winter dormancy period to keep the pot soil from being too dry.
In addition to shading in summer, good ventilation should also be provided. Insufficient light during cultivation will result in no flowering, excessive shade or too much fertilizer and water. In northern areas, potted flowers can be placed outdoors in a sunny place for maintenance after the weather warms up in spring. Move them indoors to a sunny place before winter, and keep the room temperature above 5℃ to safely overwinter.
Cactus is easily damaged by scale insects, whose larvae often lurk inside the sphere or ridges. They can be killed by spraying 1500-2000 times diluted omethoate emulsion. They can also be removed with small bamboo pieces.
It is very easy to propagate cacti, and cuttings and grafting are the main methods. Cuttings can be done from April to September. Cut the bulbs from the mother plant, let them air dry for 2-3 days, and then insert them into the sand. No watering is needed, just a little spraying will do. Many bulbs have already taken root on the mother plant, so they can be transplanted one week after cuttings.
Grafting is best done in May or June, as the grafted part heals quickly and has a high survival rate. The grafted rootstock is generally a triangular prism. Use a knife to flatten the top of the rootstock, and then flatten the bottom of the bulb. Then align the center of the bulb with the center of the rootstock, so that it fits tightly, and then tie it with a rope and place it in a ventilated and shaded place for maintenance.
Origin: Mediterranean coast.
Type: ornamental fruit plant.
Flowering period: April-June, fruiting period: August-September.
Sunlight: Prefers a sunny environment.
Temperature: Prefers warmth.
Soil: Prefers fertilizer and water, has strong adaptability, and is suitable for deep soil. It can grow in light alkaline soil.
Water: Prefers humidity.
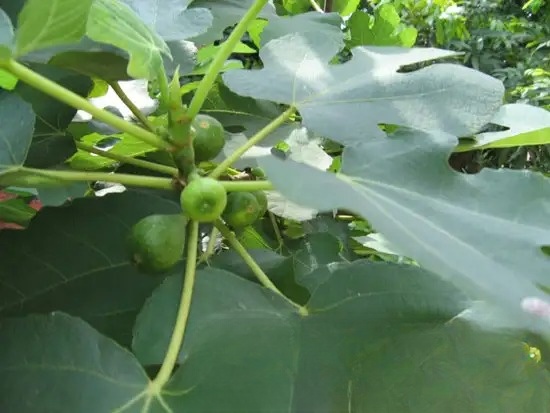
Tips for growing flowers:
Figs can be cultivated in the open field in southern North China and south of East China, and are easy to manage.
The soil for potted plants is a mixture of 4 parts leaf mold, 4 parts garden soil, 2 parts fertilizer soil, and a little horseshoe as base fertilizer. Change the soil once every 2-3 years and apply liquid fertilizer frequently.
Apply decomposed organic fertilizer once every year in autumn after the leaves fall.
Water 2-3 times in spring, apply liquid fertilizer twice during the growing season, and apply liquid fertilizer mainly composed of phosphorus and potassium once more during the young fruit expansion period.
The plant needs less water when it is newly potted, so water it twice when potting or repotting, and then water it once a day. In the dry season and summer, spray water on the branches and leaves 2-3 times a day. When the fruit matures, the amount of watering should be gradually reduced.
In the northern region, it can be moved to a sunny place outdoors for maintenance in late April or early May. In the hot summer season, it should be properly shaded around noon. Before winter, it can be moved to a low-temperature room for wintering, stop watering, and keep the temperature at around 0℃.
Common diseases and pests of figs include anthracnose, root cancer, longhorn beetles, scale insects and other pests. You can refer to the spraying methods used for flowers affected by the same diseases and pests for prevention and control.
For potted figs, the plant should not be too high, 30 cm is appropriate, so it needs to be carefully pruned. Pruning should be done in March in spring. When the seedlings grow to 40-50 cm, cut off the top at 30 cm, and when the axillary buds below grow to 3 cm, only keep the top 3-5 buds as the main branches, and cut off the rest. Prune once in July of the same year to prevent the branches from growing too long. In the spring of the second year, shorten the main branches again at 12-15 cm. When the new buds sprout out 3 cm, leave 2-3 buds on each main branch, remove the rest, and prune again in July. After two prunings like this, the tree shape will be relatively short, strong, fluffy, and much more beautiful.
Figs are mostly propagated by cuttings, usually in summer. Select one-year-old strong branches and cut them into 15-20 cm long segments as cuttings. They can take root about one month after cuttings, and then they can be transplanted for cultivation.
Origin: Arid desert areas of South Africa
Type: Succulent Flowering
period: Blooms after 3-4 years of healthy growth, and the flowering period is October.
Sunlight: Prefers a sunny environment, avoids strong direct sunlight in summer.
Temperature: Can withstand high temperatures, not cold.
Soil: Requires well-drained sandy loam.
Water: Prefers dryness, and the soil needs to be kept moist in spring and summer.
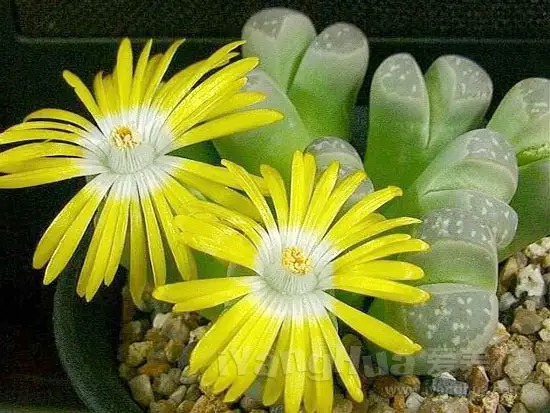
Tips for growing flowers:
Lithops are not very demanding on environmental conditions and are relatively easy to cultivate and manage. The potting soil can be prepared by mixing 4 parts of leaf mold, 3 parts of calcareous materials (shell powder, eggshell powder, old ash wall scraps, etc.), and 3 parts of river sand. It should not be planted too deep, otherwise it will easily cause rot. It is best to put a layer of pebbles or colored stones on the surface of the potting soil, which is both beautiful and has a cooling effect.
Spring and autumn are its vigorous growth period. Water it once every 3-5 days to promote its growth and flowering. The growth law of Lithops is that it starts to grow from March to April, stops growing in the hot summer season, and enters the summer dormancy period. After the cool autumn, it resumes growth and flowering, and enters dormancy again after flowering. When the plant begins to grow in spring, the original old plant gradually shrinks and is swollen by the new plant, and two young new Lithops grow here. At this time, watering should be reduced, and the pot soil should be slightly dry. Do not spray water directly on the plant to prevent wound infection and rot. After the summer, move it to a semi-dark place indoors to avoid direct sunlight. At the same time, open the window in time for ventilation and cooling, and water it sparingly to make it safe in the summer. After the fall, gradually increase watering and apply a small amount of compound fertilizer to promote bud formation and flowering. After the flowers, watering should be gradually reduced, and watering should be strictly controlled in winter to keep the pot soil dry.
Lithops like light and should be placed on a balcony or windowsill during the growing season. During the winter, the potted flowers should be placed on a south-facing windowsill and the room temperature should be kept above 13°C.
Lithops can be propagated by sowing and division.
(1) Sowing method: After harvesting the seeds in late autumn, sowing should be done immediately if there is a high-temperature greenhouse. The room temperature must not be lower than 18°C, otherwise the seeds need to be properly stored and sown in mid-May of the following year, but the germination rate will be reduced. When sowing, small deep pots are often used. First, put pea stones or small pieces of slag at the bottom as a drainage layer, then add sandy culture soil on top, and then soak the pot soil with water and carefully sow. Since the seeds are very small, the soil should be covered thinly. Use the immersion method to water, and never water directly, otherwise the seeds will be easily washed away. Seedlings will emerge about 3 weeks after sowing. After germination, maintain good ventilation conditions and thin out the seedlings in time, so that the distance between seedlings is kept at 1.5-2 cm. When transplanting, use a small bamboo piece to lift the seedlings and pot them. Do not water them immediately after planting them. Place them under a shade shed for maintenance for 5-6 days, and then water them again by immersion.
(2) Division method: Every spring, new fleshy leaves grow from the gaps in the middle of Lithops. The old leaves swell, crack, and shrink, and the new leaves grow very quickly. In summer, they shrink and crack again. This time, 2-3 young new plants can grow from the gaps. They can be cut and planted separately. Using them, you can get many new plants in a year, which is much simpler than sowing.
Origin: India and southern China
Type: Foliage plant
Flowering period: April-June
Sunlight: Prefers semi-shady environment, afraid of direct sunlight. If exposed to direct sunlight, the leaves will turn yellow easily, the growth will deteriorate, and the ornamental effect will be affected.
Temperature: Prefers warmth, avoids stuffiness.
Soil: Suitable for loose and fertile soil.
Water: Prefers moisture.
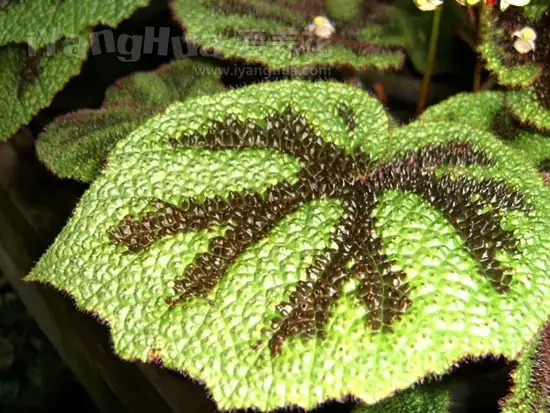
Tips for growing flowers:
The Iron Cross Begonia should be repotted once a year, preferably in spring between April and May. The potting soil should be mainly leaf humus.
Apply thin fertilizer 1-2 times a month during the peak growing season, but be careful to avoid splashing fertilizer on the leaves, otherwise the leaves will easily rot.
Since the Iron Cross Begonia has a large leaf area and a large transpiration effect, it should be watered adequately during the growing season to replenish the water supply lost due to evaporation. However, the pot soil should not be waterlogged, otherwise it will easily cause the leaves and stems to rot and die. Since the Iron Cross Begonia likes a humid environment and avoids stuffiness, it is advisable to keep the air around the plant humid in summer. For this reason, the flower pot can be placed on pebbles in a basin of water in summer to increase the air humidity, which is more conducive to its growth.
Iron Cross Begonia prefers a semi-shady environment and is afraid of direct sunlight. Therefore, when potted, it can be placed in a bright place indoors in spring and autumn, and moved to the north windowsill in summer, with attention to ventilation and cooling. In winter, it needs to be placed on the south windowsill to allow it to see more sunlight and promote its growth. The suitable temperature for growth is 18-25℃, and the room temperature in winter cannot be lower than 10℃.
Iron Cross Begonia is usually propagated by division and leaf cutting. Division is often combined with spring repotting. Leaf cutting is best done in May-June every year.
grass Origin: South America, Southeast Asia, Australia and New Zealand
Type: Fruit ornamental plant
Flowering period: May-June, fruit ripening period: August-November
Sunlight: Suitable for sunny environment, tolerates semi-shade, avoids strong sunlight exposure.
Temperature: Likes warmth, not cold-resistant.
Soil: Prefers loose, fertile and well-drained sandy loam.
Water: Likes moisture.
Potting soil is usually a mixture of equal amounts of leaf mold, fertilizer and river sand.
Fertilize once every half month, and apply 1-2 times of phosphorus and potassium fertilizers before flowering, or use Huiyou 15-15-30 potted flower fertilizer, which will help the fruits to be large and bright.
During the growing season, in addition to watering frequently to keep the soil moist, you should also spray water frequently to increase the air humidity, especially from flowering to fruit ripening, you need to spray water 1-2 times a day, but water cannot accumulate in the pot, otherwise the stems and leaves will easily rot.
The suitable temperature for growth is 10-16℃, and the minimum temperature in winter should not be lower than 5℃.
The plant needs to receive sufficient light during the growing period. If there is insufficient light, the stems and leaves will tend to grow too long, covering the fruit and affecting the ornamental effect.
Artificial pollination is required during flowering, which can increase the fruit setting rate. The branches and leaves that cover the fruits and the drooping creeping branches that are too dense along the pot can be pruned and adjusted.
Moss corals are usually propagated by division, cuttings or sowing.
Division is usually carried out in spring in conjunction with repotting. The densely growing mother plants are separated and planted separately. The width of the plant cluster should be no less than 5 cm. Generally, division is carried out once every year.
For cutting propagation, use the top 3-4 cm long tender branches as cuttings, insert them into a wet sand bed, maintain high air humidity and semi-shady conditions, and they will take root 20-25 days after insertion.
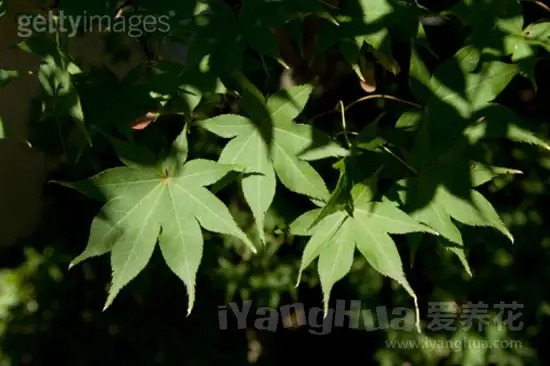
Origin: Yangtze River Basin, China
Type: foliage plant
Flowering period: The leaves are green in spring and summer, turning red in autumn, and the flowering period is from April to May.
Sunlight: Likes sunshine, relatively tolerant to shade, avoid direct sunlight.
Temperature: Likes warmth.
Soil: It is not strict with soil requirements, but slightly acidic soil rich in humus is most suitable.
Water: Tolerant to early flowering, afraid of waterlogging.
Tips for growing flowers:
The vitality of the Japanese maple is strong. For open-field cultivation, it is advisable to choose a place with high, dry and sunny terrain, loose and fertile soil, and deep soil. Avoid planting in low-lying waterlogged areas with heavy soil, otherwise it will grow poorly. Deeply turn the soil before planting and apply well-rotted organic fertilizer. It is advisable to bring soil with you when planting to protect the root system and increase the survival rate. Water it sufficiently after planting.
For potted Acer truncatum, you can use a mixture of leaf mold, garden soil and a small amount of river sand to prepare the culture soil, and add a small amount of decomposed cake fertilizer powder as base fertilizer.
For open field cultivation, generally apply organic fertilizer three times a year, avoid excessive application of nitrogen fertilizer, and pay attention to applying more phosphorus and potassium fertilizers, otherwise the leaf color will not be bright.
For potted Japanese maple, generally apply thin cake fertilizer water once a month starting from the spring budding. From September onwards, apply potassium fertilizer instead. If 0.5%-1% potassium sulfate solution or wood ash extract is applied, the leaf color will be bright.
For open-field cultivation, pay attention to watering during droughts, and frequently loosen the soil and weed to increase soil permeability to facilitate root development.
For potted Acer truncatum, water it sufficiently during the growing season, but not too much, so as to keep the soil in the pot moist.
In spring and autumn, it can be placed on the balcony or in the courtyard for cultivation. In summer, it can be moved to a semi-shaded place. Pay attention to proper shade to prevent exposure to the sun, which will cause the leaf edges to burn. If it needs to be placed indoors for viewing, it should be placed in a well-lit place with air circulation. After a period of time, it can be moved to a sunny place outdoors for cultivation. Before winter in the north, it should be moved to a cold room in time for wintering. It can be placed in a room with a temperature of 0-5℃ and the pot soil should be kept dry to safely overwinter.
Pruning should be combined with shaping after the leaves fall in winter every year.
Origin: South Africa
Type: foliage, flower viewing plant
Flowering period: summer and autumn.
Sunlight: likes light, tolerates semi-shade.
Temperature: likes warmth, afraid of heat.
Soil: suitable for sandy loam.
Water: avoid waterlogging, strong drought tolerance.
Tips for growing flowers:
Although sandy loam can be used as a substrate for potted plants, it is best to use a mixture of 4 parts leaf mold (or peat soil), 4 parts coarse sand, and 2 parts garden soil. Generally, the pot should be changed every 1-2 years in early spring.
During the peak growing season, apply thin cake fertilizer water or compound fertilizer once every half a month. Stop fertilizing in winter when the plants enter a dormant period.
The money tree is drought resistant. It is best to water it when the soil is dry and wet. In summer, water it once every day, and in spring and autumn, water it once every 3-4 days. The soil in the pot should not be too wet or too dry. Too wet will easily cause root rot; too dry will hinder the growth of leaves and stems, and the color will be dull. In winter, when the room temperature is low, watering should be controlled. Watering once every half a month or so is enough.
Hanging money plant has strong adaptability and can grow well in sunny or semi-shady conditions. It can be cultivated in a bright scattered light indoors in spring, summer and autumn, and in a well-lit place indoors in winter. The suitable temperature for growth is 15-25℃, and the room temperature in winter is not lower than 10℃ to survive the winter safely. Pay attention to ventilation when cultivating in summer, and place it in a cool place with good air circulation.
The common propagation of the hanging money tree is by division and cutting. In spring and autumn, the bulbils growing between the leaf axils can be cut and directly planted in pots. After planting, they are placed in a shaded place to keep moist. They will take root and sprout after about 20-25 days. Division can be combined with spring potting. Cutting is best done in spring. When cutting, cut a pair of mature leaves, slightly attach a part of the short stem, and insert them into the substrate. Keep the room temperature at about 20℃, and it will take root in about 1 month.
Origin: Solomon Islands, Indonesia, Malay Peninsula
Type: foliage plant
Flowering period: ---.
Sunlight: Prefers semi-shady environment, avoid direct sunlight in summer.
Temperature: Prefers warm.
Soil: Suitable for loose, fertile, well-drained soil.
Water: Prefers moisture, not drought-tolerant.
Tips for growing flowers:
The potting soil should be loose, fertile, and rich in organic matter. It is best to mix 1/3 each of fertile leaf mold or peat soil, garden soil, and coarse sand.
It is best to mix slow-release fertilizers such as oil cakes and bone meal into the potting soil as base fertilizer before planting. Apply thin liquid fertilizer once every 10-15 days during the growth period. Fertilization should not be biased towards nitrogen fertilizer, but should appropriately increase the application of phosphorus and potassium fertilizers.
Water moderately at ordinary times, keep the soil in the pot dry and moist, and avoid dryness, otherwise the leaves will turn yellow and the plant shape will be poor. But do not water too much, water accumulation in the pot will cause root rot and leaf withering. Watering should be controlled even more in winter when the temperature is low.
The roots of the green radish prefer a moderately humid environment. The leaves require an air humidity of more than 60%. In summer, while watering fully, you should also spray the leaves and backs frequently.
Pothos likes a warm environment. It grows most vigorously in a high temperature climate above 20℃. The room temperature in winter cannot be lower than 10℃, otherwise it is easy to have yellow leaves or fall leaves.
The green radish is afraid of strong direct sunlight and is suitable for growing in an environment with strong scattered light. However, it is important to absorb sunlight appropriately to maintain the thickness of the leaves. If it is too dark for a long time, it will cause the stems to grow too long, the internodes to be slender and weak, the plant shape to be sparse, the leaves to become thinner and lighter, the patterns to become smaller and lose their luster. In spring, summer and autumn, the plant can be placed near a well-ventilated east or north window, and moved to a south-facing window in winter. In summer, it is necessary to prevent direct sunlight, otherwise it will burn the leaves.
The main diseases of green radish are root rot and leaf spot caused by nematodes. Root rot can be controlled by applying 3% furandan granules. In the early stage of leaf spot disease, the diseased spots or diseased leaves should be cut off in time, and 70% mancozeb wettable powder 500 times diluted should be sprayed for prevention and control.
After long-term cultivation, the old leaves at the bottom of the green radish will gradually fall off, affecting the appearance. In spring, the plant can be cut from the base, leaving only a section close to the soil surface, to allow it to renew and grow new branches. You can also wrap the leafless branches at the bottom and bury them in the pot soil, which also has a good effect. Green radish has fewer diseases and pests, and scale insects are prone to grow in poor ventilation.
There are many methods for propagating green radish, and the following three are commonly used.
(1) Cutting method: Cut branches about 15 cm long in spring and autumn as cuttings, remove the leaves at the base of 1-2 nodes, and insert them into pots filled with culture soil, 3-5 roots per pot. After inserting, place them in a semi-shaded place, keep the soil and air moist at all times, and they will take root and sprout in about 3 weeks at a temperature of 25℃, and grow into new plants. You can also press the runners into wet sandy soil, and the aerial roots will grow after entering the soil. After new leaves grow, they can be cut into sections and transplanted.
(2) Leaf insertion method: When the temperature remains above 20℃, select the strong leaves on the upper part of the green radish branches, cut them off from the base of the petiole with a sharp and clean thin blade, then wash them with clean water, place them in a cool place for several hours, and insert the base of the petiole into clean water after the cut is slightly dry. The insertion depth should be 1.5 cm. If the insertion depth is too shallow, the water will evaporate and cannot be replenished in time, which will cause the leaves to wilt; if the insertion depth is too deep, the petiole will easily rot. After insertion, place it in a shaded place, generally change the water every 3-5 days, and it will take about 1 month for the roots to grow. This method does not damage the shape of the mother plant and is relatively simple to operate, so it is a good propagation method.
Origin: Brazil
Type: ornamental plant
Flowering period: July-October
Sunlight: Likes plenty of sunlight, but can also tolerate semi-shade, avoid frost damage.
Temperature: Likes warm and cool climates, cannot tolerate severe cold.
Soil: Likes loose and fertile sandy loam.
Water: Avoid waterlogging, tolerate early.
Tips for growing flowers:
When the seedlings grow 2-3 true leaves, they can be transplanted.
Base fertilizer needs to be applied to the planting site or potting soil.
To prevent excessive growth, water less, loosen the soil frequently, and apply topdressing fertilizer.
The optimum growth temperature is 15-30℃. Below 12℃, growth stagnates, leaves turn yellow and fall off, and flowers gradually fall off.
Potted plants in summer need to be properly shaded from the scorching sun at noon. When the flowers turn from red to white and are about to wither, seeds should be collected in time.
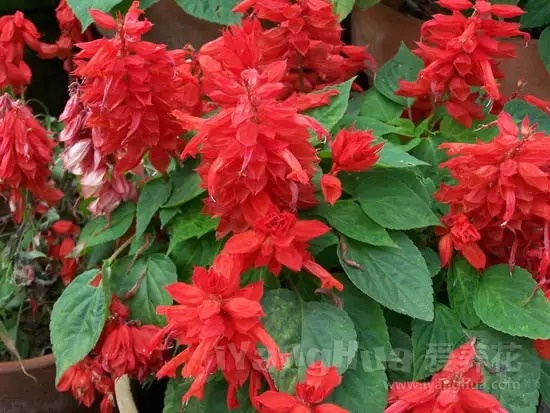
When growing Salvia splendens in a greenhouse, if the room is too hot, too humid or the light is insufficient, it is easy to get rot. You must pay attention to adjusting the temperature and humidity to ensure air circulation. In addition, Salvia splendens is prone to insect pests such as red spider mites and aphids. You can spray 1500 times diluted omethoate emulsion to prevent and control it.
Pinch the tops immediately after transplanting, and pinch at least twice during the growing season to make the plants short and strong, with many branches and dense flower spikes.
Sage can be propagated by sowing or cuttings, with sowing being more common. There is no limit to the sowing season in North China, and spring is the best choice for other regions. Sage blooms late, and those sown in spring bloom in September and October. If you want to advance the flowering period or harvest seeds, you should sow the seeds in a greenhouse or hotbed in early March. Apply a small amount of base fertilizer to the sowing bed, level the bed surface and water it thoroughly, sow after water seepage, cover with a thin layer of soil, and the seeds will germinate 8-10 days after sowing. It will bloom in about 100 days of growth, and the flowering period is about two months. Cuttings are mostly used for tender branches, which are more suitable in March-May or September-October, combined with picking the top buds.
To make the red sage bloom all year round, it is necessary to create environmental conditions suitable for its growth and development, and to pinch the tops at the right time. For the red sage planted in the flower bed or pot, the first pinching is carried out when the plant height is about 15 cm to promote the growth of side branches. When the side branches have 6-8 leaves, leave 4 leaves for the second pinching. After that, when each side branch grows 2-3 pairs of leaves, leave 2 pairs of leaves for pinching to promote the growth of more side branches, making the plant short and strong, with dense branches and leaves, and more inflorescences. If it needs to bloom on May Day, it should be sown in the seedbed in late August of the previous year, and potted in mid-to-late November. The temperature should be kept at around 20℃. Under sufficient sunlight, it can bloom at that time. If you want it to bloom on National Day, you can sow in spring, pinch it several times, and complete the pinching before September 5. It will reach its peak flowering period around National Day.
Taking advantage of the characteristic of the impatiens that after all the inflorescences are picked off, the flowers will bloom in about 25 days. By strengthening water and fertilizer management, providing sufficient light and a temperature suitable for its growth and development, it can be made to bloom all year round.
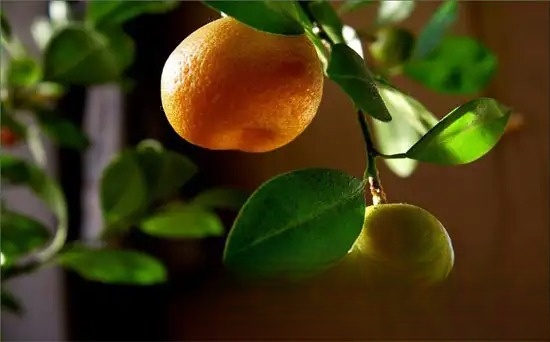
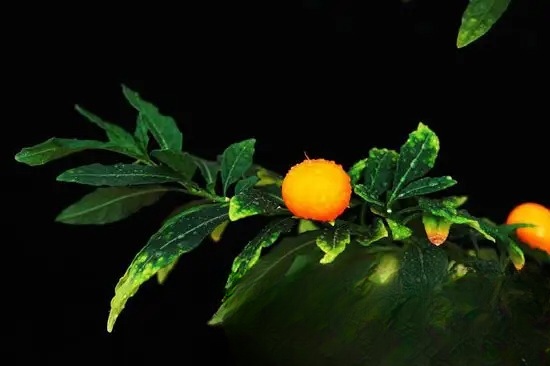
Origin: warm areas in southern China
Type: fruit-viewing plant
Flowering period: flowering period from June to August, fruiting period from November to December
Sunlight: likes sunshine, not shade-tolerant
Temperature: likes warmth, not cold-tolerant
Soil: suitable for loose acidic or neutral soil
Water: likes humidity.
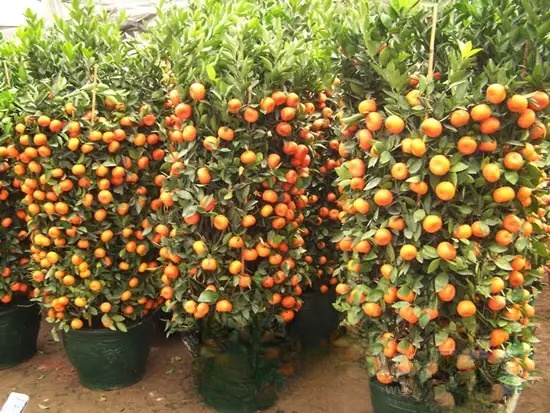
Kumquat grows best in fertile, loose, acidic sandy loam. When potting, it is advisable to use a mixture of 4 parts leaf mold, 5 parts sand, and 1 part cake fertilizer.
After the first pruning, apply decomposed organic fertilizer (such as human feces, green manure, bean cake, fish fertilizer, etc.), and then apply it again every 10 days. At this time, the temperature is suitable, and there is sufficient fertilizer and water, which is conducive to the growth of more spring shoots. When the new shoots are all grown and the tops are pinched, apply quick-acting phosphorus fertilizer (potassium dihydrogen phosphate, superphosphate) to promote the formation of flower buds. The key to the formation of flower buds is to ensure that the nutrients stored in kumquat are not consumed on excessive growth of branches and leaves, but are concentrated on the reproductive development of flower bud differentiation.
"Withholding water" can promote flower bud differentiation. As the saying goes: "Dry flowers and wet fruits", it means that you should water less appropriately during the flower bud differentiation period, which is "withholding water".
In flower cultivation, the method of withholding water is often used to inhibit plant growth and promote flower bud differentiation. Specifically, kumquats should gradually reduce the amount of watering more than 10 days before the beginning of summer heat to control the excessive growth of summer shoots and facilitate the formation of flower buds. Stop watering about 5 days before the beginning of summer heat. After 3-4 days of exposure to the scorching sun, the upper tender leaves of kumquats wilt slightly and droop, and the pot soil is dry and grayish white. However, in order to prevent the slightly wilted leaves from being overly dehydrated, a small amount of water should be sprayed on the leaves every morning and evening, and a little water can be poured into the pot at noon. When the main buds and preparatory buds of kumquats swell and turn from green to white, it means that the differentiation of flower buds has been completed. At this time, it is necessary to resume watering in time and apply thin fertilizer, and they will bloom one after another soon.
The branches and leaves of kumquat are often harmed by scale insects, red spiders, and butterfly larvae. Among them, scale insects are more common, and the occurrence period is April and May. You can spray 1000 times diluted acephate; you can also use a small brush to brush off the pests.
After the spring, the temperature rises, and kumquats grow faster, so pruning is necessary. That is, according to the need to leave branches for the round crown, select 3-5 main branches to be left on the main trunk, and cut off the other redundant main trunks at the base. Then, according to the strength of the remaining main trunk, cut them short respectively. Strong branches can be cut with 4-5 buds; weak branches can be cut with 2-3 buds. In this way, the growth of branches can be adjusted, and each main branch can be encouraged to produce more strong spring shoots, laying the foundation for flowering. After two months of growth, the new shoots are roughly even. In order to control its excessive growth, a second pruning is required, but the amount of pruning can be reduced, mainly cutting the shoots. In the future, the new shoots should be pinched once every 8-10 leaves, the purpose of which is to induce a large number of summer shoots, in order to produce more flowers and fruits. The time of the last pinching should be determined by the formation of buds on all the summer shoots.
Kumquats are commonly propagated by grafting. The rootstock is mostly citrus fruit (seed propagation), and in Guangdong, citron (high-pressure propagation). Grafting methods include cutting grafting, bud grafting, and approach grafting. Cutting grafting is done from early March to early April, 1-3 weeks before budding is appropriate. The spring shoots of longevity kumquats sprout early, so grafting should be done earlier. The scion should be selected from the middle section of a one-year-old branch, with either double or single buds. The best time for bud grafting is from mid-September to early October. Approach grafting is done from April to July, the rootstock should be potted one year in advance, and the scion should be a two-year-old strong branch.
Under normal circumstances, the fruit gradually turns yellow after the beginning of winter. To match the Spring Festival viewing, if the fruit matures early, shade and nitrogen fertilizer (0.4% urea) can be used to delay the maturity. If the fruit matures late and does not turn yellow before the Spring Festival, 1.5×10 ethephon can be applied to the fruit 25 days before the scheduled maturity, or 2×10-5×10 gibberellin can be sprayed, both of which have significant effects.
Origin: India
Type: Flowering Plant
Flowering Period: July-September.
Sunlight: Likes light but afraid of strong sun exposure, slightly shade-tolerant.
Temperature: Likes warmth, not very cold-tolerant.
Soil: Not strict with soil, tolerant to salt and alkali, suitable for growing in fertile, humus-rich and well-drained soil.
Water: Likes moisture.
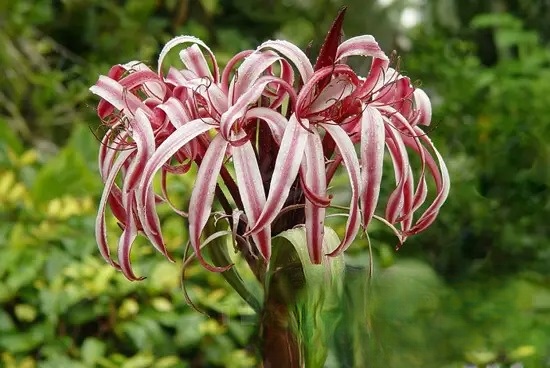
Tips for growing flowers:
Crinum orchid is suitable for both ground planting and potted planting. When potted, 3 parts of pond mud, 1 part of rice husk ash, and a small amount of bean cake can be used as base fertilizer.
This flower likes fertilizer very much. It should be topdressed with manure 2-3 times a month, and phosphate fertilizer should be applied twice before and after flowering. This will help it to bloom more and last longer.
Sufficient water is needed during the growing season, and the soil should be kept moist but not waterlogged. In autumn, watering should be reduced and phosphorus and potassium fertilizers should be applied twice to enhance its cold resistance.
When the light is strong in summer, it should be shaded or placed in semi-shade to avoid direct sunlight at noon, otherwise the leaves will turn yellow. If water can be sprayed to cool down, it will be more conducive to its growth.
Potted Crinum orchids should be moved indoors at the end of October. If the room temperature is kept above 5℃ in winter, they can safely survive the winter. In the spring of the following year, you can decide whether to repot them depending on their growth. In Nanjing, if they are planted outdoors, the above-ground parts will wither in winter, but new branches will grow again in the next spring.
After flowering, the flower stalks should be cut off if no seeds are left, and the old yellow leaves should also be removed at the same time.