Diagram of the propagation method of Kalanchoe
Kalanchoe can be propagated by two methods: cuttings and sowing:
1. Cutting propagation method of Kalanchoe
Cuttings can be made from stems or leaves.
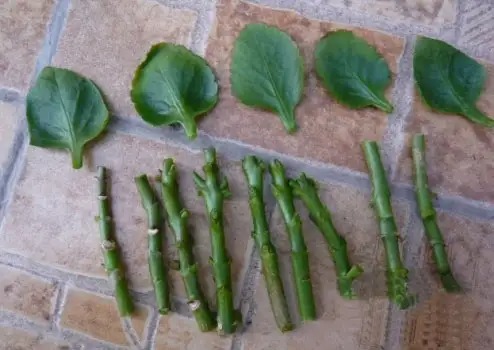
1. Stem cutting. This method is relatively convenient and quick. When cutting stems, first cut off the top buds of healthy plants, about 5 to 6 cm long, wait for the wound to heal, and insert them into the culture soil. Keep the soil moist. After about 2 weeks of rooting, you can start fertilizing.
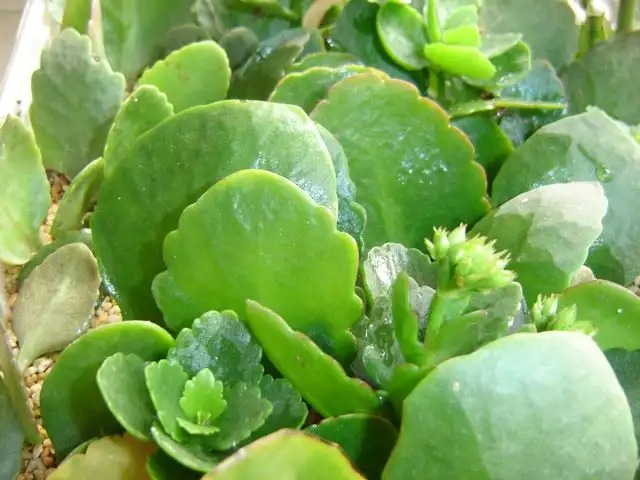
Propagation of Kalanchoe: Leaf cutting propagation
2. Leaf cuttings. Select healthy and fat leaves and cut them off. Place the cut leaves in a cool place for about half an hour to let the wound dry and heal, then shallowly insert them or spread them flat on breathable sand. Keep the sand semi-moist, not too wet, otherwise it will easily rot. When the air is dry or cold, you can wrap it with transparent film to keep it moist and warm. Place it in a place with soft sunlight and ventilation. It will take root within one month and sprout within four months.
2. Sowing and propagation method of Kalanchoe
Seed propagation is usually used in the early stages of developing horticultural varieties. Kalanchoe is mostly sown in March. Simply sprinkle the seeds on moist soil, gently compact the seeds on the soil surface, and then wrap them in a transparent plastic bag to keep them moist. Place them in a sunny place, but not in strong sunlight. They will begin to germinate after about ten days. At this time, the plastic bag can be removed, but be careful not to let the soil dry out too much. If the air is dry, spray water mist to keep it moist. After eight pairs of leaves grow, they can be moved to a full-sun or half-sun place for normal management.
How to propagate Kalanchoe from leaves
The cuttings looked like last June
This spring
Many have flower buds
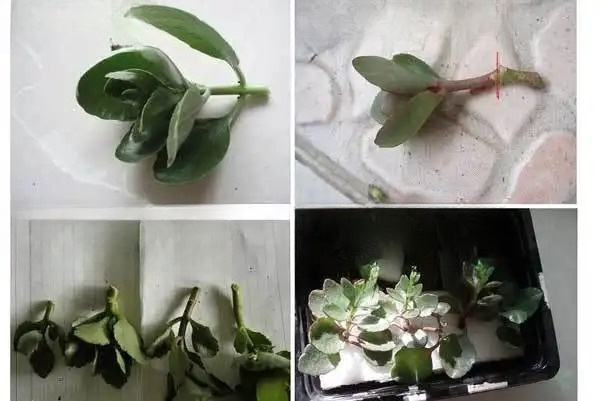
It has always been believed that flower cuttings must be done with branches, and this has been the practice for many years. Last year, I saw Teacher Ohashi introduce the method of using leaves for cuttings (referred to as leaf cuttings) at Tahua. I was very interested and kept it.
When the longevity plant I bought online arrived home, many of its leaves had been rubbed off. I carefully picked up the scattered leaves, and there were actually a large handful. I held them in my palm and was reluctant to throw away any of them. Suddenly I thought of the method of leaf cuttings. If leaf cuttings can be used, wouldn't these little lives be able to be reborn?
So I found the article in my collection and read it carefully. There were some questions that I didn't understand clearly, so I asked Teacher Ohashi for some specific methods and steps. According to the teacher's instructions, I inserted all the leaves. The pot was so big.
Soon after the planting, it was summer, and I had to water or sprinkle water every day. Sometimes the leaves would be washed away by watering, and I would pick them up and carefully check them before inserting them; sometimes I couldn't help but pick up one or two leaves to check. Leaf planting is so difficult to root!
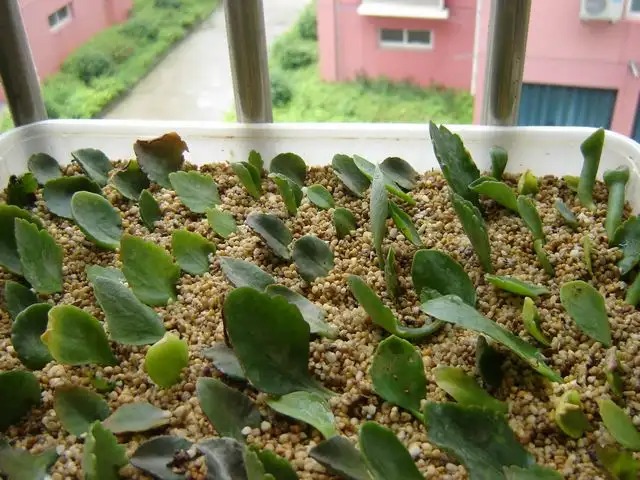
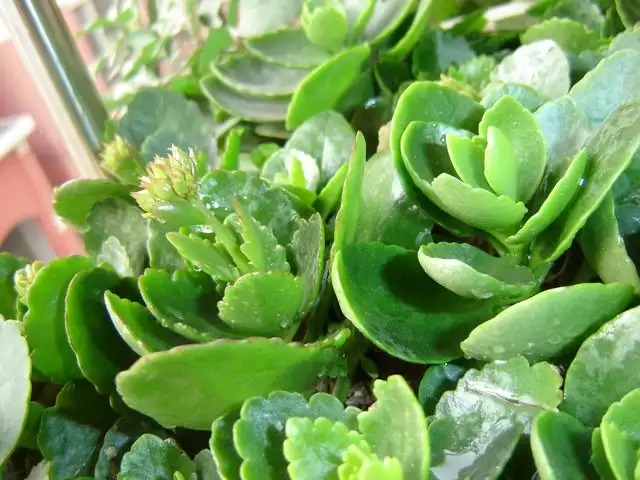
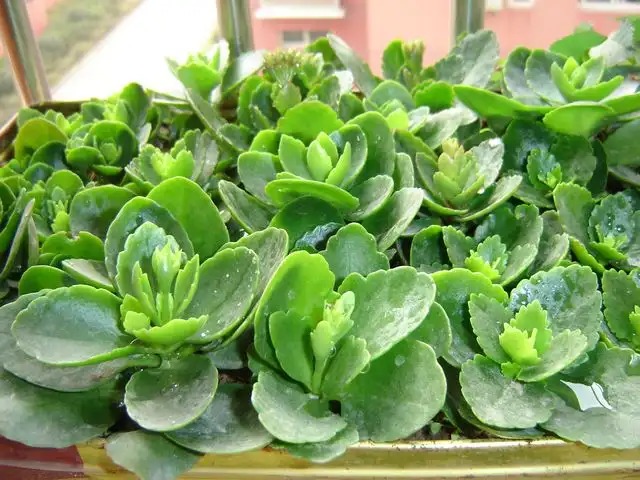
In autumn, the leaf cuttings of Kalanchoe have basically taken root, and the leaves have become hard and strong. Some leaves have gradually grown small branches. In winter, there is no place to put it indoors, so I put it on the windowsill of the balcony and covered it with a plastic bag. I didn't take care of it for a few months. In spring, I saw that it was still alive. I tried to water it with thin fertilizer twice and sprayed it with potassium dihydrogen phosphate twice. Oh, many of them have small flower buds. I am so happy.
The first leaf cuttings were all successful. Here I would like to share my experience with my friends as follows:
1. Leaf cuttings generally do not use soil, but coarse sand as the substrate, and it must be washed clean and impurities picked out;
2. It is also best to use a shallow basin as a container;
3. If conditions permit, it is best to choose thick and strong leaves, which can root and pull out small branches faster. If you intend to cut leaves from branches, you should gently twist them off;
4. Don't insert it too deep. Although it can take root, it prefers to be single and is not easy to produce branches. If you have enough patience and place the leaves flat on the substrate, it will take root and sprout quickly.
5. Water and fertilizer management is similar to that of branch cuttings. Pure sand can be fertilized to meet its growth and flowering requirements, but if conditions permit, it is better to transplant it as early as possible.
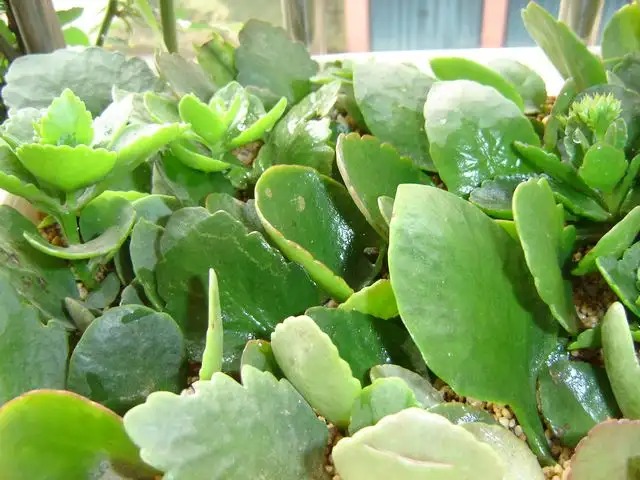
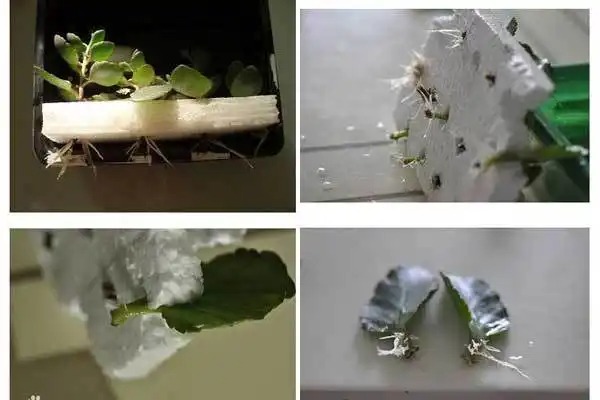
Those mother plants planted in pots were long-lived. I moved them several times in winter, which made me exhausted. I even enjoyed the air conditioning for a long time. I didn't expect that when I moved out of the house in spring, more leaves fell off. I planted all these leaves again, but this time I used two new methods to plant them.
First, the top of the cutting pot is still covered with plain sand, but only one centimeter thick, and the bottom is still covered with soil. This makes it easier to water and fertilize; second, because I found that some leaves can take root even if they fall into the soil, but they tend to rot if they are buried in the soil, so I tried this method.
Second, when I picked up a pot of dead green ivy cuttings, I found that it was cut with sawdust. I thought that the temperature in spring is unstable, and using sawdust might keep warm and be more conducive to survival, so I also cut a pot.
Now both pots have taken root, and the ones grafted from sawdust took root even earlier.
How to use cuttings to propagate Kalanchoe
I like planting flowers and often buy some seedlings to plant, or get some branches to plant myself. Watching the young lives take root, sprout, grow and bloom under my careful care, I am very happy and feel a great sense of accomplishment.
In an early spring more than ten years ago, a grandmother downstairs gave me a bunch of Kalanchoe branches, saying that her son brought them back from Shenzhen, and they were very expensive. After she planted them for two years, the flowers were all limp in the pots, half dead, so she gave me all the cut branches.
At that time, the branches were all soft, the leaves were shriveled and dark red. I cleaned all the branches and planted them in a big pot. Not long after, all of them came back to life, and small buds grew one after another. Although the pot of Kalanchoe was a single-branched plant, its bright red color and the fact that it could bloom on New Year's Day and the Spring Festival made it very popular among friends.
Last year, I bought several varieties of double-branched Kalanchoe from the Internet. In the fall, they grew very lushly, but a few of them looked bad, so I pruned some of them. After these branches were grafted, they quickly survived, just like the single-branched ones, and all of them bloomed this year.
When using cuttings to propagate longevity flowers, pay attention to the following points:
1. The soil for cuttings can be soil that has been used to grow flowers before, or garden soil, loose sandy loam is better;
2. Use a shallow pot for cuttings, not a pot that is too deep;
3. If the cut branches are stored for a few days, they are more likely to survive;
4. As long as the branches have two leaves, they are easy to root. Do not bury the leaves and plant as densely as possible.
5. Water thoroughly after planting. In the later stage of management, alternate between dry and wet, prefer dry to wet;
6. Cuttings can be taken all year round. In winter, you need to keep warm. In Hubei, you only need to put them on the balcony and cover them with plastic bags.
7. After rooting, if you cannot transplant the plants into pots as soon as possible, you can fertilize the cutting pots and manage them normally as if they were planted in the same pots.
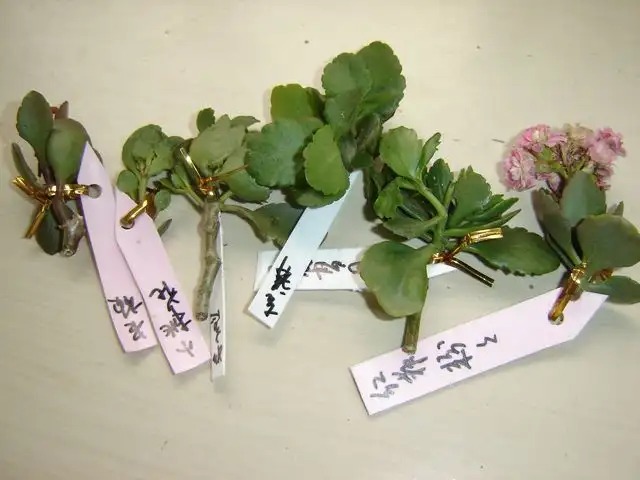
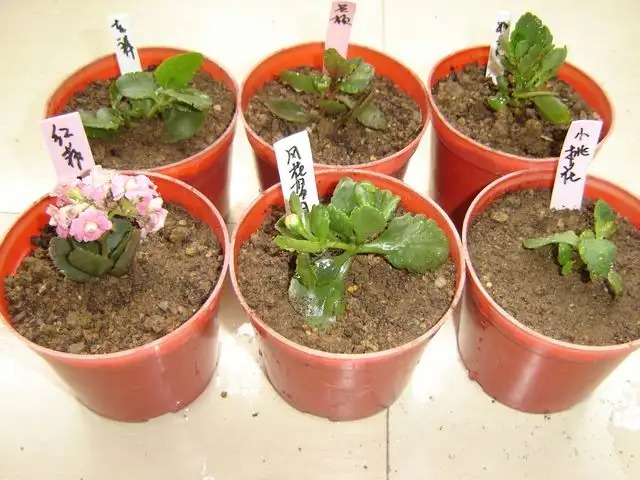
A few days ago, I received six new longevity varieties of branches from my flower friend Yan Zi 1974. It took exactly three days from her delivery to receiving them. Each branch is very fresh and in good condition, and there are carefully made labels. These six varieties are Jixiang, Ruyi, Fenghuaxueyue, Hongfeifenfen, Xiaotaohong and Katon. I wanted to plant them in one pot, but later I was afraid of confusion, so I found six small flower pots of the same size to plant them directly, so that I don’t need to change the pots this year. I think they will all survive, grow vigorously and bloom, and I am looking forward to this day.
Cutting hydroponic method of Kalanchoe
Author: Dingyun Zhishui
It is common to take cuttings from succulent plants. Most of the cuttings are directly inserted into the soil after being dried. Some branches of succulent plants are also placed at a certain height above the water surface to increase the air concentration of the lower branches of the cuttings and promote rooting.
The hydroponic cutting method of Kalanchoe can also be used as a reference for the cuttings of some succulents. In order to avoid rot, do not insert the branches of succulents into water.
Although the longevity flower still needs to be planted in the soil after taking root in hydroponics, which takes more effort than directly planting in the soil, the benefits of hydroponics are also obvious:
1. Easy to observe the rooting status at any time;
2. Easy to root, the rooting speed is more than twice faster than soil planting. The fastest variety can take root in 3 days to 1 week, and can be transferred to soil cultivation in 15 days. The slowest variety can take root in 10-15 days without any accidents, and can be transferred to soil cultivation in less than 1 month.
3. Hydroponics is more flexible than soil planting. It can be carried out at any time of the year. Water can be changed and added at any time. Unlike soil planting, there is no need to worry about excessive water and rot of branches or insufficient humidity to root. Because the rooting time is short and the chance of infection is reduced, the rooting survival rate is higher than soil planting, especially in summer and autumn.
4. When planting in soil, the growth of the terminal buds will stop, and all the nutrients will be supplied to wound healing and rooting. Some leaves will wilt and fall off, and the terminal buds will have black tips. New buds will not grow again until they take root. However, in the hydroponic state, the terminal buds can grow and take root at the same time, and the seedling management can be quickly started after the soil is transferred.
After the roots of longevity plants grow in hydroponics, they have to go through the hurdle of being transferred to soil culture. However, as long as the medium is disinfected and care is taken not to damage the roots when transplanting the seedlings, the survival rate of potting is generally 100%.
Details determine success or failure. Preparations before hydroponics of Kalanchoe:
1. Prepare the cuttings and let the cut ends dry naturally for one night or one day;
2. Wash and disinfect the seedling box, etc., and fill it with 80% boiled water;
3. Drill holes in the sterilized foam; dissolve some rooting powder with 2 drops of alcohol (because rooting powder is not easily soluble in water!);
4. Dip the end of the rod in rooting powder, then insert it into the socket and fix it. All leaves should be above the foam.
5. Remember to label them and put them gently and flatly into the seedling box;
6. If you are doing cuttings in winter, you can cover the transparent seedling box with a lid. In summer and autumn, there is no need to cover it. Then move the seedling box to a bright place and wait for rooting.
The following are the necessary conditions and matters that need to be paid attention to in order to improve the survival rate of hydroponic propagation of Kalanchoe:
1. Cutting selection is the basic premise to ensure the quality of potted flowers. For hydroponic branch cuttings, the best ones are healthy, strong and full, about 10 to 15 cm long, with 2 to 3 nodes and 3 to 4 pairs of leaves (see Figure 1 below). It is best to cut at the node between branches (see the red line in Figure 2 below) or about 1 cm below the node. The slope of the cut should be about 45° to form the largest cross-sectional area. If the terminal bud is a flower branch, cut off the remaining flowers. It is best to have a branch handle of more than 1 cm below the cutting. If the pair of leaves that interfere with the insertion hole can be removed, the rest of the leaves should be retained as much as possible.
2. The wounds of the branches, terminal buds, and petiole sections used for hydroponics must be naturally air-dried for more than 4 hours. This is determined by the characteristics of succulent plants, otherwise the wounds are prone to blackening and festering, resulting in rooting failure. Generally, herbaceous and woody cuttings should not be dehydrated for too long to prevent air from entering the vascular bundle and blocking water transport. Therefore, herbaceous and woody cuttings should be dried at most before cutting. If the leaves wilt, it is best to soak them to make the branches and leaves harden again, indicating that water transport is unimpeded before entering the next process. However, remember that longevity cuttings must not be soaked in water before cutting. Instead, they need to be air-dried to a certain extent. Even if the leaf skin is wrinkled and wilted, it doesn’t matter. On the contrary, it is easier to root. For longevity branches sent from other places, no moisturizing treatment is required. After several days of transportation, the wounds will naturally dry up after arrival, and it is very good to cut them at this time. Don’t add unnecessary details, like cuttings of grass flowers, cuttings, and then soaking them in fungicides, rooting liquid, etc. The air humidity is high in the south, so I usually cut the plants the night before and plant them on the second or third day. (I once put a succulent bulb from a neighbor on a rack for a month before it took root in moist soil, and nothing happened.)
3. The water containers, foam used for fixing cuttings, bamboo sticks used for inserting holes, etc. need to be washed and dried before hydroponics. It would be better if they can be rinsed with potassium permanganate solution to disinfect them. I also wear disposable film gloves when doing cuttings, and try not to touch the water surface with my hands after the cuttings are fixed.
4. The order of water used for cuttings from good to bad is: bottled mineral water (of course, it should be the kind of big brand with quality assurance, if not, just put it behind the tap water) → boiled water → filtered water from a home water purifier (the kind that can filter heavy metals, impurities and some harmful substances) → bottled drinking water → tap water; I sometimes use boiled water boiled with filtered water, and sometimes I just use filtered water. During the rooting process, pay attention to keeping the water clean, and it is best to change the water once a day for the first two days.
5. When hydroponically cultivating, use a bamboo stick to make holes in the foam (preferably the kind with high density, hard and thin). The hole spacing should be just enough to insert the branch stalks of the cuttings without shaking. The bottom of the branch stalk should be exposed outside the lower layer of foam, that is, it must be immersed in water; the branches and leaves on the foam should be stuck just above the hole, that is, the leaves should not be submerged in water. The leaves should also be kept dry as much as possible while waiting for rooting.
6. After inserting, try to keep the cuttings in a stable and static state. Do not move them for no reason or take them out to check frequently.
7. The upper part of the hydroponic culture does not need to be shaded, and can be exposed to the sun normally. Photosynthesis will accelerate rooting. If the water level in the container drops, water should be added in time (especially when using beverage bottles for cuttings). Do not let the cuttings leave the water for too long. I like to use a seedling box with an opaque bottom (see Figure 4), because the information I have consulted shows that the lack of light at the bottom can better simulate the dark environment under the soil, which is conducive to rooting (that is, fooling it! If you use a transparent beverage bottle, you can cover the bottle with a black plastic bag). In addition, you can use a seedling box to plant many plants at a time. The foam is suspended on the water surface and can automatically change with the water level. You don’t have to worry about it being suspended in the air and leaving the water surface like a beverage bottle.
Figure 1 is soft foam, which is too thick. Either make the branch handle longer or cut the foam thinner, choose one of the two.
The foam in Figure 2 is the most suitable, and the larger the foam, the better. It can be cut according to the size of the seedling box, so that if it fits into the seedling box, it will not shake and wet the leaves on the foam. If the foam is too small, it will be top-heavy and easy to tip over.
Figure 3. For some rare varieties, do not give up the fallen or cut leaves easily. They can also be grown in hydroponics. If the petiole is too short and the foam is too thick, the petiole cannot touch the water surface. You can make a cut on the side of the foam and "embed" the leaves in the cut so that they will not sink or fall out.
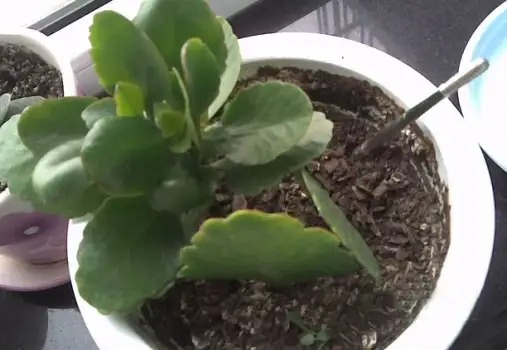
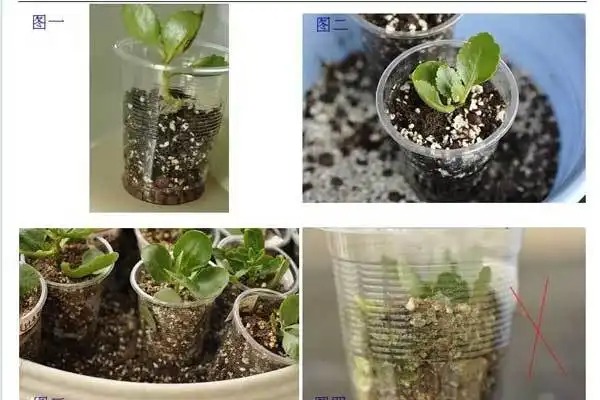
Potting and acclimatization of Kalanchoe cuttings after rooting in hydroponics
After the Kalanchoe cuttings have grown roots, it is best to pot them when the root length does not exceed 5cm. Most novices may not understand the concept of potting. Of course, there are also experts who directly pot and plant them. However, if you have not yet mastered the water control, fertilizer application, and disease prevention of flowers and plants, especially the small seedlings that have taken root in hydroponics, you should pot them once in a small pot to effectively prevent the seedlings from becoming stiff and dead. After being fully potted, the seedlings are often stronger than those directly potted, and their growth will also catch up.
The following is just a discussion of the method of transplanting into pots and personal experience, for reference only (if directly transplanting, the number of plants should be considered according to the size of the pot, and the medium should also be different).
1) When potting, you should try to avoid hot noons, and it is best to do it in the cool evening or night. The medium should be mixed wet first: I use 2 parts of peat soil, 1 part of perlite, a small amount of rice husk charcoal, and a small amount of soil fungicide (mechlorethamine is recommended). You can also use other media that you are comfortable with, such as peat soil can be replaced by humus soil and coconut bran; rice husk charcoal can be replaced by wood ash (wood ash is slightly more alkaline than rice husk charcoal, so use less); if you use nutrient soil containing vermiculite such as Cuiyun Liangtu, you need to increase the amount of perlite; if there is no mechlorethamine, potassium permanganate solution or methyl thiophanate can be used instead. The above proportions are just for reference, and the principle of soil matching is not to add organic fertilizers and quick-acting fertilizers, and try to use plain soil and new soil;
2) Set up a water filter layer in the planting pot (any diameter of 60~90mm is fine, I like to use a disposable transparent drinking cup instead, and the bottom of the cup must be drilled before use), that is, lay a layer of small ceramsite under the bottom of the pot (cup) (medium-grained blue stone, pot bottom stone, medium-grained coal slag, etc. can be used instead);
3) Fill the pot with the medium approximately 50% to 70% full according to the size of the cuttings;
4) Break or cut the foam, and then carefully remove the rooted cuttings (do not pull the seedlings directly out of the socket, as the roots will be broken and there will be wounds, which will easily be infected with bacteria after being buried in the soil);
5) Place the seedlings in the transplanting pot (cup), and then carefully fill the soil (fill the soil with one hand and lift the seedlings up with the other hand. Do not compact it hard after filling, just tap the bottom of the cup a few times); the soil should be filled to the same level as the foam on the water surface during cutting, and the crown of the seedling should be exposed above the pot surface (Figure 4 This "sitting in the well and watching the sky" style of the seedlings is very likely to cause air circulation and the leaves to be easily wetted and infected with bacteria)
6) Water thoroughly to ensure that the roots are fixed (you can also add 1500~2000 times solution of Cuiyun B1 rooting agent and sterilizing liquid to the water);
7) Place in a cool place to allow the seedlings to grow slowly (I like to place the transplanted seedlings with their pots into a pot with soil to allow the seedlings to grow slowly, see Figure 3 below. The potting soil below can simulate the earth's atmosphere, cooling down in summer and keeping warm in winter; it can absorb moisture during waterlogging and retain moisture during drought, which can speed up the growth of the seedlings and increase the survival rate of the seedlings).
Watering and lighting after Kalanchoe cuttings and seedlings
Generally, after watering the roots, the next watering must be done after the water in the transplanting pot or seedling cup is at least 80% dry. If it is potted in May or June, it is more important to pay attention to water control because there is a problem of summer. Kalanchoe is a sun-loving plant, and it is still necessary to maintain a light transmittance of 60% when shading in summer to prevent excessive growth.
When the medium in the transplanting cup becomes lighter and whiter (see Figures 3 and 4 below) or the cup becomes lighter, it is time to water. While not watering unless the soil is dry, be careful not to let the plant dehydrate for too long, otherwise the root hairs will shrink and lose their ability to absorb water.
Propagation methods and cultivation points of Kalanchoe
Kalanchoeblossfeldiana is a perennial evergreen fleshy herb belonging to the genus Kalanchoe of the Crassulaceae family. Other names: dwarf Kalanchoe, longevity flower, false Sichuan lotus. The stem is upright, 10 to 30 cm high, with many branches, and can grow naturally into a low and compact plant without pruning. The leaves are thick and fleshy, opposite, oval-oblong, with serrated edges, dark green and shiny. After mid-November, conical cymes emerge from the tops and axils of each branch, with 100 to 200 flowers per plant. Although the single flower is small, it is closely arranged and clustered into groups, with a good overall viewing effect. The flowers are scarlet, pink, orange, and bright red, which are very gorgeous. The natural flowering period is long, from December to late April, or even May. If short-day treatment is used and the temperature is suitable, flowers can be seen all year round. For home cultivation, it is an ideal indoor flower for viewing flowers when they are in bloom and leaves when they are not.
Common varieties
Common varieties include: Caroline, small leaves, pink flowers. Simone, large flowers, pure white flowers, blooming in September. Nathalie, orange-red flowers. Arjuno, deep red flowers. Miranda, large leaves, brown-red flowers. Nugget series, flowers in yellow, orange, red and other colors. Tetraploid Vulcan, winter and spring flowers, dwarf species. In addition, there are Singapore, Mount Kenya, Sumba, Sensation and Coronado.
Reproduction method
Seed propagation
The seeds of Kalanchoe are very small, with about 35,000 to 88,000 seeds per gram. The pH value of the sowing medium should be between 6.0 and 6.5. The medium should be steam sterilized and watered thoroughly before sowing. A medium composed of 1 part peat: 1 part sand: 4 parts vermiculite is ideal. Sprinkle the seeds on the medium in rows, and then press the medium lightly with your hands. The seeds do not need to be covered. After sowing, cover the plug tray with clean plastic or glass, and place the plug tray in a place with scattered light (be careful not to expose it to direct sunlight). It will germinate after 10 days at 17°C. Remove the plastic or glass as soon as the seedlings appear. After 7 weeks of sowing, when the plants grow to a certain size, they can be transplanted into 2-inch pots.
Cutting propagation
The best time to do cuttings is in May-June or September-October. Choose slightly mature fleshy stems, cut 5-6 cm long, insert them into the sand bed, cover them with film after watering, and keep the room temperature at 15-20 ℃. Roots will grow 15-18 days after cutting, and they can be potted in 30 days. 10 cm pots are commonly used. If there are not many seedlings, you can use leaf cuttings. Cut the strong and full leaves from the petiole, wait for the cut to dry slightly, and then insert them obliquely or lay them flat on the sand bed, maintain humidity, and about 10-15 days, roots will grow from the base of the leaves and new plants will grow.
Propagation by division
After the old plants have passed the summer, they should be repotted and soiled in late August to early September, otherwise their growth will decline. At the same time, the larger plants can be cut into several clumps with a sharp knife and planted separately. After they survive, they should be topped 1 to 2 times to promote more branches and flowering.
Cultivation points
Pot and substrate requirements
The pot should be small and well permeable, and loose sandy soil is preferred. Kalanchoe grows best when planted in a permeable earthenware pot, but it is not beautiful when placed indoors. It can be covered with a plastic pot or a porcelain pot, or it can be directly planted in a small purple sand pot or plastic pot. When planting, put a layer of broken charcoal blocks or broken hard plastic foam blocks at the bottom of the pot to enhance its permeability. Although Kalanchoe is not very selective about soil, it is easy to rot in heavy clay, and grows best in loose, fertile, slightly acidic sandy loam. For home potted plants, it is advisable to mix equal amounts of leaf mold and topsoil from the vegetable garden, and then add 5% to 8% sand as the culture soil. When planting, add some bone meal or nitrogen, phosphorus and potassium compound fertilizer as base fertilizer.
Fertilizer and water management
"Appropriate water control makes the leaves lush, and more fertilizer with phosphorus and potassium makes the flowers colorful". Kalanchoe is a succulent plant with more water in its body, so it is more drought-resistant but afraid of waterlogging. It grows well in dry indoor conditions. In spring and autumn, water the pot soil thoroughly after about 3 days when it is dry, and keep it slightly moist. In summer, it is better to water less, once every 5 to 7 days. Kalanchoe placed outdoors should be protected from rain in the rainy season. Too much water will easily cause root rot, leaf fall, or even death. Appropriate water control makes the pot soil dry and wet, so that the branches and leaves will be lush and there will be more flowers. After entering the room in winter, it is advisable to water it at noon with water close to room temperature, and water it once a week or so.
Kalanchoe likes fertilizer. Half a month after the seedlings are potted or the old plants are divided, 2 to 3 times of liquid fertilizer mainly composed of nitrogen can be applied to promote the growth of stems and leaves. After flowering, liquid fertilizer mainly composed of nitrogen can be applied once to promote its rejuvenation. In the rest of the time, except for the summer, only nitrogen, phosphorus and potassium compound fertilizers can be applied. When fertilizing, do not get the fertilizer on the leaves, otherwise the leaves will rot easily. If the leaves are accidentally stained, wash them off with water. Kalanchoe has a long flowering period. It is necessary to break the rule of not fertilizing during the flowering period. Apply a thin nitrogen, phosphorus and potassium fertilizer or 0.2% potassium dihydrogen phosphate solution once a month to prevent the flowers from becoming smaller and lighter in color due to lack of fertilizer in the later period.
Lighting Management
Kalanchoe prefers a sunny environment. Except for a little shade at noon in midsummer, it should be placed in a sunny place at other times. It needs to be exposed to direct sunlight for at least 4 hours a day to grow healthily. The flower pot should be rotated 180° every half month on the balcony of a building to ensure that it receives light evenly and avoid crown eccentricity, which reduces its ornamental value. Although it can grow in semi-shaded places, its stems are thin, leaves are thin, and flowers are few and light in color, far less lush than in sunny places. If it is too shaded, it will not only easily lose leaves and flowers, but even if the flowering plants are placed in the shade, the flower color will become dim, and then the flowers will fall off and wither.
Temperature control
The most suitable temperature for the growth of Kalanchoe is 15-25 ℃. Above 30 ℃, the growth is slow and it enters a semi-dormant state. Below 10 ℃, the growth stops. Below 8 ℃, the leaves turn red and the flowering period is delayed. Below 0 ℃, it is easy to freeze to death. Therefore, to keep Kalanchoe well, you must create a small environment that is warm in winter and cool in summer. Avoid strong sunlight at noon in midsummer and place it in a semi-shaded place with sufficient scattered light, such as under a big tree, under the eaves or on a north-facing balcony. Pay special attention to ventilation and cooling. You can sprinkle water on the ground nearby, but not on the plant. After the beginning of autumn, from late August to early September, it can gradually see the sun. From October onwards, it should see more sunlight to promote its transformation from vegetative growth to reproductive growth. When the lowest temperature drops to around 10 ℃, move it indoors and place it in front of the south-facing or west-facing windowsill so that it can see more sunlight, keep 10 ℃ at night and 15-18 ℃ during the day, and it will bloom in December.
Pest Control
Aphids: They can cause serious damage to Kalanchoe, especially in winter and early spring. If left alone, the number of aphids will explode. The control method is to spray with 3000 times dilution of 40% dimethoate emulsion (1 g dimethoate emulsion in 3 kg of water); or 1000 times dilution of 25% phosmet emulsion.
Thrips: They like to attack the soft tissues at the growing points of plants with strong growth. It is recommended to use sticky insect boards to monitor their number every week. Even if a small number of adults appear, attention should be paid to the prevention and control of thrips. During the period of thrips occurrence, spray pesticides when there are 3 to 5 insects per plant. Spray pesticides in the early morning when the dew has not dried. You can use 1000 times of 50% phoxim emulsifiable concentrate, 1500 times of 10% imidacloprid wettable powder, or pyrethroid pesticides. It is best to apply pesticides twice in 6 days. You can use 1000 times of Methotrexate plus 2000 times of Acta for better prevention and control.
Scale insects: They mainly feed on axillary buds and growing points, causing damage. It is difficult to eradicate them in a greenhouse, and the key lies in early monitoring. A small amount of scale insects can also cause considerable damage. Generally speaking, as long as the plants are attacked by the insects, they can no longer be sold. Once scale insects are found in the greenhouse, it is recommended to deal with them on the spot to prevent them from spreading. In case of a large outbreak, spray with 1000 times of 40% omethoate, 1500 times of 50% malathion, 1000 times of 255 phosmet, 1000 times of 50% dichlorvos, or 3000 times of 2.5% cypermethrin. Spray once every 7 to 10 days for 2 to 3 times in a row.
Leaf rollers: Leaf rollers are moth larvae, and leaves wrap them in a very distinctive form. When an insect pest breaks out, if you neglect to check, the damage will be quite serious. At the end of the second instar larvae before the leaves roll up, spray 1000 times of 80% dichlorvos Emulsion or 1500 times of 60% double-effect phosphorus Emulsion, 1000 times of 90% crystal trichlorfon, 1000 times of 25% phosmet Emulsion, 1500 times of 5% fipronil suspension, 1000 times of 50% phoxim Emulsion.
Powdery mildew: The most serious fungal disease that attacks Kalanchoe. Infection with powdery mildew is difficult to identify because the disease is already very advanced by the time its characteristic white fuzzy mold appears. In most cases, visible symptoms are limited to localized growth stunting, deformities of leaves and growing points, flower distortions, and dark gray scars on leaf nodes and their forward stems. Most powdery mildews on Kalanchoe are phytotoxic and chemical control is difficult to achieve.
Gray mold: This can cause rot in the leaves and stems of Kalanchoe during the winter. Keeping the leaves dry and the pots well ventilated can help prevent this. Be aware that many gray molds will leave noticeable spots on the leaves.
Rhizopus: Occurs in warm and humid environments. This fungus specifically infects thin and soft tissues. If the environment is too warm and humid, Rhizopus will often occur.
Stem rot: There are many fungi that cause stem rot in Kalanchoe, such as Phytophthora, Rhizoctonia, Rhizoctonia, and Columnar Sporangium. Generally, these fungi can be found on infected plants, but the most common is with fungus gnats that drill holes in the stems and cause damage at the same time. Both pathogens and insect pests should be treated in a two-pronged approach.
Pythium: The root system of Kalanchoe is very sensitive to improper watering. Too dry or too wet can cause problems. According to experience, Pythium mostly appears as a secondary disease in adverse conditions. Kalanchoe can survive with a small number of roots. If the root environment is not good, the plant will only grow a part of the roots, making it easier for Pythium to invade.
Mosaic virus: the most common virus of Kalanchoe, which is extremely common in modern hybrids. This virus only appears in plants that grow in poor conditions and are severely infected. It manifests as dark green mosaic spots on the leaves, and in severe cases it can inhibit the growth of the diseased plants. At present, there is no feasible immune test method to prevent and control this virus, and aphids may be carriers of this virus.
Watch Application
Kalanchoe is a short and compact plant with densely packed flowers, which has an excellent overall viewing effect. It is a flower pot for indoor use in winter, and can be placed on windowsills, desks, and tables.