Cultivation techniques of potted flowers at home
Cultivation techniques of potted flowers at home
1. Put it in the basin
Planting flowers in pots refers to the work of planting flower seedlings in pots for the first time. Planting flowers in pots is an important operation process in potted flowers.
1. Selection of flower pots Choose a flower pot of appropriate size according to the size of the seedlings or saplings. It is not good to have a flower pot that is too big or too small. If the flower pot is too big, there will be too much water in the pot soil. Because the leaf area of the plant is small, the amount of water evaporation is not large, and the pot soil is not easy to dry, which affects the breathing of the root system and even causes root rot. It is also not beautiful. Placing the flower pot also takes up space. In addition, the roots are mostly concentrated at the bottom and around the flower pot, and there are fewer inside, so the utilization rate of nutrients is low. If the flower pot is too small, it will be top-heavy and asymmetrical, which not only affects the viewing, but also because there is less soil, water and fertilizer cannot meet the needs of flower growth, and the root system is difficult to stretch.
The material of the flower pot should be determined according to the type of flowers to be cultivated, your economic conditions and hobbies. For cultivating Chinese orchids and cymbidium orchids, you should use orchid pots. For daffodils, you should choose pots that match the shape. For example, if the daffodil is carved into a "festive flower basket", the flower pot should be round or in the shape of a flower basket. Rectangular or oval pots are not suitable. On the contrary, the shape of "double phoenixes facing the sun" should be square or oval. For those who are mainly interested in viewing the root system, use transparent pots or place them on rockery stones.
2. Soak the ceramic pot in water. A new ceramic pot must be soaked in water for several hours before use. This allows the pot to absorb enough water before use. Otherwise, the pot will absorb the water in the soil and affect the growth of flowers. In addition, soaking helps remove harmful substances on the pot.
Flower pots made of other materials do not need to be soaked in water. Old flower pots should be cleaned before being put into pots, exposed to the sun for sterilization and removal of possible insect eggs, and sprayed with pesticides if necessary.
3. Laying the bottom of the pot In addition to using a pore-free pot for hydroponics or aquatic flowers, the bottom of the pot must have a large enough hole to facilitate drainage. First, cover the drainage hole at the bottom of the pot, and cover it with a piece of pottery pot fragments or tiles to block but not clog the drainage hole, so as to facilitate drainage. If the flower pot is placed on the ground, pests in the soil, especially earthworms, must be prevented from entering the pot. Nylon mesh, copper mesh, palm leather, etc. can be laid at the drainage hole.
Then lay a layer of river pebbles or large sand, slag, broken bricks, ceramsite, etc. on the bottom of the pot to facilitate water seepage and prevent the drainage holes at the bottom of the pot from being blocked. The specific materials can be obtained locally. The thickness of the laying is 1/6 -1/3 of the height of the flower pot, which depends on the type of flowers cultivated. For example, orchids should be thicker, and annual herbaceous flowers should be shallower.
4. The time for potting depends on the most suitable transplanting time for various flowers and your needs. There is no definite time requirement. Seedlings of deciduous flowers and trees should be potted before they shed their leaves but before they sprout. Seedlings of evergreen flowers and trees should be potted when they grow slowly in winter and spring.
5. Fill the pot with nutrient soil and plant seedlings . Choose different nutrient soil or soilless substrates according to the flowers you want to grow. First, add an appropriate amount of culture soil, then carry the seedlings into the pot, and plant one in the center of the pot. Pay attention to filling the culture soil evenly around the pot. When it is about to be filled, lift the seedlings up slightly and shake the pot to make the soil and roots closely contact. The soil surface should be 2-5 cm lower than the top edge of the pot. The specific height should increase as the pot grows larger. The flower pot should leave more. The height from the soil surface to the pot edge is generally about 1/10 of the pot height to avoid overflowing from the pot when watering and fertilizing (Figure 1).

Potting flowers at home
1. Drainage hole 2. Flower pot fragments or tiles 3. Coarse sand or broken bricks, expanded clay 4. Nutrient soil 5. Seedlings (seedlings) 6. Soil filling tools
6. Watering Water the flowerpot immediately after potting it. Pour water slowly into the pot. Make sure to water thoroughly the first time until water seeps out from the bottom of the pot. If it is difficult to water thoroughly in one go, water it several times. You can also place the flowerpot in a container filled with water so that water can slowly seep in from the drainage holes at the bottom of the pot. When the soil on the surface of the pot becomes moist, take it out in time. Note that the water in the water container should not be higher than the edge of the flowerpot.
If you are planting seedlings without a container for root protection, you should place them in a semi-shaded place for maintenance after potting, and then move them to a sunny place after the seedlings have grown. Seedlings with container root protection are usually placed directly in a sunny place after potting.
(ii) Repotting
Repotting refers to the entire process of taking a flower plant out of its pot and placing it in a pot with a larger diameter, or simply changing the soil and then planting it back in the original pot, or using a new pot.
1. Time to repot The following situations require repotting: ① When the flowers grow up, the original flowerpot can no longer provide the soil nutrients needed for the plant to continue to grow, and the roots have penetrated the drainage holes. ② The soil in the pot is compacted, and the physical properties have deteriorated, affecting ventilation and water permeability. ③ The soil in the pot lacks nutrients, the organic matter has decreased, or the pH has changed, which is not suitable for the growth needs of the planted flowers. ④ There are many rotten roots, or there are pests and diseases in the pot soil that seriously damage the roots. ⑤ Use root shoots for reproduction or division.
It is best to repot flowers when they are dormant and new buds are just sprouting. Especially for evergreen woody flowers, it is best not to do it during the dormant period, because it is not conducive to the recovery of damaged roots. Generally, repotting is done once a year, but grown plants can be repotted once every 2 years.
2. The size of the pot should be selected according to the root width of the flower. When repotting herbaceous flowers, the diameter of the pot is generally 3-6 cm larger than the root width diameter. For large woody flowers, the diameter of the pot is 20-40 cm smaller than the crown diameter of the plant. The diameter of the pot for cultivating cacti should be equal to or slightly larger than the diameter of the ball.
3. Repotting method (Figure 2) Take the flower plant out of the pot. Take-out method: ① For small pots or underdeveloped root systems, hold the bottom of the pot with one hand and knock the pot with a fist with the other hand to loosen the soil and pot, and then take out the plant. ② For large and medium-sized pots or pots with full root systems, use the pot-knocking method to take out the flower plant, that is, hold the pot with both hands, turn the plant downward, and gently knock the edge of the pot on a wooden block to separate the plant from the pot, then turn the pot upward and take out the plant. This method is not suitable for large potted flowers. ③ For large woody flowers, you can first dig out the soil on the edge of the pot, and then one or two people step on the edge of the pot, hold the trunk with their hands and forcefully take out the plant. ④ For tall flowers and trees grown in large containers such as flower pots, you must first dig out the soil around the edge of the flower pot, then gently tip the flower pot over, being careful not to damage the branches and leaves, place the edge of the pot against the corner wall, or use a long piece of wood to support one side against the wall and the other side against the edge of the pot, then several people work together to pull out the plant.
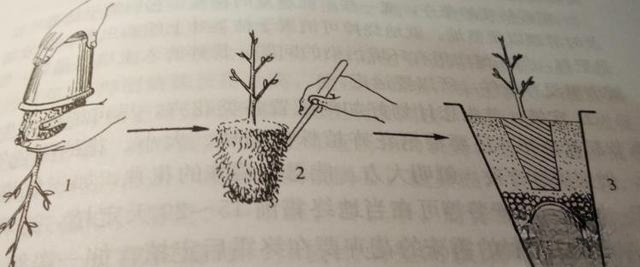
Repotting of household potted flowers
1. Take the flower out of the pot 2. Remove the soil and flower roots 3. Move it to a larger pot
4. Treatment of the residual soil in the original flower pot ① If the plant is small and the root system is not aged, after changing to a larger pot, the original pot soil can be left as it is if the quality is good. Move the plant with the original soil to a larger pot, and then fill the gap with culture soil. ② For perennial woody flowers, 1/4 -1/2 of the soil ball should be removed, and some old roots should be removed. ③ For adult plants that are easy to root and have strong growth or old plants that have been cultivated for many years, when changing pots, the original soil on the roots should be completely removed or only part of the old soil at the root neck should be retained, and rotten old roots should be trimmed. ④ When repotting orchids, remove the old planting materials and cut off the old rhizomes, wash with clean water, and dry in the sun before potting.
3. Land preparation and planting
1. Land preparation If you are moving to a new house and want to plant flowers on the land next to the city building, you should clean up the debris in the soil in advance. This is a labor-intensive task, but it will be easier later. Break up the large clods of soil, remove stones, broken bricks, tiles, mortar, residual tree roots, broken plants and other weeds in the soil, and apply an appropriate amount of base fertilizer. If the soil is too poor, you can replace part of the poor soil with more fertile loam, and buy more farmyard manure to apply to the soil. In spring, you should use a plow or shovel to plow the land. It is best to plow the land before it freezes, which is conducive to eliminating pests and diseases in the soil and maturing the soil. Make ridges or ridges according to the purpose of cultivation. A 1-meter-wide ridge can be used to grow most flowers. Flat ridges are used in arid areas, and high ridges or ridges are used in rainy or low-lying areas. The ridge width is 50 to 60 cm.
Flowers that die after frost or some flowers that cannot survive the summer should have their dry stems and leaves cleaned up in time for land preparation. Burning them on the spot can eliminate pests and diseases on the dry stems and leaves. The ash is also a fertilizer, but it will cause environmental pollution in cities. It is best to crush them and apply them to the soil, but there is no such condition in cities, so they need to be transported away.
2. Planting First, you should plan how to arrange the various flowers so that they bloom during the growing season. You should also arrange the flowers according to their height, size, and flower color, so that they are well-arranged and bright. Flowers that can tolerate frost, such as pansies, marigolds, daisies, and straw daisies, can be planted 15-20 days before the last frost in the local area, so that the beautification effect can be seen in advance. Flowers that are afraid of frost should be planted after the last frost, such as saffron, marigolds, dahlias, zinnias, etc. Woody flowers should be planted early in spring.
Use a pickaxe to dig holes on the ridges or furrows, then apply fertilizer and mix it with the soil. Then plant the seedlings. If you use containers to grow seedlings, be sure to remove the containers, unless you use newspapers to make seedling tubes. Cover the lower part of the seedling pile with soil, but do not destroy the seedling hole for watering. Then water, let the water overflow or flush with the seedling pile, but do not let it flow out of the hole. When the water has completely penetrated into the soil, cover the seedling pile with soil by hand.
3. Direct seeding : It is carried out before or after the last frost. Sow directly on the bed or ridge at a certain distance. After the seedlings emerge, thin out the seedlings, remove the extra weak seedlings, and keep the strong seedlings. Generally, thin out the seedlings 2-3 times, and most species will leave only one seedling at the end. Large-flowered sunflowers, Mirabilis jalapa, Celosia cristata, Pinnata, Impatiens, etc. can all be sown directly. Bulbous flowers such as large-flowered canna, dahlia, gladiolus, tuberose, lily, tulip, etc. can be directly cultivated as bulbs.