Practical flowergrowing tips 8
Vegetable friend: I have been growing vegetables on the balcony for 6 years. I have tried all kinds of vegetables. Finally, I found that the following 7 kinds are really suitable for home potted plants. They are easy to grow. The key is that you can pick them when you want to eat them. After picking them, they will grow wildly again. Some of them can be eaten in one pot for a year.
1. Lettuce
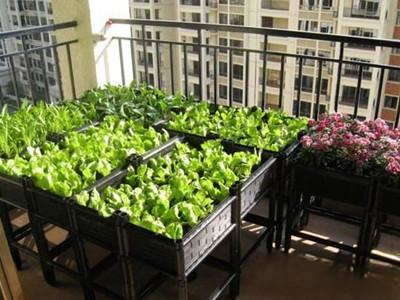
There are both head lettuce with bulbous rhizomes and leaf lettuce with large leaves and no bulbs. If planted on a balcony, it is recommended to harvest leaf lettuce from the outer leaves layer by layer. Lettuce can be harvested about 30 days after cultivation. It is tenacious and resistant to cold and heat, and does not require much care. However, do not expose it to too much light, because it grows vigorously, and too much light will cause the lettuce to bolt and the leaves to harden, so do not place it in a place with lights at night.
2. Perilla

Planting basil on the balcony allows you to pick and eat it anytime, and experience its freshness and fragrance at any time. New seedlings are available in May and June, and even beginners can grow them well.
3. Rapeseed

Rapeseed is a plump and tender root vegetable. If you grow it in a pot, it is recommended to plant small rapeseed the size of a palm. You can directly sow the seeds in the pot.
3. Mustard
The leaves of mustard greens look cute, but they taste spicy. The seeds of mustard greens are ground into powder to make mustard powder. Except for the coldest season, mustard greens can be sown all year round.
4. Chrysanthemum

Planting chrysanthemum at home, you can eat the freshly picked leaves raw. You can sow in spring or autumn, but autumn sowing is recommended so that you can enjoy the delicious taste for a long time in winter. Chrysanthemum has strong resistance to diseases and pests, making it very suitable for beginners.
6. Auricularia auricula
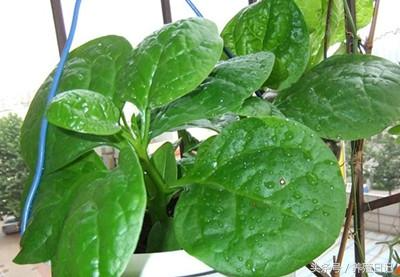
The leaves of Auricularia auricula are thick, rich in vitamins and minerals, and have a smooth taste, which most people can accept. Moreover, it is very heat-resistant and has a long harvest period, which can be harvested until autumn. Auricularia auricula is a vine plant and needs a support or trellis.
7. Chives
Although chives cannot be used in cooking alone, they are indispensable. You can plant them in a pot at home and pick some leaves when you need them. It is very convenient and you don’t have to worry about forgetting to buy them.
In spring, azaleas begin to bloom and sprout again. Do you like azaleas? Then I will teach you a new way to play with them. Just pick a small piece of azalea on the roadside. In 3 simple steps, the branches can be turned into a pot of azaleas!

Step 1: Branch processing
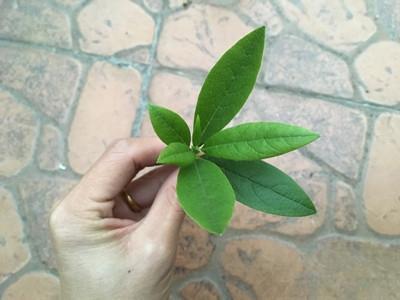
Leave about 5 leaves
45 degree bevel of cut
Step 2: Soak the branches in rooting water
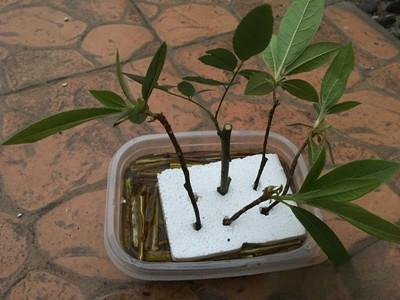
Generally soak for about 24 hours
I use homemade rooting water made from willow twigs (click on the right to see the method: learn how to make your own rooting water using willow twigs in 2 minutes, a tomboy demonstrates how!), or you can use rooting powder directly.
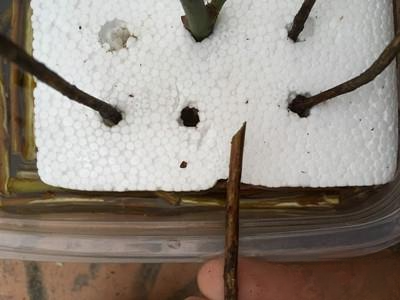
Step 3: Cuttings
Insert the branches into the substrate
You can directly use water for cuttings, but pay attention to the need to protect the base of the branches from light so that they can easily take root. I choose sand for cuttings, which has two advantages: one is that the roots grow stronger, and the other is that the roots do not need to be protected from light.
Step 3: Plant in a flowerpot after rooting
knock off
If the weather is warm where you are, the azalea branches will generally take root in a few weeks. Then you can choose a suitable flowerpot and soil to plant it, and it may bloom next year!
Sowing time: Clivia can be sown in March. However, in some areas, the temperature is still very low and the room temperature is not stable, so it is necessary to start sowing in April. The optimum germination temperature is 15-25℃. When the temperature is too high, the seeds are prone to corruption before germination, and the germination rate will be reduced.
Step 1. Choose the soil
The ideal mixture is a mixture of equal amounts of river sand and leaf mold, with good water permeability and ventilation. The soil used should be sieved before mixing, preferably in small particles.
Step 2: Choose the tools
The best depth for sowing soil is 6 to 7 cm. Therefore, if the amount of seeds is small, you only need to use a shallow unglazed ceramic pot; when the amount of seeds is large, you can use a special sowing box made of wooden boxes or polyethylene.
Step 3: Start sowing
Pour the soil into the container and make the surface of the soil flat. Place a seed every 2 to 3 cm. Use your fingertips to press the seed into the soil. Cover it with 1 cm of soil and water it thinly. Turn the seed over and you can see a protruding part similar to the navel. Roots grow from the navel and grow downwards, while leaf buds grow upwards. When sowing, it is correct to sow with the navel part facing downwards.
Step 4: Germination Management
As long as the temperature is suitable, the water and soil are appropriate, there is no need to worry about the low germination rate even if the sowing is rough and large. When the temperature is suitable, it will germinate in 50 to 60 days and emerge in 100 to 120 days.
Farming Diary Lixia: Today I shot a video of making rooting water with willow branches. Click on the right to watch: "Learn how to make rooting water with willow branches in 2 minutes. A female man demonstrates!" This article is a graphic version, which is convenient for flower lovers without wifi to read.
First of all, willow bark contains natural salicylic acid, which can promote rooting, germination and leaf photosynthesis of plants. Therefore, rooting water made from willow branches can promote rooting. Using it to propagate flowers such as green radish, spider plants, roses and azaleas can greatly increase the survival rate.
Step 1: Cut the willow branches into small pieces.
Step 2: Use a heavy object to break it up. Generally, it can be used as rooting water after soaking for 24 hours. If you don’t want to break it up, it will take longer.
Step 3: Soak the broken willow branches in water.
The air in the city is more or less polluted, such as formaldehyde, secondhand smoke, car exhaust, etc. Do you want to breathe fresh and healthy air? Then quickly keep the following 7 kinds of oxygen-producing plants at home! Maybe they can help us live a few more years?
1. Apricot Wisteria
Apricot leaf vine symbolizes happiness and looks very similar to the large-leafed green radish. Due to the large leaves of the apricot leaf vine, it can absorb more than 80% of harmful gases in the room when placed in the room for a long time, while increasing the negative ions in the air. The apricot leaf vine can also release oxygen and absorb carbon dioxide. It is a "high-efficiency air purifier" among organisms. Since it can purify benzene and formaldehyde in the air at the same time, it is very suitable for placing in a newly renovated room.
2. Chlorophytum
Chlorophytum has a strong ability to absorb formaldehyde. It can also absorb carbon monoxide and nitrogen peroxide emitted by stoves, electrical appliances, and plastic products. It can decompose benzene and absorb nicotine in cigarette smoke. Therefore, it is known as the "King of Formaldehyde Removal" and "Green Purifier".
3. Schefflera
Schefflera is evergreen, with plump and beautiful plants, and is very easy to manage. The goose-foot-shaped leaves can also absorb nicotine and other harmful substances in the air, and convert them into harmless substances through photosynthesis, which can bring fresh air to the room. Potted plants are arranged in living rooms, study rooms and bedrooms, with a strong sense of green.
4. Tiger Skin Orchid
Tiger Piranha has a very strong ability to adapt to the environment. It is a tenacious plant that will not die even if you forget to water it for a month. Tiger Piranha can purify the air at night. If there are two pots of such plants in a 10-square-meter room, they can absorb the carbon dioxide emitted by a person at night.
5. Bamboo
The bamboo is strong and easy to manage. The transpiration efficiency of bamboo leaves is high, which is beneficial to increase air humidity and negative ion concentration. Bamboo can absorb a variety of toxic and harmful gases and is an excellent indoor air "purifier".
6. Rubber Tree
Rubber trees are easy to maintain and have strong adaptability to the environment. They have a strong ability to absorb carbon monoxide, carbon dioxide, hydrogen chloride, formaldehyde, etc. They can absorb sulfur and chlorine in the air and can effectively inhibit the growth of actinomycetes.
7. Silver Queen
Silver Queen has a super strong air purification ability. Studies have shown that the higher the concentration of pollutants in the air, the stronger the purification ability of Silver Queen. It can also effectively absorb harmful gases such as nicotine and formaldehyde.
I am often asked by flower lovers, how often should I water my green radish and my fortune tree? Actually, no one can answer this question, because everyone's maintenance environment is different.
Watering has always been a big problem in growing flowers. If you don’t know how to water them, the flowers will not grow well at best, and may even die. So this is the difference between a flower killer and a master.
So how do you judge when to water your potted plants? You have to learn how to judge the dryness and wetness of the potting soil. Here are a few ways to judge the dryness and wetness of the potting soil. Once you learn them, you will become a master of flower cultivation.
1. Leaf observation method: observe the leaves on both sides slightly curled up, and the newly grown tender stems slightly drooped, which indicates water shortage. (Generally, experienced flower lovers can tell whether the flowers are lacking water just by looking at them, but it is still difficult for novices)
2. Knocking method: Use your fingers to gently knock on the wall of the basin. If the sound is crisp, it means there is a lack of water. If the sound is dull, there is no lack of water. (This also requires some experience to judge)
3. Observation of the pot: if there are no wet marks on the outer wall of the pot and it is grayish white, it means there is lack of water. If there are wet marks on the bottom of the pot or the lower half of the pot wall, it means there is already lack of water but it is not serious.
4. Soil inspection method: insert a small bamboo stick or disposable chopsticks into the soil of the pot, leave it for 1-2 minutes, then take it out. If the chopsticks are not wet and no soil is brought out, it means that watering is needed. If there is a water mark on the bamboo stick, it means that watering is not needed yet. (This method is very suitable for beginners!)
Flower lover: The leaves of my Clivia turned yellow and wilted inexplicably. When I pulled it up, I found that the roots were almost rotten. It should not survive, so I had to throw it away. Unexpectedly, two months later, my neighbor told me that her Clivia had bloomed, and it was a Clivia with rotten roots that she picked up from the garbage dump. I was stunned!
It turns out that my neighbor is an expert in growing flowers. After some consultation, she told me the causes and treatments of Clivia root rot, as follows:
There are three main reasons for the root rot of Clivia:
① In the seedling stage of Clivia, if everything below the leaf base rots, this is mainly caused by excessive watering or the application of uncomposted organic fertilizer.
② If the root below the middle part rots during the growth period of Clivia, and the rotten part appears as brown spots, it may be caused by excessive fertilizer or fertilizer contact with the roots.
③In winter and spring, when Clivia is forming buds, if the soil temperature is too high, its roots will turn dark brown or red and rot.
How to deal with Clivia root rot:
① If you find a Clivia plant with rotten roots, knock it out of the pot immediately, gently peel off the soil, and then rinse the roots with clean water.
②Use a clean knife to completely remove the rotten root pieces and cut them down to normal tissue. Cut off the bad leaves of Clivia to reduce nutrient consumption.
③Then put the processed Clivia roots into 0.1% potassium permanganate solution and soak for 5 minutes for disinfection.
④ Dip the disinfected Clivia in a little sulfur powder or wood ash, or apply carbendazim to its wound. Then, place it in a ventilated and cool place and let the wound dry for 2 to 3 days.
⑤ If the root rot of Clivia is serious, you need to plant it in sterilized sandy soil (high temperature sterilization or exposure to the sun) to promote new roots. If the root rot is not serious, you can replace it with new sterilized culture soil and repot it.
⑥ After the Clivia is potted, watering must be strictly controlled. Never water it unless it is dry. At the same time, it should be placed in a ventilated and cool place for maintenance. After a month, if its leaves are not wilted, it has survived. At this time, dig the pot soil from one side, and you can see new roots growing around the cut. After the new roots sprout, you can switch to normal water and fertilizer management.
The most fearful thing about the fortune tree is too much water. Once there is too much water, the leaves will turn yellow and the roots will rot. If it is not handled in time, it will easily lead to the death of the fortune tree. What should I do if the fortune tree has rotten roots? Don't rush to throw it away. You can try the following method, maybe it will flourish again.
Flower lovers: I saw the tips of the leaves of the fortune tree turned yellow, so I thought I would change the soil in spring. Later, I found that the roots were black. I checked online and found that the roots were rotten and needed to be cut off. So I kept cutting them. Isn’t that cruel? After cutting, the right root was black in the middle, so I continued to cut. It became like this now.
Removal of rotten parts
Treatment methods for root rot of fortune tree:
1. Cut off the rotten parts: Remove all the rotten parts of the money tree, don't be soft-hearted!
2. Disinfection: Cut off the rotten parts of the money tree and soak it in a solution of carbendazim for about half an hour. Of course, it can be longer.
disinfect
3. Drying: It is very important to dry the treated money tree. Basically, it takes more than 10 days to dry. The drying time mainly depends on the climate and the dryness of the trunk. During the drying period, I basically sprayed water every three hours because I happened to be free at home, so I didn't plan to remove the leaves. (If you don't have time, it is recommended to remove the leaves.)
Hydroponics for two weeks
4. Treatment before planting: If you want the money tree to take root faster, you can use some rooting powder.
Then you can grow it in water or in soil. For hydroponics, it usually starts to take root after a week. For soil cultivation, because you can't see it directly, you can usually see from the branches and leaves that it is alive in 2 months. For planting in the soil, the soil must be dry, and all the leaves must be cut off, and then small leaves will grow.
Planting in the soil for 2 months
Growing flowers is actually not complicated. As long as you understand the habits of flowers and are good at using the resources around you, you will not worry about not being able to grow flowers well. Today I will introduce to you the 6 magical effects of kitchen supplies: baking powder (baking soda) on flowers.
1. Promote the absorption of nutrients for potted flowers
When growing flowers, it is very important to absorb nutrients well. Adding some baking soda to rice water to water the flowers will enhance the flowers' adhesion and absorption of fertilizer liquid, and the roots of the flowers will grow stronger.
2. Make the leaves of flowers greener
Spraying the leaves with an appropriate amount of baking soda solution can also achieve the effect of fertilizing the roots, making the leaves of flowers greener and more shiny, and the texture of the leaves also appears thicker.
3. Let flowers bloom and flourish
When orchids are about to bloom, watering them with a 1/10,000 concentration of baking soda solution will help them bloom more luxuriantly and for a longer period of time. Put a small amount of baking soda powder into the clean water in a bucket. The amount of baking soda is 1/10,000 of the clean water. Stir evenly with a wooden stick until the baking soda is completely dissolved in the water to form a solution. Then spray the baking soda solution in the spray bottle evenly onto the stems and leaves of the orchid.
4. Prevention and control of rose powdery mildew
Roses often get powdery mildew, which can be prevented and controlled by watering them with a small amount of baking soda solution.
① Put a small amount of baking soda powder into clean water and stir it evenly with a wooden stick. After the baking soda is completely dissolved in water to form a solution, pour the solution into a spray bottle.
②Spray the baking soda solution in the spray bottle evenly onto the stems and leaves of the rose.
5. Make Clivia grow better
Clivia is also a plant that likes to live in a weak alkaline environment. So if you often spray some baking soda solution on the flower pot of Clivia, Clivia will grow better. Just spray the baking soda solution in the spray bottle evenly on the soil of the flower pot once a week.
6. Make chrysanthemums grow vigorously, with green leaves and bright flowers
Watering chrysanthemums with an appropriate amount of baking soda solution can make the flowers grow vigorously, with green leaves and bright flowers; it can not only provide chrysanthemums with sufficient nutrients, but also increase the absorption rate. Use a spray bottle to evenly spray the baking soda solution on the stems and leaves of the chrysanthemums and the soil in the flowerpot.
Flower lovers: Since the space for growing flowers at home is very limited, I started to wonder if I could grow some flowers and plants in the bathroom. After some attempts, I found that the following 6 potted plants are suitable for growing in the bathroom because they are shade-tolerant and easy to grow. What I didn't expect was that the bathroom has gradually become a garden, and there is no odor and it is more fresh.
1. Ivy
Ivy has strong adaptability to the environment, has strong cold and shade tolerance, and is particularly easy to cultivate.
2. Purple-backed arrowroot
Purple-backed arrowroot likes shade and is very suitable to be placed in the bathroom. Avoid direct sunlight and do not keep it in the sun, otherwise it will cause serious sunburn.
3. Haruha
The leaves of the spring feather are large and highly ornamental. The cut leaves can be used in large flower arrangements. The leaves have peculiar shapes and are very shade-tolerant, making them suitable for indoor bathroom placement. Unless the light is too weak, they can be grown in pots anywhere indoors.
4. Pothos
Pothos is very shade-tolerant and is suitable for year-round cultivation in the toilet. In spring, summer and autumn, it should be placed on the east or north window of the bathroom (or living room, bedroom), and in winter, it should be placed on the south indoor window.
5. Miniature Coconut
The height of a miniature coconut potted plant is generally no more than one meter. As it is shade-tolerant, it is very suitable as an indoor small or medium-sized potted plant for decorating living rooms, study rooms, bathrooms, conference rooms, hotel service desks and other indoor environments, adding a tropical atmosphere and charm to the interior.
6. Chlorophytum
Chlorophytum is very shade-tolerant and can be placed in the bathroom or living room, but it is usually placed in a higher position. When placed on the balcony or windowsill, avoid strong sunlight in the summer. Excessive light can easily make the leaves white-green. In winter, it can be exposed to more sunlight.
Flower lovers: When I first moved to a city building, the flowers and plants I raised died very easily. A flower farmer told me that it was because the environment in the building was drier than in the countryside. Later, I raised the following 7 drought-resistant potted plants, and my home is finally lush and green.
1. Tillandsia
Tillandsia likes dryness and is extremely drought-tolerant. You only need to spray water on the plant or its surroundings occasionally, but remember that water should not accumulate between the leaves.
2. Chlorophytum
I have tried not watering the spider plant for more than two months, and it still grew green and full of life. It is also very easy to reproduce, and if you don't take care of it in a haphazard way, you can keep a pot of it for a lifetime, let alone 20 years.
3. Aloe Vera
Aloe vera is drought-resistant but afraid of waterlogging. If the soil in the pot is too wet and the drainage is poor, it will easily cause root rot, leaf rot, or even death of the entire plant.
4. Yushu
Jade plant should be classified as a succulent plant, right? Anyway, this guy is not afraid of drought, sun or cold, and it may bloom after being raised for 20 to 30 years.
5. Keel
It is highly drought-resistant, and the soil should not be too wet for a long time, let alone waterlogging.
6. Euphorbia pulcherrima
Because the Euphorbia obesa is native to arid areas, it has strong drought resistance. In order to adapt to the dry climate and reduce water evaporation, the leaves of the Euphorbia obesa gradually degenerate, forming leaf-like branches like the Euphorbia obesa.
7. Take root
The plant prefers a warm, sunny environment, is drought-resistant, heat-resistant, and barren-resistant, but not cold-resistant. It is not very demanding on the soil and is suitable for growing in well-drained acidic soil. The plant has strong adaptability and requires extensive cultivation and management.
Orchid lovers: Rainwater is ground water, which not only contains sufficient oxygen, but also rich in nitrogen and some trace elements. The roots and leaves of orchids can absorb it directly. In addition, rainwater is slightly acidic, which can improve the soil of orchids. It is the most ideal water for watering orchids. After I watered orchids with rainwater, the roots were strong, the leaves were green, and the flowers grew vigorously. There are two ways to water orchids with rainwater as follows:
1. Pour
When it rains, place the orchid pots in an open-air yard and let the rain fall on the pots until the surface of the pots is soaked and the bottom of the pots seeps out of the rain. When it rains, choose spring rain and continuous rain. Do not rain less or not in autumn rain, winter rain and rainstorms, and artificial rainfall. Do not rain more in thunderstorms. After rain, the orchid pots should be put away in a cool and shady place in time, and not exposed to the sun. If the orchid pots are exposed to the sun after rain, the temperature of the pots will rise, which will harm the orchid seedlings and make them prone to rot.
2. Tunjiao
On rainy days, collect and store rainwater and use it gradually.
3. Storage methods
① Collect water from the eaves. For tiled houses, do not collect water from the kitchen eaves. The kitchen is full of smoke and fumes, which are harmful to orchids. Do not collect water from the eaves of newly tiled houses. Newly tiled houses have a strong lime smell and the alkalinity is harmful to orchids. For brick-concrete houses, the first eaves water cannot be used, and you should collect water from the second or third eaves. For brick-concrete houses, the first eaves water is heavy with dust, the water is unclean, and the quality is not clear, which is not good for orchids.
② Collect rainwater. There are many rainstorms in summer, so use spare equipment to collect water. You can build a pool to collect water, or collect water in a depression. If you collect water in a depression, the lawn will have good water, but the road surface will have poor water.
4. How to use:
① Use covered containers to store rainwater to prevent evaporation.
②The temperature of rain water is generally below 18℃. The water temperature will rise when heated after storage. Do not spray orchids when it exceeds 22℃.
③ Rainwater is best for watering orchids. When the orchid seedlings are growing quickly, use rainwater to water them, the effect will be particularly obvious.
④ Focus on the use of rainwater. For precious, rare and foliage-art orchid varieties, using more rainwater will help improve the ornamental and economic value of orchids.
Flower lovers: Other people’s large-flowered geraniums are already blooming beautifully, but the ones I have are just growing taller as long as I feed them with good food and drink.
In order to curb its growth, I cut off some large leaves to give it some color.
I am just a small enclosed balcony party. Are you happy or sad that you have grown like this? You are still growing vigorously. If you don’t bloom, I will cut off your water and food.
The diameter has reached 50CM and is still growing. Do you want to grow into a "Hulk"?
This is a large-flowered geranium blooming in someone else's home. Let's appreciate and compare it together.
The more I look at it, the more angry I get. It's about to burst the pot, but why won't it bloom? Some flower lovers may say that the large-flowered geranium needs vernalization to bloom. Sorry, it has already been vernalized. I just want to say that if it doesn't bloom, I will throw away your fake flower.
Asparagus fern has thin and soft branches. If it can be carefully cultivated and shaped, it can become a bonsai with clear layers, orderly heights and elegant shapes. The specific cultivation and shaping methods are as follows.
Step 1. Prepare materials
Choose one asparagus fern about 20 cm tall and two asparagus fern about 10 cm tall; prepare irregularly shaped white marble shallow pots and several matching racks; several rocks about 10 cm in size; and appropriate amounts of culture soil and moss.
The substrate used for asparagus fern potted plants is generally a mixture of 1 part leaf mold, 2 parts garden soil and 1 part river sand. A small amount of decomposed animal manure can be added as base fertilizer later.
Step 2: Modeling
Spread a thin layer of culture soil in a shallow pot, plant the tallest asparagus fern with its branches and leaves bent toward the left side of the pot on the far right side of the pot, and then plant the other two plants, the second and third tallest, in turn.
Try to choose a good planting location to ensure that the three asparagus ferns are in a coordinated and unified orientation, and the whole potted plant looks well-arranged, full and dense, and not messy.
Step 3: Decoration
After planting the asparagus fern, place a few rocks on the right rear side of the pot, and cover the substrate of the pot with moss as decoration, making the overall pot look lush and lively; finally, spray clean water on the planted asparagus fern and moss to ensure that the soil in the pot is moist.
Every spring, when the weather warms up and the temperature rises to 15℃ around mid-March, Christmas cactus starts to grow wildly. The first thing to do at this time is to choose a pot, change the pot and transplant it. If you do this well, your Christmas cactus will bloom and bloom all year round, and it may even bloom twice!
Common flower pots for growing Christmas cactus include plastic pots, purple clay pots and porcelain pots. Plastic pots are mainly used for small and medium-sized plants of cuttings, as well as for the cultivation of various grafted small and medium-sized plants. Purple clay pots are mainly used for collective cultivation of medium-sized plants. Porcelain pots are mainly used for the cultivation of large grafted plants. Stop watering various plants a few days before repotting to facilitate removal from the pot.
1. Cuttings of small and medium-sized Christmas cacti
Since the original pot is relatively small and the cultivation substrate is small, it is necessary to change the pot once a year, choose a larger pot, and mix an appropriate amount of organic fertilizer into the culture soil. Put a layer of small-grained ceramsite at the bottom of the pot and add a layer of plastic gauze.
After removing the original pot, check the root system. If there is no major problem, you can plant it in a new pot with the original soil. If there is a problem with the root system, you can prune it appropriately, but do not remove too much of the original soil. After planting, water it in time. To make the potted plants more spectacular, you can plant 3 cuttings in a larger and shallower purple sand pot. Put more ceramsite at the bottom of the pot to facilitate drainage and ventilation.
2. Grafted small and medium-sized Christmas cacti
The pot should also be changed once a year. In order to make the plant shape beautiful and the flowers bloom spectacularly, the one-pot-multiple-plants cultivation method is generally adopted.
Although the cultivation medium is not as demanding as that of cuttings, in order to achieve rapid growth, it must also be loose, fertile, well-drained and breathable culture soil. You can add some organic fertilizer in an appropriate amount, and a thick layer of expanded clay is required at the bottom of the pot.
3. Grafted large Christmas cactus
For plants grafted by traditional methods, dwarf grafting methods and root grafting methods, they can be planted in a larger light purple sand pot in an orderly and clear hierarchy, with tall plants planted in the center and short plants planted around them. This will quickly form a large plant group. For root grafted plants, when using larger flower pots, 5 to 6 plants can be evenly planted in each pot, which will quickly form a radial plant shape.
The plant can be repotted once every three years. It is difficult to remove the plant from the pot when repotting. Sometimes it is better to break the pot than to damage the roots too much, because if the roots of large plants are damaged, some stem nodes will fall off.
When repotting and transplanting, if you choose a Panci pot, you should ensure the air permeability of the pot bottom. You can put a breathable plate made of a waste plastic basket at the bottom of the pot, keep it 1 cm away from the bottom of the pot, and then spread a thick layer of large-grained ceramsite on it. All kinds of plants should be watered in time after repotting, and placed in a place with scattered light to allow them to grow slowly.
In early spring, the temperature gradually rises, and Clivia gradually enters a vigorous growth stage. Growing Clivia well in early spring is very beneficial to its future growth, bud formation, and flowering. It is no longer a dream for Clivia leaves to become green and bloom year after year!
1. Hardening and adaptation of seedlings
Pay attention to the characteristics of spring temperature changes, so that Clivia can gradually adapt to the rising temperature and prevent it from catching a cold. Because Clivia that overwinter indoors lacks nutrient supply, once exposed to wind and sun, the leaves will become dehydrated, making them less bright, and their hardness and thickness will decrease. In severe cases, they may even turn yellow or rot.
In the southern region, when cultivating Clivia, it can be allowed to overwinter in the sun in normal years. If it is covered with a film, it should be gradually removed. In colder regions, if Clivia overwintered indoors, it should be moved from indoors to outdoors to harden the seedlings and receive outdoor sunlight and fresh air.
Generally, at noon on a windless, sunny and warm day, when the temperature reaches 15℃, move it outdoors to get exposure to sunlight and fresh air, and gradually extend the time it is placed outdoors until it adapts to the outdoor environment and climate, so as to restore the vigorous growth of the Clivia and make the Clivia plant short and strong.
2. Add water and fertilizer
After the spring, as the weather warms up, the growth rate of Clivia accelerates, and the demand for water and fertilizer increases greatly. The amount of watering should be gradually increased compared to winter, but do not increase it suddenly to prevent excessive watering from rotting the fleshy roots, causing Clivia root rot, yellow leaves, or even the death of the entire plant.
You can add nutrient-rich organic fertilizers such as decomposed bean cake water, chicken and pigeon feathers, livestock hoof horns, or special fertilizers for Clivia. Apply thin fertilizers frequently, and avoid applying concentrated fertilizers or raw fertilizers to prevent leaf scorch and root rot.
3. Cooling during flowering period
After the spring, the temperature gradually warms up. If the temperature is too high, the flowering period of Clivia will be shortened. If the indoor temperature is controlled at around 15℃, the flowering period can be extended by more than a month, improving its ornamental effect.
4. Change pots and soil
Repotting and changing soil in early spring will not affect the growth of Clivia plants, so it is the most appropriate. Repotting and changing soil for Clivia is one of the important measures to accelerate its growth. Whether it is a seedling or an adult orchid, it is necessary to change the pot and soil. For mature Clivia that is blooming, wait until the flowers fade before repotting. According to the size of the Clivia plant, change to a slightly larger pot and use leaf mold suitable for growth.
5. Division cultivation
When repotting, if there are small daughter plants with 4 to 5 leaves next to the Clivia plant, the daughter plants should be broken off and the wounds of the daughter plants and the mother plant should be smeared with gentian violet or plant ash to prevent the wounds from infection and rot. Then, plant the treated daughter plants in a sterilized plain sand pot and maintain them for about 1 month. When the daughter plants grow new roots, replant them.
Senior orchid lovers: Whether or not an orchid blooms depends on whether it has flower buds. Some orchid flower buds grow from pseudobulbs, while others grow from leaf buds. In the early stage, they are round drums with clear silk patterns on them.
Orchids that bloom in spring have their flower buds formed in summer, emerge in autumn, and become buds in winter. Autumn is the key period for the healthy growth of orchids. Autumn is the season for repotting orchids, and it is also a dry season.
To protect the flower buds, you need to do the following two things:
1. Don’t damage the flower buds when planting orchids
When pruning yellow leaves, carefully check whether there are hidden flower buds in the leaf clips to prevent accidentally cutting the flower bud heads. Flower buds with damaged heads will rot and turn black when soaked in water. When planting orchids, remember the direction of the flower buds. If the flower buds originally grow on the sunny side, plant them facing the sunny side. If the direction is changed, the flower buds will stagnate and wilt.
2. Do not spray orchids in hot and dry weather
When the weather is hot and dry, the flower buds' bracts are slightly open and not tightly closed. Watering will soak the flower buds' bracts. When the water temperature rises, it will burn the bracts. If the bracts are damaged, the buds will gradually rot and die. When the flower buds emerge from the soil, water should be filtered from the edge of the pot. Watering from the center of the pot will easily damage the flower buds.
Flower lovers: If you want to grow flowers well, you must fertilize them. However, neither compost nor chemical fertilizers are suitable at home. What should you do? You can use the following 6 methods to water flowers. Flowers will still grow vigorously without fertilizers. It is easy to grow flowers to overflowing pots, with green leaves and continuous flowers.
1. Bean curd water
Now many families make their own soy milk, and the remaining bean dregs are also one of the very good fertilizers. It contains nutrients such as protein, multiple vitamins and carbohydrates.
Production process: collect the bean dregs and put them into a large cola plastic bottle, add 5 times of clean water, seal the bottle mouth, and allow it to ferment fully. During fermentation, it should be noted that there should be air in the bottle, because the microorganisms need aerobic respiration during the fermentation process. It can be used in about 10 days in summer and about 20 days in spring and autumn. When using, add clean water at a ratio of 1:1.
2. Magnetized water
When you water the flowers with magnetized water, the leaves will be dark green, the stems will be thick, the root system will be well developed, and the flowers will have strong resistance to cold and pests and diseases, such as Clivia, Camellia, Azalea, and Five-needle Pine. This is because magnetized water can enhance biological activity, allow the organic matter in the potting soil to decompose well, and allow the inherent fertility of the soil to be fully utilized, significantly increasing the number of microorganisms and nutrients in the soil, thereby promoting the growth of flowers.
3. Rice washing water
Rice washing water is rich in phosphorus, which is an important element for flowers to bloom. Phosphorus can make flowers bloom more and bear more fruits. If you often use rice washing water to water flowers, it can not only make the flowers bloom brightly, but also the rice washing water is acidic after fermentation. It can be used to water flowers that like acid, especially azaleas, jasmine, gardenias, and white jasmines, so that they grow strong, have a strong fragrance, and delay the flowering period. It can also prevent the leaves from yellowing and keep them green all year round.
Therefore, rice water should be used more often in home flower cultivation. However, it is best to use fermented rice water for watering flowers. Fermentation method: collect the rice water and put it in a container such as a water tank, cover it and store it for about 10 days before use.
4. Fish water
The water in fish ponds, aquariums and filter cotton washing has a temperature close to the natural air temperature and contains fish bait residues and excrement, which can be converted into nutrients needed by plants. It is a good water for watering flowers.
5. Milk
Milk can be used to water flowers. The organic matter in milk can improve the soil structure and make the soil fertile. However, milk cannot be poured directly into flower pots, otherwise it will irritate the flowers. Therefore, it is necessary to dilute the remaining unspoiled milk with water in a ratio of 1:10 and use it to water flowers.
6. Beer
Using beer to water flowers can make potted plants grow vigorously, with green leaves and bright flowers. It can not only make potted plants get sufficient nutrients, but also absorb them very quickly. Specific usage method: Mix water and beer in a ratio of 1:50 and then use it to water flowers.
Flower lovers: I often hear people say that you can grow vegetables at home, but a novice like me has no idea where to start. Until I learned that I could use a basket and a few sheets of paper to grow seedlings without soil or watering, I can eat fresh and safe vegetables that I grow myself every day.
1. Pea sprouts
① When selecting seeds, it is best to choose seeds that are tender, large and smooth. They need to be cleaned before sowing, and the seeds that are infested with insects and broken are removed. However, old seeds cannot be used for germination.
② The germination tool should preferably be a special plastic seedling tray purchased, but a flat tray can also be used instead.
③ Wash the plastic seedling tray and place 1-2 layers of clean straw paper or A4 paper on the bottom of the tray. Soak the paper bed with water.
④ Soak the pea seeds for 24 hours, then spread them evenly on the paper bed. Spray the seeds with water once a day, and the temperature should be kept at 20-25℃ during the day and 8-18℃ at night.
⑤ In 12 to 15 days, the pea seedlings will grow into about 15 cm long. It is generally suitable to harvest at this time.
2. Broad bean sprouts
① It is better to choose small seeds with fast growth rate and tender quality. It is especially important to note that fresh broad beans and old seeds cannot be used to produce broad bean seedlings. Before sowing, they need to be cleaned and insect-infested and broken seeds should be removed.
② Soak the broad bean seeds in water for 24 hours, then pour out the water and cover with a wet towel to germinate. Wash the broad beans every day, and short sprouts will appear after 3 days.
③Sprinkle the sprouted broad beans on a plate covered with 1-2 layers of white paper. Spray water 1-2 times a day to keep the paper and broad beans moist.
④ In 12 to 15 days, the broad bean sprouts will grow into 10 to 15 cm thick and tender ones. When the sprouts are strong and turn green, they can be harvested.
3. Radish sprouts
① The seeds for growing radish seedlings should be large, bright in color, and tender in quality.
② You can choose a flat-bottomed porcelain plate, plastic plate or other container. Place a piece of clean paper on the bottom and spray it with water.
③Spread the seeds evenly and spray them wet. The amount of seeds should be enough to cover the entire surface of the paper.
④ Cover the plate with a wet towel and spray water 1 to 2 times a day to keep the paper moist.
⑤ Keep the temperature between 18 and 25 degrees Celsius. After 3 days, the seeds will sprout. Remove the wet towel and let the sprouts see the light. Fresh radish sprouts will be produced in 7 to 10 days. The seedlings can be harvested when they are 6 to 10 cm tall, the cotyledons are flat and fully enlarged.
4. Water spinach seedlings
① Choose water spinach seeds with full seeds and high germination rate. Soak the water spinach seeds in tap water for 36 hours, then take them out and drain the surface water.
② Place 1-2 layers of clean white paper on a flat container and spray the paper wet. Sow the seeds evenly on the paper bed after soaking for 36 hours, and sow them in such a quantity that the seeds cover the paper surface. Cover the seeds with a wet towel to keep them moist. Spray water 1-2 times a day, and spray so that there is no water on the paper bed. Keep the temperature at 20-25℃. After germination, remove the moisturizing towel and increase the light.
③ The seeds germinate in 2-3 days, and the sprouts begin to elongate in 5-7 days. When the sprouts grow to 6-8 cm in 8-10 days, the amount of water spray and light should be increased appropriately to ensure that the cotyledons unfold and the outer shell of the water spinach seeds is removed. The water spinach seedlings are harvested when they grow to 10-12 cm and the two pairs of cotyledons are fully unfolded and V-shaped.
5. Sunflower seedlings
① Any kind of sunflower seeds can be used to produce sunflower seedlings. You should choose seeds with full seeds and high germination rate.
② Soak the sunflower seeds in tap water for 8 hours, remove them and drain the surface water. Place 1-2 layers of clean white paper on a flat-bottomed container and spray the paper wet. Sow the seeds soaked for 8 hours evenly on the paper bed and cover with a wet towel to keep them moist. Spray 1-2 times a day, and the amount of water sprayed should be such that there is no water accumulation on the paper bed. Keep the temperature at 20-25℃. After germination, remove the moisturizing towel and increase the light. Also pay attention to the amount of water sprayed and insufficient light will cause the seed shell to not fall off.
③8-10 days. When the sprouts grow to 6-8 cm, the amount of water and light should be increased appropriately to ensure that the cotyledons are unfolded and the sunflower seed shells are shed. The sprouts can be harvested when they are 8-12 cm tall, the seed shells fall off, and the cotyledons are fully unfolded.
Soybean sprouts are rich in nutrients and taste good, but the bean sprouts bought on the market are not reliable (there are too many incidents of toxic bean sprouts) and the taste is not very good, so many friends choose to grow bean sprouts at home, but many people report that their own bean sprouts are very slow and have a low success rate, and they also have a stinky smell, which feels very bad.
This problem mainly occurs due to the poor quality of the beans, such as old soybeans. However, these are the only beans available in supermarkets. However, this problem is not difficult for foodies. Some netizens have discovered that processing the soybeans according to the following 3 steps can not only increase the success rate, but also prevent them from having a rotten smell. Let’s learn about it together!
1. Soak soybeans and sort the soybean seeds to remove broken and worm-eaten seeds. Soak the sorted seeds in tap water for more than 12 hours, preferably no more than 24 hours, and wash them twice in the middle.
2. Refrigerate and germinate at low temperature (key point): Put the soaked soybeans in a fresh-keeping bag, and then throw them into the refrigerator (note, do not freeze them). Don't worry about it. After a few days or a week (the temperature in the refrigerator is relatively low, so germination will be slower), as shown in the picture, the soybeans will show small tips.
The soybeans show their small tips
3. Pick out the bean sprouts with small fangs from the fresh-keeping bag, put them in a container with a breathable bottom, cover them with a wet towel, and water them three times a day. In about three days, the bean sprouts will be ready.
Special reminder:
①If you feel that the low-temperature germination time is too long, you can also germinate it at room temperature.
② If you don’t put heavy objects on the bean sprouts, they will be thin and long. When you stir-fry them, you will feel like your mouth is full of beans, and the taste is not as good as thick and strong ones. So remember to put something on them.
③ Low temperature germination is slower, but you can soak more beans at one time, or soak the beans in batches.
④ It is best not to expose it to light, as it will taste a bit bitter.