Growth and cultivation of Clivia
Growth and cultivation of Clivia
Clivia growing conditions
The normal growth, development, flowering and fruiting of Clivia are closely related to the environmental conditions of its growth. Good environmental conditions suitable for the growth of Clivia can adapt to the needs of the plant at each growth and development stage and promote its vigorous growth. Otherwise, it will affect the normal growth and development of the plant. The environmental conditions of Clivia mainly include five elements: temperature, light, soil, water and fertilizer.
Temperature requirements:
The origin of Clivia is in the mountain forest area of southern subtropical Africa, where it is warm all year round. The annual average minimum temperature is not less than 10℃, the maximum temperature does not exceed 22℃, and the annual precipitation is 500-1500 mm. The growth and development of various organs of Clivia adapt to this natural environment that is neither cold nor hot, neither wet nor dry. Therefore, when it is artificially cultivated, it is also necessary to create a natural environment similar to the origin, so that the plant can grow and develop better. The optimum temperature for artificial cultivation should be controlled at 15-25℃. When the temperature drops below 10℃, the growth and development of the plant is slow. When it drops to 5℃, the growth and development will be inhibited. When the temperature drops below 0℃, the leaves will be frostbitten in mild cases, and the whole plant will be frozen to death in severe cases. When the temperature exceeds 30℃, the leaves will grow too long, and the leaves will be slender, soft and thin. If the humidity is low, the leaves will wither and turn yellow. In severe cases, the whole plant will wither and die. When the temperature exceeds 30℃ in summer, ventilation and cooling should be carried out.
Different sizes of Clivia plants have different temperature requirements. Seedlings require relatively higher temperatures. This is because the seedlings are small and have vigorous growth. High temperatures are conducive to rapid growth in the seedling stage. The temperature difference required in the seedling stage is smaller. The seedling growth temperature should be controlled at 20-30 ℃ . If it is lower than 15 ℃ , the new leaves will grow slowly. If it is lower than 10 ℃ , the new leaves will grow very slowly and tend to grow chicken tongue leaves, that is, new leaves with thin tips. For one-year-old seedlings, the temperature should be controlled at 20-25 ℃ . For two-year-old seedlings, the temperature should be controlled at 15-25 ℃ . For mature orchids, the temperature should be controlled at 15-25 ℃ . For mature orchids, especially in the winter arrow season, the temperature can be between 10-25 ℃ . Artificially creating a large temperature difference is very conducive to the arrow of the flower and does not cause the phenomenon of pinching the arrow.
Temperature difference is the difference between the highest and lowest temperatures in the environment, and also refers to the temperature difference between day and night. Temperature difference allows plants to adjust the speed of nutrient absorption, which is more conducive to the growth and development of plants. It is conducive to the full absorption of nutrients by the leaves of Clivia. Temperature is a major condition for the healthy growth of Clivia. The difference between Clivia grown on windowsills and in flower cellars is often obvious in the temperature difference. The temperature difference in flower cellars is large, while the temperature difference on windowsills is small. Especially in winter, there is almost no temperature difference when growing orchids on windowsills. Plants grown in flower cellars are superior to plants grown on windowsills in terms of leaf brightness and color. Plants grown on windowsills will have poor leaf gloss, drooping leaves, and are prone to pinching arrows. Temperature has a certain impact on photosynthesis and respiration of plants. Plant photosynthesis and respiration are two interdependent processes. Photosynthesis is the process of synthesizing organic matter to store energy, while respiration is the process of decomposing organic matter. Temperature has a direct impact on photosynthesis and respiration. Within the temperature range of adaptation, the growth, metabolism and absorption rate of plants are related to the temperature. When the temperature is high, the metabolism speeds up and the plants grow rapidly. When the temperature is low, the metabolism slows down and the growth rate of plants also slows down. When the temperature and light are insufficient, it is difficult for plants to maintain life.
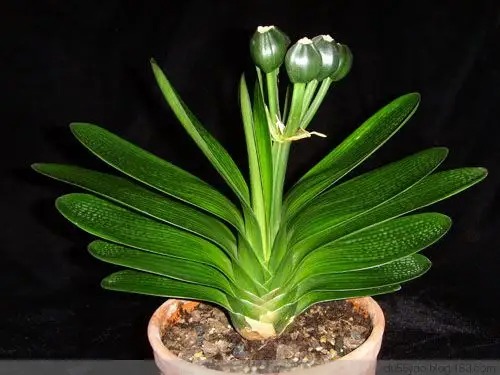
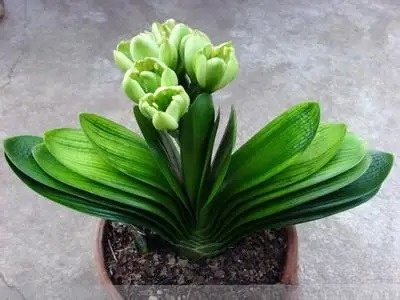
The growth state of leaves is different at different temperatures. In summer, the leaves tend to grow long and thin due to high temperatures. In spring, autumn and winter, especially in winter, the temperature difference is artificially controlled, and the newly grown leaves are wide and short. Temperature also has a great impact on the flowering period. When the temperature is too high, the flowering period is short, and when the temperature is low, the flowering period is long. In summer, when the temperature is above 30℃, the flowering period may last for 15-20 days. In winter, when the temperature is 10-15℃, the flowering period can reach more than 30 days. The most suitable temperature for flowering is 15-25℃. Within this temperature range, the large temperature difference is conducive to drawing arrows. The flowers are large and colorful, and the fruit setting rate is high. Therefore, temperature can control the length and time of the flowering period.
Water requirement:
Water is an essential element for plant life. No plant can survive without water. The annual precipitation in the native place of Clivia is 500-1500 mm, but the rainfall in each month is uneven. The precipitation is less from May to September, more from October to April of the following year, and higher from November to February of the following year. Therefore, the plant adapts to this dry and wet environment. When there is more water, the leaves and roots can store a certain amount of water. Once the soil moisture decreases, the plant can still use the stored water to maintain life and survive the drought season.
Water is the raw material for photosynthesis of Clivia plants, and it is also the carrier for absorbing and transporting nutrients. Chemical elements such as nitrogen, phosphorus, and potassium in the soil can only be absorbed by the roots of the plant if they are dissolved in water. The organic matter produced by the leaves must be dissolved in water to be transmitted to the various organs and tissues of the plant. Water is an important component of the plant body. The water content of the roots of Clivia plants is about 91%, while the water content of the leaves is about 90%, which is slightly lower than the water content of the roots. Therefore, the cells and tissues in the Clivia plant can only carry out normal physiological activities if there is sufficient water in the body. If there is a lack of water, the plant will wilt and the leaves will droop.
Clivia requires a neutral pH value in water, that is, a pH value of 6.5-7, which is suitable for the growth and development requirements of the plant.
Don't take watering Clivia as a trivial matter, because it is a key issue in the cultivation of Clivia. Watering Clivia cannot be dogmatic or stereotyped. It should be decided when to water and how much to water according to the changes in seasons and weather. You can't water it as soon as you see the surface soil is dry, which will cause water accumulation in the pot. The method to detect the amount of water in the pot is to knock on the pot wall with the index finger joint. If the sound is crisp, there is less water in the pot. If the sound is dull, it means that the pot is moist. Another method is to pick up the pot based on past experience. If the pot soil is heavy, it does not lack water. If the pot soil is light, it means that there is a lack of water. In order to water thoroughly, the pot soil must be loose and breathable, with good water retention. If the pot soil is compacted and dry, no matter how much water you pour, no matter how many times you pour it, the water will flow along the pot wall to the bottom of the pot. All of it flows out from the bottom hole, and the roots are not watered at all. If you mistakenly think that the plant has been watered thoroughly, the Clivia will soon be in a state of drought, and the plant will wilt over time. In mild cases, the roots will dry up, and in severe cases, the entire plant will die.
The time of watering is related to the season. In spring and winter, the indoor flower cellars in the north need heating. The temperature is higher at night, and the temperature is the lowest in the morning, so it is best to water the flowers in the morning. Because the temperature of the water stored in the flower cellar is close to the temperature of the pot soil, it is beneficial to the growth of the plants. In summer and autumn, heating is not needed, but the temperature is hot and relatively high.
The amount of water required by Clivia plants during growth, the humidity in the potting soil must be maintained at about 40%. It is unscientific to simply emphasize that water should be applied when it is dry or wet. It should be flexibly controlled according to the changes in seasons and climate. In spring, it should be large and permeable, in summer, it should be frequent and small, in autumn, it should be neither dry nor wet, and in winter, it should be dry or wet. Watering Clivia should be based on changes in temperature, the intensity of light, and the dryness and wetness of the environment. Try to do it at a regular, quantitative, and periodic basis to form a regular pattern. It should not be arbitrary and water whenever you want. One point of special attention is that the humidity of the water must be close to the humidity of the potting soil, otherwise the temperature difference between the water and the potting soil will affect the normal growth of the plant. Some people also use magnetized water, acidic water, oxygenated water, etc. to water Clivia. We can gradually experience, summarize and explore in the practice of orchid cultivation, and constantly summarize new experiences.
In short, if you master the art of watering Clivia, use high-quality water suitable for the growth of Clivia, and follow scientific methods, you will definitely be able to cultivate more vigorous Clivia.
Fertilizer requirements:
During the growth and development of plants, a large number of nutrients are needed, and fertilizer is an important source of plant nutrition. Nutrients that require a large amount include carbon, hydrogen, oxygen, nitrogen, phosphorus, potassium, calcium, magnesium, sulfur, iron, etc.; trace elements that require a smaller amount include iron, copper, manganese, zinc, boron, chlorine, etc. During the growth and development of plants, once these nutrients are lacking, they will be stunted, and in severe cases, they may cause diseases.
Plants mainly absorb nutrients from the soil and fertilizers through their roots. Nitrogen, phosphorus, and potassium are elements that plants need in large quantities. The content in the soil alone cannot meet the needs of plants. Only artificial supplementation can ensure the healthy growth of plants.
The absorption of nitrogen, phosphorus and potassium is mainly completed by carbon dioxide in the air and water in the soil. Other elements can be obtained from nutrient soil.
Nitrogen fertilizer Nitrogen fertilizer is the main component of Clivia plant protein. It is the most basic substance that constitutes the plant body. Without nitrogen, it is impossible to produce protein and protoplasm.
Nitrogen is the main raw material for chlorophyll, which is an essential substance for photosynthesis. Therefore, if nitrogen is well supplied, the plant will grow vigorously, with broad and thick leaves, green and strong plants, high fruiting rate and full grains.
When nitrogen is deficient, the plant grows slowly, is short and weak, has narrow and thin leaves, blooms late, sets few fruits, and the bottom leaves turn yellow. However, when too much nitrogen fertilizer is applied, the leaves become soft, thin, and droop, and the disease resistance is weakened, making it more susceptible to diseases and insect pests. The application of nitrogen fertilizer to Clivia must follow the principle of appropriate amount.
Common nitrogen fertilizers for Clivia include: decomposed bean cake, peanuts, peanut cake, castor seeds, sesame, sesame oil residue, cottonseed cake, etc. Freshwater fish offal is also a good nitrogen fertilizer. These fertilizers must be fully fermented and decomposed before use.
Phosphorus fertilizer Phosphorus is the main component of the cytoplasm and nucleus of Clivia plants. It can promote cell division and reproduction. It makes new roots and seedlings grow faster, and mature orchid plants bloom earlier and bear more fruits, with fuller grains. Phosphorus can enhance photosynthesis.
Phosphorus can make stems and leaves tough and enhance disease resistance. When plants lack phosphorus, roots and seedlings grow slowly, and old leaves on the stems turn purple or dark green. This affects the growth and development of reproductive organs. There will be delayed flowering, fewer seeds in the fruit, and less plump fruit.
Commonly used phosphorus fertilizers for Clivia include: bone meal (without salt), fish scales, rice bran, etc., which can be used after fermentation and decomposition.
Potassium fertilizer Potassium is one of the elements with a high content in Clivia plants, and its content is highest in the young leaves of seedlings and root tips. It can promote the plant's absorption of nitrogen and the formation of protein. Potassium can make the plant's roots grow strong and the leaves broad, thick and upright. The veins are clear and raised, which can improve the plant's drought resistance and resistance to diseases and pests. When the plant lacks potassium, the cellulose in the cell wall decreases, the leaves are soft, the veins are not raised, and it is easy to be infected by diseases. Old leaves are prone to yellow-brown spots.
Common potassium fertilizers for Clivia include: plant ash, charcoal, straw, rice husk ash, etc. Potassium exists in the form of potassium carbonate and is easily soluble in water. The growth of Clivia is inseparable from the three elements of nitrogen, phosphorus and potassium. Their effects on Clivia mainly focus on:
Nitrogen fertilizer mainly promotes rapid growth of plants, lush leaves, and broad leaves, and has an obvious effect on leaf growth.
Phosphorus fertilizer mainly promotes bright flower colors, plump fruits, high fruit set rate and early flowering. It has obvious effects on flowers and fruits.
Potassium fertilizer has the effect of increasing leaf rigidity and promoting root growth. Nitrogen, phosphorus and potassium are essential nutrients for Clivia plants, and each has a unique role. They cannot replace each other and must be used in combination.
Organic fertilizer is the most commonly used fertilizer by orchid growers. It has little stimulation to the root system, is easy to absorb, has stable fertilizer effect, is easy to use, and is suitable for the needs of the general public.
Chemical fertilizers are quick-acting fertilizers with quick effects and short duration. If applied improperly, they can cause side effects such as root burn and yellow leaves. Try not to use them when growing crops, or try them in small quantities to gain experience before using them in large quantities.
Lighting requirements:
Light is the energy source for photosynthesis of plants. Light is an indispensable condition for the growth of various plants and has a very important impact on the growth of Clivia. There is a photosensitive pigment in the plant body, which causes a series of physiological and biochemical reactions in the plant body under the action of light. Clivia relies on chlorophyll in the plant body to absorb sunlight and synthesize carbon dioxide and water into organic substances such as grapes, so that Clivia plants can develop normally.
Practice has shown that the Clivia grown in the flower cellar has light and yellowish leaves due to sufficient light, wide leaves, strong contrast, obvious flower faces, and prominent veins. However, the flowers grown indoors are small, light in color, dark in leaves, and grow poorly.
Clivia cultivation requires not only oblique light, but more importantly, top light. This will increase the leaf light area and enhance photosynthesis. The most suitable temperature for photosynthesis of Clivia is 20-30℃. When the temperature exceeds 40℃, photosynthesis tends to stop. Therefore, it is necessary to prevent excessive light in summer and improve the utilization rate of light in winter.
In the midsummer when the light intensity is high and the temperature is high, shading should be used to control the light. The best light season for Clivia is September, October, March and April, when the temperature is neither too cold nor too hot and the light is suitable. It is also the season for changing the soil. During this period, the plant will have two growth peaks. The plants in the flower cellar are heated and insulated in winter, and the light can meet the demand, so they will have the best growth stage, which is also the vigorous flowering season. Pay attention to light and use light scientifically, so that Clivia can stretch its leaves, have raised veins, shiny leaves and upright plants.

Basic Clivia Cultivation Technology
Cultivation History and Flower Culture Clivia was discovered in the Drakensberg Mountains in South Africa around 1828. It was introduced from South Africa to Europe in the 1820s and from Germany in the mid-19th century. At that time, it was difficult for people to see it except for the Qingdao concession where it was cultivated for viewing. Later, the Japanese gave Clivia to the Manchu emperor. At that time, only the varieties given by the court chef to the dyeing factory were called "dyeing factories". The varieties passed down from the temple were named "monk" in memory of the monks who cultivated it. In recent years, due to the careful cultivation of professional workers and enthusiasts, new varieties have continued to appear, becoming one of the most popular flowers, and the reputation of Clivia has not diminished to this day. The name of Clivia first gives people a sense of reverence, and people imply that Clivia has a strong character and is not afraid of power.
Key points of propagation: It can be propagated by sowing, division and tissue culture. Seed propagation is not as fast as division in terms of seedling formation and early flowering, except for cultivating new varieties or obtaining variant varieties from natural hybrid seedlings. Division propagation is a widely used propagation method, which is to cut the axillary buds produced at the junction of the pseudobulb and the root from the mother plant and cultivate them separately to form new plants. It is easy to operate, has a high survival rate, and grows quickly. It can bloom in 2-3 years. The best breeding period is when it enters the vigorous growth period after flowering. In a greenhouse with a stable temperature between 15-25℃, it can be propagated in all seasons. Or in September-October, when the fruits are ripe and the pots and soils are changed in autumn, the axillary buds can be cut for propagation; or it can be cut with a knife at 1/2 of the pseudobulb. The cut pseudobulb can produce different numbers of small buds, and the small buds can be cut to form new plants. The best time is when the temperature is stable at around 20℃ in spring, combined with soil change. In addition, the explants can also be cut and sterilized, inoculated, and induced to root to form new plants for tissue culture.
In cultivation management, the humus formed after the plant body decays is most suitable for the growth and development of Clivia. It contains sufficient nitrogen, phosphorus and potassium, which can provide its needs for a long time, and has good water retention and heat preservation, which is suitable for the watering of Clivia. It must be controlled moderately. Too much water will cause serious hypoxia, hinder the normal breathing of the plant, and cause the root system of Clivia to rot or even die; if there is too little water, it will cause the leaves to wilt and dry up, and even die. Therefore, watering should be done by watering the pot soil with thin liquid fertilizer, and the amount and time of watering should be controlled according to the temperature changes and the growth strength of the plant. The minimum temperature for Clivia to grow is 10 degrees Celsius, the optimum temperature is 15-25℃, and the maximum limit is 30℃. It will enter semi-dormancy when it exceeds 30℃, and the temperature difference between day and night is 8-12℃, which is most suitable for the growth of Clivia. It must be placed in a shade shed during summer to avoid direct sunlight from burning the leaves, and sometimes it is necessary to spray water to cool down. In winter, it needs to be brought indoors and exposed to sunlight. When the temperature is the lowest in winter, it should be kept at 6-10℃ to avoid freezing. The temperature difference between day and night should be 8-10℃, and the room temperature should be 15℃.
Clivia likes a cool and humid climate. In summer, if you want Clivia to grow well, you must take measures to create conditions that are conducive to its growth.
Shading: In summer, it should be placed under an outdoor shade. It would be ideal if it can block direct sunlight at noon but can still see sunlight in the morning and evening.
Cooling: In addition to placing the Clivia in a ventilated place, the Clivia pot should also be placed in a pool of water or water (raised with wooden boards), and water should be sprayed frequently around the placement and on the leaves of the plant to make the Clivia grow in a small environment below 25°C and with a humidity of 60-70%.
Weight loss: When the temperature of the Clivia is above 25℃, it is necessary to reduce or stop fertilizing appropriately to avoid excessive fertilization and burn the fleshy roots. If more fertilizer is applied in spring, half of the potting soil can be replaced from the top in summer, and then replaced after the beginning of autumn. If the temperature can be lowered to below 20℃, fertilization can still be applied.
Watering: Adhere to the principle of watering when the soil is half dry and water thoroughly when watering. Never let water flow into the heart of the leaves to avoid heart rot and "heading".
Insect prevention: When attacked by scale insects, you can spray the leaves with 1000-1500 times dichlorvos solution.

Clivia cultivation
1. Breeding
The flowering period of Clivia is mostly in winter. During this period, appropriate measures should be taken to ensure its normal flowering, pollination and fruit setting. This is a very important period.
The colors of Clivia include orange-yellow, orange-red, bright red, scarlet, etc. Special colors include apricot yellow, milky white, snow white, green, etc. Light has a great influence on the color of flowers. The flowers are large and colorful when there is sufficient sunlight. Insufficient light makes the flowers pale. Phosphorus and potassium fertilizers should be applied during the flowering period to increase the fruit setting rate.
Artificial pollination should be carried out during the flowering period, and the method and timing of pollination should be mastered. Clivia flowers are bisexual flowers, with six stamens and one pistil growing in the same flower. The stamens are short, with a ball of pollen on the top, and the stigma of the pistil has a trident.
The pollination time is when the stamens and pollen mature after one day of blooming. At this time, the three forks of the pistil stigma secrete mucus, which is very easy to stick to the pollen. This is the right time for pollination. The pollination time is between 9:00 and 11:00 in the morning and between 1:00 and 3:00 in the afternoon. At this time, there is plenty of sunshine and the temperature is moderate, which can achieve a good pollination effect. After the first pollination, you can pollinate again after 1-2 days to ensure the pollination effect.
Pollination tools such as tweezers and small medicine bottles should be prepared in advance. During the pollination operation, first use tweezers to pick the stamens, and use soft paper to roll 2-3 stamens in the middle of the paper roll that is equal to the size of the bottle mouth. After rolling the pollen, leave about 1cm of pollen rods, and insert the pollen into the bottle and store it for later use. You can directly use tweezers to pinch the pollen for pollination, or you can pull out the pollen wrapped in the paper roll of the small bottle and directly apply it to the three forks of the pistil to complete a pollination. After the pollination is completed, some fine treasures and meaningful ones should be labeled with the name of the male parent. The pollination time provides a basis for breeding new varieties.
The sexual reproduction of Clivia is mainly completed by cross pollination, that is, cross pollination between different varieties or different plants of the same variety. This has a high fruiting rate and is easy to optimize. Self-pollination has a low fruiting rate and shows an obvious degenerative trend.
Different varieties of Clivia will produce different offspring when they are hybridized. To continuously improve and develop new varieties of Clivia, we must pay attention to its heredity, variability and the relationship between plants. Selecting excellent plants as the father has a good effect on the improvement of the offspring. Selecting treasures and fine products as the father, according to the evaluation standards of Clivia appreciation, pay special attention to veins, head shape, brightness, rigidity, fineness, color and other important indicators as the father. Not all orchids can be used as fathers, but every orchid can be used as mother.
In order to cultivate excellent new varieties, we must select both excellent male and female parents, so that a new generation of excellent varieties can be produced. Clivia is a heterozygote with complex genetic genes. The seeds in the same fruit are often very different. Good flowers fertilize good pollen. The probability of treasures and fine products appearing is also very small. Some seedlings grow very well at the beginning, but lose their condition when they are small seedlings. Some seedlings have 1-2 leaves that are not very good, but they gradually get better after growing a few leaves, that is, good flowers fertilize good pollen, which is different from the result of good flowers fertilizing good pollen.
After nine months from pollination, the fruit of a Clivia flower turns from green to yellow, and then from yellow to red, and the fruit begins to mature. When the fruit is ripe, the entire fruit arrow should be cut off from the middle of the arrow shaft and placed in a light and ventilated place for 15-20 days of ripening. Peel out the seeds, select those with full seeds and buds, and prepare for sowing. The shriveled ones without buds can be eliminated. A fruit has at least one seed, and up to 20-30 seeds. Clivia seeds contain a lot of water and are not suitable for long-term storage. They must be sown within a week after peeling. If the time is too long, the seeds will shrink and the buds will shrink, affecting the germination rate. If you want to store the seeds for a longer time, it is best to shoot them later, or peel them later after shooting them.
2. Seedling cultivation
Clivia seedling cultivation has unique technology. Clivia seedling cultivation time is generally from November to February of the following year. The key to seedling cultivation is temperature control. The temperature of seedling cultivation is generally between 20-30℃, and there must be a certain temperature difference, so as to ensure fast germination and uniform germination. Before seedling cultivation, it is necessary to prepare seedling cultivation utensils such as shallow pots, wooden boxes, small-hole plastic baskets, etc. These utensils must have drainage holes or gaps. The size of the utensils should be convenient for moving, and the depth should be about 8-10cm.
Below are several feasible seedling raising methods.
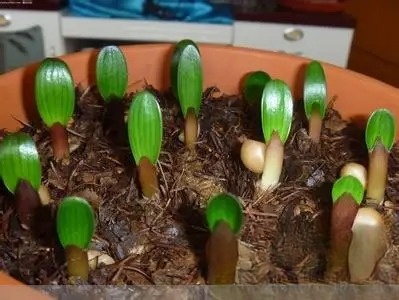
River sand seedling method: sieve the river sand into the size of millet grains, wash it with clean water, and then boil or scald it with boiling water for 3-5 minutes to kill harmful bacteria. Then put the processed river sand into the container, scrape it flat with a board, and arrange the buds of the seeds downward neatly. The spacing depends on the number of seeds. The seeds can be denser if there are more seeds, and sparser if there are fewer seeds. After arranging them, cover them with a layer of sand. It is best to just cover the seeds, not too thick; after covering the sand, it should be 1-2cm away from the top of the container. Then water it thoroughly, and then water it once a day. After about 30 days, the coleoptile will grow.
Sawdust seedling method: Sawdust seedling method is to select sawdust of white pine, forged wood, or hard miscellaneous wood, wash it clean, put it in the container, spread it flat, and place the spacing, cover, and water it in the same way as the river sand seedling method. The difference is that the sawdust seedling method will emerge about a week earlier than the river sand seedling method.
Pine needle seedling method: Choose larch pine needles, soak them to make them contain water and clean them, put them in a container, flatten them, and place the seeds with the buds facing down. The difference from the above two seedling methods is that the covering layer on the seeds should be thicker, generally about 1 cm. The pine needle seedling method has a high germination rate and is not easy to spoil. Pine needle seedling method should keep the pine needles in a neither dry nor wet state.
3. Transplantation of seedlings
Seedlings refer to buds with a growth period of about half a year, with 1-3 leaves. Seedlings like light and high temperature, and the temperature can be controlled at 20-30℃ for the best. When the seeds grow the first true leaf from the coleoptile, the plant begins to develop itself. The seedlings begin to be potted about 3 months after sowing. The potting should be done in batches at the right time. When the first leaf grows about 1 cm, it is the best potting height. When the new leaves that have just grown and the seedlings that have not grown new leaves grow to a certain height, they will be potted for the second time. For the seedlings, choose shallow pots or wooden boxes, plastic baskets and other utensils, fill the nutrient soil 1 cm away from the top, level it, use bamboo chopsticks or pointed bamboo sticks to poke holes, open the spacing appropriately, and then carefully insert the fleshy roots of the seedlings, and then press the soil firmly, but note that the front of each leaf must face one direction to facilitate light.
4. Management during the seedling stage
1.
Seedlings Clivia seedlings refer to seedlings in the one-year growth period, usually with about 6 leaves. At this time, the characteristic of cultivation management is to separate multiple seedlings into separate pots. Generally, 4-inch (13cm) pots are used, and 1-3 plants can be planted according to the size of the place. Management during the seedling stage directly affects the growth and development of the plant. The temperature of the seedlings should be around 20℃, and attention should be paid to lighting and ventilation. The number of roots is basically the same as the number of leaves during the seedling stage. In summer, the temperature is high and the pots for seedlings are small and easy to dry out. Therefore, when it is particularly hot, the seedlings should be watered once in the morning and evening to maintain the humidity of the pot soil. Fertilization can be applied after the seedlings are divided into pots. The concentration of fertilizer should be low, and it is generally applied once every half a month.
2. The middle seedling
stage of Clivia is the biennial stage from the seedling stage to the full two years. At this time, there are about 13 leaves, the plant shape is stable and various indicators have been determined. Management at this time is the main period for the cultivation of Clivia, and it has higher requirements for soil, water, temperature, light, fertilizer, etc. The biennial needs to change the nutrient soil once in spring and autumn, and change to a larger flower pot, generally using a 5-inch to 6-inch pot (16-20cm). When changing the soil, first fill the pot with 1/5 thick nutrient soil, hold the root system of the plant with your hand to fill the root core with soil, do not let the soil fall out, and put it in the pot. Fill the soil around and compact it. The plant is placed in the middle, that is, do not expose the rhizome and do not bury it too deep. The correct position of the soil is buried between the rhizome and the pseudobulb.
3.
After more than two years of growth, the Clivia enters the reproductive growth stage and can bloom and bear fruit. It is called a mature orchid. After entering the reproductive growth period, Clivia needs a large amount of nutrition. It not only needs to grow and develop, but also needs to shoot arrows, bloom, and bear fruit. If it is malnourished, the plant will be weak, the flowers will be few, the flowering period will be delayed, and the fruit will be few. In order to make the Clivia in the adult stage thrive, it is necessary to strengthen various management, especially pay attention to the supply of fertilizers. Phosphorus and potassium fertilizers should be applied regularly and the application amount should be increased to ensure that the plants bloom on schedule, the flowers are large and colorful, and the fruit setting rate is high. When the mature orchid shoots arrows, it is necessary to maintain a suitable temperature and temperature difference and sufficient water to prevent the occurrence of arrow pinching.
A Brief Discussion on Clivia Cultivation
Clivia is suitable for indoor cultivation, which is mainly determined by its internal structure and physiological functions. Clivia is an evergreen perennial herb with strong shade tolerance and thick, dark green leaves. The mesophyll contains a large amount of chlorophyll, which can absorb carbon dioxide and water under the sun, synthesize organic matter for its own growth and development, and release oxygen at the same time. In addition, there are many stomata and villi on the broad and thick leaves of Clivia, which can secrete a large amount of mucus. During the gas exchange process, it can absorb a large amount of indoor dust, dust and harmful gases, making the indoor air clean. Therefore, Clivia is also known as an "absorber" and "dust collector", and the guardian of human health. So how can this guardian of health grow and develop healthily in your home? Florist Leng Guangyou introduced to us that the home care of Clivia should mainly start from temperature and humidity, soil, water, light, nutrition and other aspects.
Since Clivia is native to the mountain forests of South Africa, where the natural environment is like spring all year round, the various organs of the Clivia plant have adapted to this natural environment that is neither too hot nor too cold. Therefore, in the daily maintenance process, the temperature should be controlled between 15-25 degrees. When the temperature drops below 10 degrees, the growth and development of Clivia will be slow, and when it drops below 0 degrees, it will freeze to death. Similarly, when the temperature reaches or exceeds 30 degrees, it will also seriously affect the normal growth and development of Clivia.
Water is an important component of Clivia. According to measurements, Clivia contains 60%-80% water, especially its fleshy roots, which have a strong water storage function and strong resistance to drought. Clivia likes neutral water. Clean, unpolluted tap water, well water, river water, etc. can be used for irrigation. However, since the water temperature of fresh tap water and well water is lower than the soil temperature and contains some impurities, they should be left for 1-2 days before use. As for watering, there are also many details. For Clivia seedlings, the best way is to use a watering can for spraying. Spray the nozzle upward onto the leaves. The advantage of this is that in addition to achieving the purpose of watering the flowers, it can also wash away dust. At the same time, mist beads are left on the leaf surface to ensure that the leaf surface has a certain humidity. The evaporation of water in the sun can reduce the surface temperature of the leaves and prevent sunburn. However, for Clivia that is in bloom, sprinkler irrigation cannot be used to prevent water from entering the leaf sheath and causing heart rot. For Clivia that is in bloom, water can only be poured into the pot.
So when is the right time to water and how much water to water? This mainly depends on the ambient temperature of the Clivia. The general principle of watering is "water when it is wet and water when it is dry, do not water when it is not dry, and water thoroughly when it is dry." Watering thoroughly means that all the roots of the Clivia are in the same humidity.
To judge whether the water is thoroughly poured, you cannot just decide based on whether there is water flowing out from the bottom of the pot. Because sometimes the pot soil is dry and hardened, and shrinks into a ball. After watering, the water quickly flows from the pot wall to the bottom of the pot and flows out from the bottom hole. The center of the pot soil is not even exposed to a little water. If you stop watering at this time, the leaves of the Clivia will wilt and form a pinched arrow when it is shooting. Here I will teach you a simple and effective watering method, which is to immerse the flower pot in a basin or bucket filled with water, soak for half a minute and then take it out. However, the disadvantage of doing so is that the nutrients in the soil are easier to lose, so if you want the Clivia to have deep roots and large leaves, you must also pay attention to replenishing it with nutrients in time. The nutrients required by Clivia mainly come from organic fertilizers, such as bean cakes, peanut oil cakes, animal offal, etc. Under normal circumstances, it can be applied in spring and autumn in a year. Apply once in spring after flowering around the end of April and early May; apply again in autumn after the fruit is harvested around mid-September to late October.
Clivia is a moisture-loving plant and has relatively high requirements for the humidity of the growing environment. Its most suitable humidity range is 70%-80%. Clivia grown in such an environment has tender green leaves, clear veins, short, wide, and neat leaves, and high ornamental value. However, due to the limitations of home environment conditions, it is difficult for ordinary families to meet this standard. This is also the main reason why many people cannot grow Clivia well. Clivia is a medium-day plant and has no strict requirements for light. As long as the temperature is suitable, the light time is longer or shorter, it can bloom normally. Short days in winter and spring are more conducive to flowering. Good light is an important condition to ensure that Clivia flowers are large and colorful. But it still likes relatively weak light, especially strong light.
The leaves of Clivia are phototropic. If it is placed in one place indoors for a long time, the leaves will definitely turn towards the sun. In terms of its plant shape, it is difficult to achieve the ornamental effect of a line when viewed from the side and an open fan when viewed from the front.
Clivia must be placed in a north-south direction. If it is not in a north-south direction, the leaves will grow sideways. What should I do if the leaves grow sideways? You can pull the two leaves together and then clip them together, or you can use a playing card to surround them so as not to hurt the leaves. Normally, the leaves will be corrected in 15-20 days.
The thick fleshy roots of Clivia store enough water, but also put forward higher requirements for the soil on which it depends for survival. Only the kind of nutrient soil with good air permeability, loose texture and rich humus is suitable for the growth of Clivia fleshy roots.
Rot-resistant leaves or pine needles must be fermented before use. Fermentation is not good, otherwise the roots will easily be burned. Clivia must change the soil once a year.
The time and frequency of changing the soil of Clivia depends on the size of the seedling and the season. For mature Clivias like these, the soil should be changed once a year. The best time to change the soil is in spring and autumn, because Clivia grows vigorously at this time, and the growth of the plant will not be affected by changing the soil. Take the Clivia out of the pot, cut off the rotten roots and old roots without absorption capacity, and remove the waste soil. Cover the drainage hole of the flowerpot with broken pot pieces, fill it with 2-5 cm thick nutrient soil, grab a handful of soil to fill the roots, then put the plant in the pot, fill the pot with nutrient soil to half the height of the pot, and gently press down along the edge of the pot with your hand, so that the roots stand in the pot and are not easy to bend. The key point of changing the soil is to fill the roots with soil. Otherwise, there is no soil at the roots, and water and nutrients cannot reach the roots, which is easy to cause root rot and pinched arrows. After changing the nutrient soil, water it thoroughly.
In fact, there is much more to know about the maintenance of Clivia than this. Many maintenance knowledge still needs to be explored and accumulated by orchid growers in practice. But you don't have to worry, because many Clivia lovers also know that it is difficult to keep Clivia well, but it is also not easy to kill it. Although this is a joke, it also shows from another perspective that Clivia is not so delicate. As long as you work harder and pay more attention in your daily life, you will definitely be able to cultivate Clivia with luxuriant branches and leaves, bright flowers and red fruits, and your life will naturally add some beauty and fun.
Clivia cultivation technology
In order to cultivate excellent new varieties, it is necessary to select excellent male and female parents, so that a new generation of excellent varieties can be produced. Clivia is a heterozygote with complex genetic genes. The seeds in the same fruit often have great differences. The probability of good flowers and good pollination, treasures, and fine products appearing is also very small. Some seedlings grow very well at the beginning, but lose their condition when they are small seedlings. Some seedlings have 1-2 leaves that are not very good, but gradually get better after growing a few leaves, that is, good flowers and good pollination, and the results of good pollination and inferior flowers are different.
Technical issues in Clivia cultivation and management are the key to determining the good growth and development of the plant. The following introduces various technical issues in the management of the entire cultivation process:
Seedling selection and seedling management. Management of one-year-old seedlings. Management of two-year-old orchids.
Management of Chengling orchids, management during flowering period, hybridization techniques and breeding of new varieties
Selection
After nine months from pollination, the fruit of a Clivia flower turns from green to yellow, and then from yellow to red, and the fruit begins to mature. When the fruit is ripe, the entire fruit arrow should be cut off from the middle of the arrow shaft and placed in a light and ventilated place for about 20 days of after-ripening. Peel out the seeds, select those with full seeds and buds, and prepare for sowing. The shriveled ones without buds can be eliminated. A fruit has at least one seed, and up to 20-30 seeds. Clivia seeds contain a lot of water and are not suitable for long-term storage. They must be sown within a week after peeling. If the time is too long, the seeds will shrink and the buds will shrink, affecting the germination rate. If you want to store the seeds for a longer time, it is best to drop the arrow later, or peel them later after dropping the arrow.
Seedling cultivation
Clivia seedling cultivation has unique technology. The seedling cultivation time of Clivia is generally from November to February of the following year. The key to seedling cultivation is temperature control. The temperature of seedling cultivation is generally between 20-30℃, and there must be a certain temperature difference. In this way, it can ensure fast germination and uniform germination.
Before raising seedlings, you need to prepare the equipment for raising seedlings, such as shallow pots, wooden boxes, small-hole plastic baskets, etc. These equipment must have drainage holes or gaps. The size of the equipment should be convenient for moving, and the depth should be about 8-10cm. The following are several feasible methods for raising seedlings.
River sand seedling method: sieve the river sand into the size of millet grains, wash it with clean water, and then boil or scald it with boiling water for 3-5 minutes to kill harmful bacteria. Then put the processed river sand into the container, scrape it flat with a board, and arrange the buds of the seeds downwards neatly. The spacing depends on the number of seeds. The seeds can be denser if there are more seeds, and sparser if there are fewer seeds. After arranging them, cover them with a layer of sand, just enough to cover the seeds, but not too thick. After covering the sand, it should be about 1cm above the upper edge of the container. Then water it thoroughly, and then water it once a day. After about 30 days, the coleoptile will grow.
Sawdust seedling method: Sawdust seedling method is to use sawdust of white pine, forged wood, or hard miscellaneous wood, wash it clean, put it in a container, spread it flat, and place the seedlings in the same spacing, covering, and watering as the river sand seedling method. The difference is that the sawdust seedling method germinates about a week earlier than the river sand seedling method.
Pine needle seedling method: Choose larch pine needles, soak them to make them contain water and clean them, put them in a container, flatten them, and place the seeds with the buds facing down. The difference from the above two seedling methods is that the covering layer on the seeds should be thicker, generally about 1 cm. The pine needle seedling method has a high germination rate and is not easy to spoil. Pine needle seedling method should keep the pine needles in a neither dry nor wet state.
Management of seedlings
Seedlings refer to buds with a growth period of about half a year, with 1-3 leaves. Seedlings like light and high temperature, and the temperature can be controlled at 20-30℃ for the best. When the seeds grow the first true leaf from the coleoptile, the plant begins to develop itself. The seedlings begin to be potted about 3 months after sowing. The potting should be done in batches at the right time. When the first leaf grows about 1 cm, it is the best potting height. When the new leaves that have just grown and the seedlings that have not grown new leaves grow to a certain height, they will be potted for the second time.
When transplanting seedlings into pots, choose shallow pots or wooden boxes, plastic baskets and other utensils. Fill the nutrient soil 1 cm away from the top, level it, poke holes with bamboo chopsticks or pointed bamboo sticks, leave appropriate spacing, then carefully insert the fleshy roots of the seedlings, and then press the soil down. However, note that the front of each leaf must face in the same direction to facilitate light.
Management of one-year-old seedlings
Clivia seedlings refer to seedlings in the one-year growth period, usually with about 6 leaves. At this time, the characteristic of cultivation and management is to separate multiple seedlings into separate pots. Generally, 4-inch (13cm) pots are used, and 1-3 plants can be planted according to the size of the place. Management during the seedling stage directly affects the growth and development of the plant. The temperature of the seedlings should be around 20℃, and attention should be paid to lighting and ventilation. The number of roots is basically the same as the number of leaves during the seedling stage. In summer, the temperature is high and the pots for seedlings are small and easy to dry out. Therefore, when it is particularly hot, the seedlings should be watered once in the morning and evening to maintain the humidity of the pot soil. Fertilizer can be applied after the seedlings are divided into pots. The concentration of fertilizer should be low, and it is generally applied once every half a month.
Management of the second-year Chinese orchid
The period from the seedling stage to the full two years of the Clivia is the biennial mid-orchid stage. At this time, there are about 13 leaves, the plant shape is stable and various indicators have been determined.
Management at this time is the main period for the cultivation of Clivia, and it has higher requirements for soil, water, temperature, light, fertilizer, etc. The biennial needs to change the nutrient soil once in spring and autumn, and change to a larger flower pot, generally using a 5-inch to 6-inch pot (16-20cm). When changing the soil, first fill the pot with 1/5 thick nutrient soil, hold the root system of the plant with your hand to fill the root core with soil, do not let the soil fall out, and put it in the pot. Fill the soil around and compact it. The plant is placed in the middle, that is, do not expose the rhizome and do not bury it too deep. The correct position of the soil is buried between the rhizome and the pseudobulb.
Cheng Linglan's Management
After a growth period of more than two years, Clivia enters the reproductive growth stage and can bloom and bear fruit, which is called a mature orchid.
After entering the reproductive growth period, Clivia needs a large amount of nutrition supply. It not only needs to grow and develop, but also needs to shoot arrows, bloom, and bear fruit. If it is malnourished, the plant will be weak, the flowers will be few, the flowering period will be delayed, and the fruit will be few. In order to make the Clivia in the mature period thrive, it is necessary to strengthen various management, especially pay attention to the supply of fertilizers, apply potassium fertilizers regularly, and increase the application of phosphorus and potassium fertilizers. To ensure that the plants bloom on schedule, the flowers are large and colorful, and the fruit setting rate is high.
When the mature orchid is shooting arrows, it is necessary to maintain a suitable temperature and temperature difference and sufficient water to prevent the occurrence of arrow pinching.
Management during flowering period
The flowering period of Clivia is mostly in winter. During this period, appropriate measures should be taken to ensure its normal flowering, pollination and fruit setting. This is a very important period.
The colors of Clivia include orange-yellow, orange-red, bright red, scarlet, etc. Special colors include apricot yellow, milky white, snow white, green, etc. Light has a great influence on the color of flowers. The flowers are large and bright in full sunlight. Insufficient light makes the flowers pale. Phosphorus and potassium fertilizers should be applied during the flowering period to increase the fruit setting rate.
Artificial pollination is required during the flowering period, and the method and timing of pollination must be mastered. Clivia flowers are bisexual, with six stamens and one pistil growing in one flower. There is a ball of pollen on the short top of the stamen, and a trident on the stigma of the pistil.
The pollination time is when the pollen of the stamens matures one day after the flowers open, that is, the pollen bursts. At this time, the three forks of the pistil stigma secrete mucus, which is very easy to stick to the pollen. This is the appropriate period for pollination.
The pollination time is between 9:00-11:00 in the morning and 1:00-3:00 in the afternoon. At this time, there is sufficient sunlight and the temperature is moderate, which can achieve a good pollination effect. After the first pollination, you can pollinate again after 1-2 days to ensure the pollination effect.
Pollination tools such as tweezers and small medicine bottles should be prepared in advance. During the pollination operation, first use tweezers to pick the stamens, and use soft paper to roll 2-3 stamens in the middle of the paper roll that is equal to the size of the bottle mouth. After rolling the pollen, leave about 1 cm of pollen rods, and insert the pollen into the bottle and store it for later use. You can directly use tweezers to pinch the pollen for pollination, or you can pull out the pollen wrapped in the paper roll of the small bottle and directly apply it to the three forks of the pistil to complete a pollination. After the pollination is completed, some fine treasures and meaningful ones should be labeled with the name of the male parent and the time of pollination, which provides a basis for breeding new varieties.
Hybridization technology and new variety breeding
The sexual reproduction of Clivia is mainly completed by cross pollination, that is, different varieties or different plants of the same variety are selected for cross pollination. This has a high fruiting rate, which is convenient for optimization, while self-pollination has a low fruiting rate and shows an obvious degenerative trend.
Different varieties of Clivia will produce different offspring when they are hybridized. To continuously improve and develop new varieties of Clivia, we must pay attention to its heredity, variability and the relationship between plants. Selecting excellent plants as the father will have a good effect on the improvement of the offspring.
Choose rare and fine orchids as the father plant. According to the appreciation and evaluation standards of Clivia, special attention should be paid to the father plant with outstanding important indicators such as vein pattern, head shape, brightness, rigidity, delicacy, color, etc. Not every orchid can be the father plant, but every orchid can be the mother plant.
In order to cultivate new high-quality varieties, we must select both excellent male and female parents, so that a new generation of high-quality varieties can be produced. Clivia is a heterozygote with complex genetic genes. The seeds in the same fruit often have great differences. The probability of good flowers fertilizing good pollen, and the appearance of treasures and fine products is also very small. Some seedlings grow very well at the beginning, but lose their condition when they are small seedlings. Some seedlings have 1-2 leaves that are not very good, but they gradually get better after growing a few leaves, that is, good flowers fertilizing good pollen, and the results of good flowers fertilizing good pollen are different from those of inferior flowers fertilizing good pollen.
Clivia cultivation technology
The technical issues in Clivia cultivation and management are the key to determining the good growth and development of the plant. The following introduces various technical issues in the entire process of management and cultivation.
In order to cultivate new high-quality varieties, we must select both excellent male and female parents, so that a new generation of high-quality varieties can be produced. Clivia is a heterozygous plant with complex genetic genes. The seeds in the same fruit often have great differences. The probability of good flowers fertilizing good pollen, and the appearance of treasures and fine products is also very small. Some seedlings grow very well at the beginning, but lose their condition when they are small seedlings. Some seedlings have 1-2 leaves that are not very good, but they gradually get better after growing a few leaves, that is, good flowers fertilizing good pollen, and the results of good flowers fertilizing good pollen are different from those of inferior flowers fertilizing good pollen.
After nine months from pollination, the fruit of a Clivia flower turns from green to yellow, and then from yellow to red, and the fruit begins to mature. When the fruit is ripe, the entire fruit arrow should be cut off from the middle of the arrow shaft and placed in a light and ventilated place for about 20 days of after-ripening. Peel out the seeds, select those with full seeds and buds, and prepare for sowing. The shriveled ones without buds can be eliminated. A fruit has at least one seed, and up to 20-30 seeds. Clivia seeds contain a lot of water and are not suitable for long-term storage. They must be sown within a week after peeling. If the time is too long, the seeds will shrink and the buds will shrink, affecting the germination rate. If you want to store the seeds for a longer time, it is best to shoot them later, or peel them later after shooting them.
Clivia seedling cultivation has unique technology. The seedling cultivation time of Clivia is generally from November to February of the following year. The key to seedling cultivation is temperature control. The temperature of seedling cultivation is generally between 20-30℃, and there must be a certain temperature difference. In this way, it can ensure fast germination and uniform germination.
Before raising seedlings, you need to prepare the equipment for raising seedlings, such as shallow pots, wooden boxes, small-hole plastic baskets, etc. These equipment must have drainage holes or gaps. The size of the equipment should be convenient for moving, and the depth should be about 8-10cm. The following are several feasible methods for raising seedlings.
River sand seedling method: Sieve the river sand into the size of millet grains, wash it with clean water, and then boil or scald it with boiling water for 3-5 minutes to kill harmful bacteria. Then put the processed river sand into the container, scrape it flat with a board, and arrange the buds of the seeds downwards neatly. The spacing depends on the number of seeds. If there are many seeds, they can be denser, and if there are few seeds, they can be sparser. After arranging them, cover them with a layer of sand that just covers the seeds. Do not cover them too thickly. After covering the sand, it should be about 1cm above the top of the container. Then water it thoroughly, and then water it once a day. After about 30 days, the coleoptile will grow.
Sawdust seedling method: Sawdust seedling method is to use sawdust of white pine, forged wood, or hard miscellaneous wood, wash it clean, put it in a container, spread it flat, and place the seedlings in the same spacing, covering, and watering as the river sand seedling method. The difference is that the sawdust seedling method germinates about a week earlier than the river sand seedling method.
Pine needle seedling method: Choose larch pine needles, soak them to make them contain water and clean them, put them in a container, flatten them, and place the seeds with the buds facing down. The difference from the above two seedling methods is that the covering layer on the seeds should be thicker, generally about 1 cm. The pine needle seedling method has a high germination rate and is not easy to spoil. Pine needle seedling method should keep the pine needles in a neither dry nor wet state.
Seedlings refer to buds with a growth period of about half a year, with 1-3 leaves. Seedlings like light and high temperature, and the temperature can be controlled at 20-30℃ for the best. When the seeds grow the first true leaf from the coleoptile, the plant begins to develop itself. The seedlings begin to be potted about 3 months after sowing. The potting should be done in batches at the right time. When the first leaf grows about 1 cm, it is the best potting height. When the new leaves that have just grown and the seedlings that have not grown new leaves grow to a certain height, they will be potted for the second time. For the seedlings, choose shallow pots or wooden boxes, plastic baskets and other utensils, fill the nutrient soil 1 cm away from the top, level it, use bamboo chopsticks or pointed bamboo sticks to poke holes, open the spacing appropriately, and then carefully insert the fleshy roots of the seedlings, and then press the soil firmly, but note that the front of each leaf must face one direction to facilitate light.
Clivia seedlings refer to seedlings in the one-year growth period, usually with about 6 leaves. At this time, the characteristic of cultivation management is to separate multiple seedlings for cultivation. Generally, 4-inch (13cm) flower pots are used, and 1-3 plants can be planted according to the size of the place. Management during the seedling stage directly affects the growth and development of the plant. The temperature of the seedlings should be around 20℃, and attention should be paid to lighting and ventilation. The number of roots is basically the same as the number of leaves during the seedling stage. In summer, the temperature is high and the pots for seedlings are small, which is easy to dry out. Therefore, when it is particularly hot, the seedlings should be watered once in the morning and evening to maintain the humidity of the pot soil. Fertilization can be applied after the seedlings are divided into pots. The concentration of fertilizer should be low, and it is generally applied once every half a month. The Clivia seedling stage is the two-year middle orchid stage when it reaches two years. At this time, it reaches about 13 leaves, and the plant shape is stable and various indicators have been qualitatively determined.
Management at this time is the main period for the cultivation of Clivia, which has higher requirements for soil, water, temperature, light, fertilizer, etc. The nutrient soil of biennials needs to be changed once in spring and autumn, and a larger flower pot is used, generally a 5-inch to 6-inch pot (16-20cm). When changing the soil, first fill the pot with 1/5 thick nutrient soil, hold the root system of the plant with your hand to fill the root core with soil, do not let the soil fall out, and put it in the pot. Fill the soil around and compact it. The plant is placed in the middle, that is, do not expose the rhizome and do not bury it too deep. The correct position of the soil is buried between the rhizome and the pseudobulb.
After a growth period of more than two years, Clivia enters the reproductive growth stage and is ready to bloom and bear fruit, becoming a mature orchid.
After Clivia enters the reproductive growth period, it needs a large amount of nutrition. It not only needs to grow and develop, but also needs to shoot arrows, bloom, and bear fruit. If it is malnourished, the plant will be weak, the flowers will be few, the flowering period will be delayed, and the fruit will be few. In order to make the Clivia in the mature period thrive, it is necessary to strengthen various management, especially pay attention to the supply of fertilizers, apply potassium fertilizers regularly, and increase the application of phosphorus and potassium fertilizers. To ensure that the plant blooms on schedule, the flowers are large and colorful, and the fruit setting rate is high. When the mature Clivia shoots arrows, it is necessary to maintain a suitable temperature and temperature difference and sufficient water to prevent the occurrence of arrow pinching.
The flowering period of Clivia is mostly in winter. During this period, appropriate measures should be taken to ensure its normal flowering, pollination and fruit setting. This is a very important period.
The colors of Clivia include orange-yellow, orange-red, bright red, scarlet, etc. Special colors include apricot yellow, milky white, snow white, green, etc. Light has a great influence on the color of flowers. The flowers are large and bright in full sunlight. Insufficient light makes the flowers pale. Phosphorus and potassium fertilizers should be applied during the flowering period to increase the fruit setting rate.
Artificial pollination is required during the flowering period, and the method and timing of pollination must be mastered. Clivia flowers are bisexual, with six stamens and one pistil growing in one flower. There is a ball of pollen on the short top of the stamen, and a trident on the stigma of the pistil.
The pollination time is when the pollen of the stamens matures one day after the flowers open, that is, the pollen bursts. At this time, the three forks of the pistil stigma secrete mucus, which is very easy to stick to the pollen. This is the appropriate period for pollination.
The pollination time is between 9:00 and 11:00 in the morning and between 1:00 and 3:00 in the afternoon. At this time, there is sufficient sunlight and the temperature is moderate, which can achieve a good pollination effect. After the first pollination, you can pollinate again after 1-2 days to ensure the pollination effect.
Pollination tools such as tweezers and small medicine bottles should be prepared in advance. During the pollination operation, first use tweezers to pick the stamens, and use soft paper to roll 2-3 stamens in the middle of the paper roll that is equal to the size of the bottle mouth. After rolling the pollen, leave about 1cm of pollen rods, and insert the pollen into the bottle and store it for later use. You can directly use tweezers to pinch the pollen for pollination, or you can pull out the pollen wrapped in the paper roll of the small bottle and directly apply it to the three forks of the pistil to complete a pollination. After the pollination is completed, some fine treasures and meaningful ones should be labeled with the name of the male parent. The pollination time provides a basis for breeding new varieties.
The sexual reproduction of Clivia is mainly completed by cross pollination, that is, different varieties or different plants of the same variety are selected for cross pollination. This has a high fruiting rate, which is convenient for optimization, while self-pollination has a low fruiting rate and shows an obvious degenerative trend.
Different varieties of Clivia will produce different offspring when they are hybridized. To continuously improve and develop new varieties of Clivia, we must pay attention to its heredity, variability and the relationship between plants. Selecting excellent plants as the father will have a good effect on the improvement of the offspring.
Choose rare and fine orchids as the father plant. According to the appreciation and evaluation standards of Clivia, special attention should be paid to the father plant with outstanding important indicators such as vein pattern, head shape, brightness, rigidity, delicacy, color, etc. Not every orchid can be the father plant, but every orchid can be the mother plant.
In order to cultivate excellent new varieties, we must choose excellent male plants and excellent female plants, so that we can produce a new generation of excellent varieties.
Clivia is a heterozygote with complex genetic genes. The seeds in the same fruit often have great differences. The probability of good flowers fertilizing good pollen, rare and exquisite products is also very small. Some seedlings grow very well at the beginning, but lose their condition when they are small seedlings. Some seedlings have 1-2 leaves that are not very good, but gradually get better after growing a few leaves, that is, good flowers fertilizing good pollen, and the result is different from that of inferior flowers fertilizing good pollen.
Clivia pest control 1
During its growth process, Clivia is attacked by pathogenic bacteria and pests, which seriously affects the normal growth and development of the plant, reduces its ornamental value, and even causes the death of the entire plant. It must be taken seriously.
Pests | Diseases
1. Soft rot:
It is a bacterial infection. This disease often occurs in the hot and hot seasons of summer and autumn. In a high humidity, stuffy and poorly ventilated environment, both seedlings and mature orchids can be infected with this disease. In the early stage of the disease, the leaves appear brown and dark green water stains, blister-like lesions, and spread rapidly. Make the leaves fall to the edge of the pot. If not handled in time, it will cause the death of the whole plant. High fever diseased plant heads are caused by soft rot.
Treatment method: If the diseased plants are found, they must be handled in time, the diseased leaves must be removed and the wounds cleaned. 60% Benomyl wettable powder or compound trimethoprim powder can be applied for good results. If lesions appear in the heart of the leaves, it will be difficult to handle. All lesions must be removed decisively and smeared with powder, otherwise the whole plant will rot soon.
Preventive measures: Prevention is the main thing. Since this disease often occurs in the high temperature season of summer and autumn, cooling and ventilation should be strengthened in this season, and the amount of fertilization and watering should be controlled. Do not water the heart of the orchid. Before entering the high temperature season, agricultural streptomycin, thiophanate-methyl, carbendazim and other preventive and sterilization drugs can be sprayed regularly. When changing the soil in spring, the flower soil can be sterilized to prevent the occurrence of soft rot.
2. Leaf spot disease:
The disease is caused by bacterial infection. The main causes are the replacement of uncomposted raw soil, the application of unfermented fertilizers, the long-term non-change of potting soil, the imbalance of nitrogen, phosphorus and potassium in the fertilizers, and the excessive amount of fertilizers. In the early stage of the disease, small yellow-brown spots appear on the leaves, and then the color of the spots gradually deepens, the area of the scars continues to expand, and ulcers occur, so that the whole plant rots.
Treatment method: Replace the new soil with well-composted soil, stop fertilizing and spraying drugs, use 70% thiophanate-methyl, thiophanate-methyl, etc., spray once every 10 days, and spray 3-4 times in a row to cure.
Precautions: Do not use raw soil and raw fertilizers, do not apply fertilizers at too high a concentration, and do not allow solid fertilizers to come into direct contact with the roots.
3. Anthrax:
It is caused by an unknown bacteria infection. This disease often occurs in hot and humid seasons. The main cause of the disease is excessive nitrogen fertilizer application. In the early stage of the disease, small brown spots appear on the leaves, which then expand into a round or oval shape. The spots gradually dry up, and in severe cases, the whole plant is infected.
Treatment method: Spray 70% thiophanate-methyl and 60% anthracnose, fumei, and multi-bacteria on the leaves at the early stage of the disease. Spray 3 to 4 times continuously to achieve a good therapeutic effect.
Preventive measures: apply more phosphorus and potassium fertilizers, reduce the humidity of potting soil, pay attention to ventilation and cooling, and spray thiophanate and other drugs in advance for prevention.
(IV) Root rot:
Root rot is caused by many reasons and can occur all year round. Severely hot and high temperatures, excessive temperatures, long-term non-drying of the potting soil, excessive fertilization, root damage when changing the potting soil, and excessive watering after a long drought can all cause root rot.
Treatment method: When a plant with root rot is found, remove all rotten roots, soak it in a sterilizer and dry it, replace it with new decomposed nutrient soil with 30% to 50% sand, and in severe cases, put it all in the sand to induce new roots.
Preventive measures: Pay attention to ventilation and cooling in hot seasons, do not let the potting soil be too wet, stop fertilizing in hot seasons, do not apply fertilizer at too high a concentration, and do not injure the roots when changing the soil.
(V) Sunburn:
It is a physiological disease that mostly occurs in summer and autumn. It is caused by high temperature and strong light directly shining on the leaves. In mild cases, the leaves turn from green to yellow, and in severe cases, the leaves become dehydrated and dry and die. This disease seriously affects the ornamental and normal growth and development of the plant, thereby reducing the quality of the plant.
Preventive measures: In summer and autumn, the temperature is high and the light is strong, so you need to avoid light. You can add sunshade nets, bamboo curtains, and leather curtains to the flower cellar to reduce the intensity of light, create an environment of scattered light, and pay attention to ventilation and cooling.
Clivia pests and their control 2
There are not many types of insect pests for Clivia. In addition to scale insects, white nematodes and earthworms are also prone to occur in the pot soil. Among them, scale insects are the most harmful. Scale insects are piercing-sucking insects. They use needle-like mouthparts to pierce the leaf tissue of Clivia to suck juice, causing damage. Generally, they do not directly damage the plant tissue, but only form spots on the affected parts, causing various symptoms and metamorphosis, such as curling leaves, leaf shrinkage, and severe tumors, and spread pathogens.
1. Brown Soft Scale
The brown soft scale is a pest with piercing-sucking mouthparts. The female adult of this pest is oval or oblong, flat, with a slightly raised back, generally 3-4cm long and 3-3.5cm wide, with a round and narrow front end and a swollen rear end. It is usually light yellow-brown, yellow or reddish-brown, with a slightly curved back. The back of the body is soft or slightly hardened, forming an irregular lattice pattern, with 7-8 antennae, a pair of reddish-brown eyes, and thin or medium-thick legs. The newly hatched nymph is oval, slightly rounded on the upper part, pointed on the lower part, light yellow, 0.6mm long and 0.3mm wide. The nymph is oblong, flat, with a slightly raised back, light yellow-brown, with hair on the edge of the body, and a pair of very long tail hairs, reaching half the body length, and similar in appearance to the adult.
Disease pattern: Brown soft scale insects often occur in hot and humid seasons, and are also prone to occur indoors in winter. Under normal circumstances, four generations occur in a year, and 1-2 instar nymphs overwinter in the open air. The time for hatching nymphs of each generation is mid-March, late May, early August and early October. Each female insect can give birth to more than 300 children, and then the female adult dies and turns brown-red.
Brown soft scale insects often gather on the leaf sheaths of Clivia, affecting the photosynthesis of Clivia, causing the Clivia to grow sluggishly, withering leaves and losing its ornamental value. Scale insects have strong reproductive capacity, and most of them are covered with a layer of wax shells, which have strong drug resistance. If not controlled in time, it can cause the death of the entire Clivia plant in severe cases.
Prevention and control methods: The prevention and control of scale insects should also be based on prevention. Scale insects are fixed in one place all year round to harm plants. Because of their tiny bodies, they are generally ignored by people. Therefore, when buying Clivia, be careful not to bring home Clivia with scale insects, otherwise they will be inadvertently spread by humans and affect the growth of Clivia.
(1) Manual control. Scale insects use their long and thin mouth needles to penetrate deep into the tissues of Clivia and suck the nutrients of the plant. Once they leave the plant, they cannot survive. Therefore, manual control can be used. Use bamboo sticks, small wooden sticks and other tools to gently wipe off the scale insects and soot-like substances, and then wipe with clean water. Do not cause scars on the leaves during the control process to prevent infection with other diseases. The best time to manually control scale insects is when the scale insects are nymphs and adults. When the adults lay eggs, the eggs should be scraped off as well. Although manual control is simple, it is difficult to eradicate scale insects due to their small size. At the same time, the workload is large, so chemical agents should be used for eradication.
(2) Drug control. Chemical control of scale insects is the main method for large-scale control of scale insects. The protective layers of colloid and wax on newly hatched nymphs are thinner and easily absorb drugs. Gardeners can seize this favorable opportunity to use contact pesticides to control scale insects. There are many drugs to choose from, such as 1000-1500 times diluted 80% dichlorvos emulsion, 1500-2000 times diluted 90% trichlorfon crystals, or 1000-2000 times diluted 50% emulsifiable concentrate of phoxim, 800-1000 times diluted 25% phosmet emulsifiable concentrate, 1000 times diluted 50% fenitrothion, 1000 times diluted 40% omethoate, 1000 times diluted 50% acephate, or 2000 times diluted 20% cypermethrin.
When operating, pay attention to the front and back leaves, and spray all the parts with insect pests. For scale insects over 2 years old, since the insect bodies are covered with colloid and wax, high-efficiency and low-toxic insecticides must be used for elimination. 40% emulsifiable concentrate of omethoate, 1000-1500 times liquid, 50% emulsifiable concentrate of malathion 800-1000 times liquid or 50% emulsifiable concentrate of ethion 1000-1500 times liquid can all play a role in prevention and control. In addition, methyl parathion stock solution can be used, which can achieve good results at any time. This drug is easy to use to treat insects. Apply the drug to the affected area with a cotton swab, once every 3 days, and apply it 3 times in a row. During the egg-laying period, apply it again after 7-10 days to completely eliminate it. The amount of medicine should be reduced according to the size of the Clivia. At the same time, it is best not to apply the new leaves and tender leaves temporarily, and it is even more forbidden to apply the medicine after injury to avoid drug damage. It is best to apply the medicine outdoors, otherwise there will be a bad smell indoors.
(3) Biological control. Also known as using insects to control insects. It mainly uses the natural enemies of scale insects, such as ladybugs, parasitic wasps, and parasitic fungi. In particular, the red-margined black ladybug among the ladybugs can prey on 2,000 scale insects in its lifetime. Ladybugs often forage on the branches and leaves of leguminous plants during the day. This insect has a phenomenon of suspended animation and is easy to catch. After catching it, it can be put in a breathable paper bag for later use. In the morning or evening, the captured ladybugs are placed on branches and leaves to attract the scale insects. The ladybugs will immediately chew the scale insects and can eat 2 to 3 insects every 5 minutes. For an adult Clivia plant with scale insects, as long as 2 to 3 ladybugs are placed, all the scale insects will be eliminated.
In addition to the brown soft scale insect, other pests that attack Clivia include Connor's mealybug, blowing cottony scale, and red round scale. Their control methods refer to the brown soft scale insect.
2. Snails
Snails are serious in many southern provinces and cities, and the northern regions are also affected by them. There are four types of snails that harm garden plants: gray bar snail, thin ball snail, homotypic snail and striped flower snail. The most common one is the gray bar snail. Snails harm Clivia in greenhouses, as well as chrysanthemums, orchids, hydrangeas and other flowers.
The gray snail has two pairs of tentacles, the posterior tentacles are longer, and the tops of the tentacles have black eyes. The shells are medium-sized, solid, oval, and the shell surface is yellow-brown or amber with dense growth lines and whorls. The reproductive pore is located on the lower right side of the head, and the respiratory pore is located on the right side of the back of the body where it connects to the shell. The shell is oval, milky white, and shiny. The newly hatched juvenile shells and shells are light brown.
Disease pattern: Gray snails produce one generation per year, and their life span can be more than one year. Snails live at the bottom of flower pots or under bricks during the day, and crawl out to the leaves at night to cause harm. The damage caused by snails to Clivia is mainly the feeding of the perianth, stamens, pistils and young leaves. There are sporadic small notches on the damaged leaves, and silver marks are left wherever they crawl, affecting the normal photosynthesis of flowers and also damaging their ornamental value. They hibernate during low temperatures in winter and high temperatures in summer, and become active and cause harm when environmental conditions are suitable. Female insects lay eggs in grass roots, soil at the roots of flowers, under stones or in the soil.
Prevention and control methods: Drug control: Apply 80% chloranil granules or 10% polyacetaldehyde granules, 1.5g per square meter, or sprinkle some lime powder around the pot. A simple and more effective method is manual capture.
3. Woodlice
Woodlice are also called woodlice and watermelon worms. They belong to the class of crustaceans. They are widely distributed in the north and south, and mainly damage the roots and stems of flowers, causing stem rot.
The woodlice is 10mm long, with a gray or brown back that is wide, flat and shiny. The body is divided into 13 segments, and the first thoracic segment is fused with the neck. There are 2 pairs of antennae, one of which is short and not obvious. There is a pair of compound eyes, which are black, round and slightly protruding. The newly hatched woodlice is white, with 6 pairs of legs. After molting once, there are 7 pairs of legs.
Disease pattern: Woodlice have one generation in one year. They like to live in humid conditions and are not drought-resistant. When touched by foreign objects, the body curls up into a ball and pretends to be dead and motionless. They lurk at the bottom of the flower pot during the day and eat tender roots from the drainage holes at the bottom of the pot. They are active at night to cause harm. Each female lays about 30 eggs, which take about 60 days to hatch. The woodlice has a strong regeneration ability. If the antennae and limbs are broken, new antennae and limbs can be grown through molting. This insect mainly damages the roots and stems of Clivia, causing notches and ulcers on the stems.
Prevention and control methods: (1) When the disease is serious, use 30% long-acting phosphorus mixture 3000 times diluted and spray it on flower pots, the ground or plants. (2) Keep the greenhouse clean and remove excess bricks, weeds and various waste items.
4. Nematode disease
Nematodes are a type of tiny animals.
Pathogenesis: Clivia parasitic nematodes are generally tiny, less than 1 mm long, with unsegmented bodies, and a translucent elastic cuticle wrapped around the outside of the body. The internal organs are buried in the body cavity, directly bounded by the body wall. The males and females are dioecious, and the males and females are different in shape. The eggs are laid in the egg capsule, which is oval in shape. Its reproduction is through the mating and egg laying of male and female nematodes. After the flowers are damaged, they grow poorly, the plants are short, the leaves are wrinkled, and they even die early. It can be seen that there are warts of different sizes on the roots, the root system is underdeveloped, and the growth is stunted. Dissecting the small warts can show white round granules inside, which are the white nematode bodies.
Prevention and control methods: To prevent and control diseases caused by nematodes, drugs such as dibromochloropropane, furadan, and dazomethane are effective.
Areca palm is a clumping evergreen foliage plant of the genus Areca palm in the family Arecaceae.
The palm of the field is a shrub or small tree that can be up to 3-8 meters tall in its native habitat. The stem is smooth and burr-free, with obvious leaf scars in annular patterns, and many tillers at the base, growing in clusters. The leaves are smooth and slender, pinnate compound leaves, 40-150 cm long; the leaflets and petioles are slightly curved, with soft tips; the pinnae are lanceolate, 20-25 cm long, asymmetrical on both sides, with a dorsal ridge in the middle of the rachis; the leaves are bright green, and the slender petioles and stems are golden yellow.
Areca palm is produced in Madagascar, Africa. It is widely introduced and cultivated. It can be grown in gardens or potted plants in South China, and in other regions as potted plants for viewing. It likes a warm, humid, semi-shady and well-ventilated environment. It is not cold-resistant, but relatively shade-tolerant and afraid of the scorching sun. It is suitable for growing in loose, well-drained, humus-rich soil.
Areca palm can be propagated by sowing and division. Seeds used for sowing and propagation are not easy to collect in China, and are mostly imported from abroad. Conventional vines are mostly divided by division, which is carried out around April, combined with repotting. Select plants with many tillers at the base, remove some of the old potting soil, and use a sharp knife to divide them into several clumps from the base connection. Each clump should not be too small, and must have 2-3 plants, and retain a good root system; otherwise, the growth will be slow after division, and it will affect the ornamental effect. After subplanting, place it in a high humidity and temperature environment, and spray water frequently to facilitate the recovery of growth.
Areca palm potted plants can be made into culture soil with leaf humus, peat soil, 1/3 river sand and part of the base fertilizer. Its tiller buds grow relatively close to the rhizomes. When potted, they are slightly deeper than the original planting to prevent the new buds from taking root better. May to October is its vigorous growth period, and it is necessary to provide relatively sufficient water and fertilizer conditions. Keep the pot soil moist at ordinary times. During the high temperature period in summer and autumn, it is also necessary to keep the air humidity around the plant high, but avoid water accumulation in the pot soil to avoid root rot. Generally, decomposed liquid fertilizer or compound fertilizer is applied once every 1-2 weeks to promote the vigorous growth of the plant and the leaf color is dark green. In autumn and winter, less or no fertilizer can be applied, and the pot soil should be kept dry and wet. Areca palm likes warmth, and it is necessary to do a good job of heat preservation and frost prevention in winter. Generally, it can be relatively safe to overwinter at around 10℃. If the temperature is too low, the leaves will turn yellow, the leaf tips will dry up, and the roots will be damaged, affecting the growth of the next year. It likes semi-shade, and 50% shade should be applied in spring, summer and autumn. It is suitable to be placed in a place with strong scattered light for indoor cultivation; it can also tolerate a darker environment, but it should be regularly moved outdoors to a place with better light for maintenance to facilitate recovery and maintain a high ornamental state. If the environment is dry and poorly ventilated, red spiders and scale insects are prone to occur, so it should be sprayed with 800 times omethoate for prevention and control.
The branches of the Areca palm are open, the leaves are slender and slightly drooping, the plant shape is graceful, and the posture is free and easy. It is a famous tropical foliage plant. It is relatively shade-tolerant and suitable for indoor greening decoration. Generally, small and medium-sized pots can be arranged in living rooms, study rooms, bedrooms, conference rooms, etc., for long-term viewing. It can still maintain a good viewing state in a dark room for 1-2 months. Large plants are planted in wooden barrels and arranged in the building's foyer, lobby, etc., which can reflect the tropical Fengguang.
Money tree likes warmth, the temperature is 20℃-30℃, and the temperature needs to reach above 5℃ in winter, otherwise it is easy to suffer from cold damage, causing leaves to fall off and die. Money tree likes light and can also grow in shaded places. It should be properly shaded in summer. The scorching sun can easily make the leaves wither and the leaf tips burn. But it is also necessary to prevent excessive shade, which will make the leaves grow too long, the branches thin and weak, the petioles and internodes become longer, and the leaves become smaller, which seriously affects the appreciation and growth.
Money tree grows faster, can grow 40 cm-60 cm per year, and the top is obviously dominant. If the branches are too long, it will hinder the appearance. It should be pinched or shortened to promote branching and promote the expansion of the stem base. Prune once a spring every year, remove thin branches, weak branches, and dense branches, and shorten the annual branches to an appropriate height, so as to form a round and beautiful crown with appropriate height. In addition to nitrogen fertilizer during the growth period, phosphorus and potassium fertilizers should be applied appropriately, which can not only keep the crown green, but also promote the expansion of the stem base and improve the ornamental value.
Money tree is drought tolerant, but avoid excessive moisture and waterlogging. Because the swollen part at the base of the money tree's stem can store water, excessive moisture or waterlogging will cause the plant to grow poorly, rot its roots, and cause the leaves to turn yellow or even die. Money tree is extremely afraid of smoke, and its leaves will turn yellow and wither after smoke.
In summer, the pot soil should be kept relatively dry, and water should be sprayed on the branches frequently. The amount of water sprayed should be enough to moisten the branches but not drip into the soil.